

Many people want their outdoor lights to turn on and off automatically. It saves energy, keeps the house safer, and makes life easier. But setting up a timer for outdoor lights can feel confusing, especially if you’ve never done it before.
There are different types of timers, each with their own setup steps and features. If you want your porch light to welcome you home at night, or your garden to look great in the evening, learning how to set a timer is a smart move.
This guide will walk you through everything you need to know. You’ll learn how outdoor light timers work, how to choose the right one, and how to install and set them. There are also tips for common problems, safety, and getting the most from your lights.
Whether you want to boost home security or just enjoy a well-lit backyard, you’ll find clear steps and practical advice here.
Why Use A Timer For Outdoor Lights?
Outdoor lights left on all night use a lot of power. Timers help control when your lights turn on and off, giving you more control and saving you money. Let’s look at the main benefits:
- Energy savings: Lights only stay on when needed. This can cut your electricity bill by 10–20% compared to leaving them on all night.
- Security: Timers make it look like someone is home, even when you’re away. Burglars often avoid homes with changing light patterns.
- Convenience: No need to remember to switch lights on or off every day. Lights come on at sunset or a set time.
- Longer bulb life: Lights run less, so bulbs last longer.
- Customization: Some timers let you set different schedules for weekdays and weekends.
Many experts say that automatic lighting is a simple but powerful way to improve home safety and comfort.
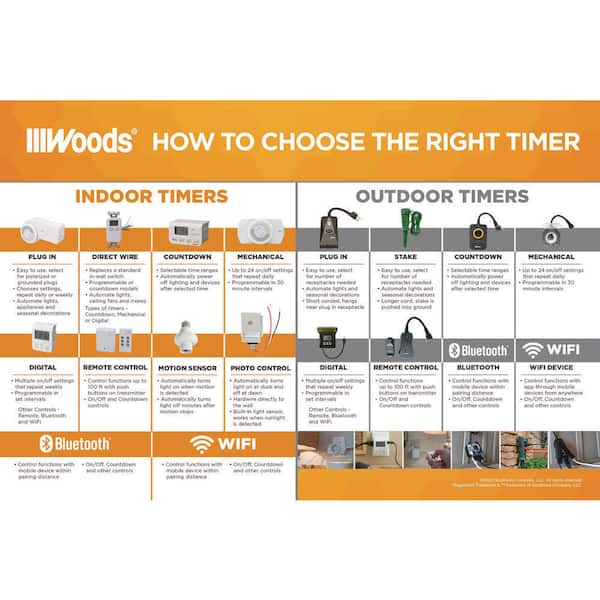
Types Of Outdoor Light Timers
Choosing the right timer matters. Different types work better for different needs, and each one has its own way to set up. Here are the main types you’ll find:
| Type | How It Works | Best For | Ease of Setup |
|---|---|---|---|
| Mechanical Plug-In Timer | Manual dial sets on/off times | Simple plug-in lights | Very easy |
| Digital Plug-In Timer | Buttons to program schedule | More complex schedules | Easy |
| In-Wall Timer Switch | Replaces wall switch | Permanent fixtures | Medium (some wiring) |
| Photocell Timer | Turns lights on at dusk/off at dawn | Lights that need to follow daylight | Very easy |
| Smart Timer | Controlled by app or voice | Smart homes, remote control | Medium to hard |
Mechanical Plug-in Timers
These are the classic timers with a dial. You plug them into an outdoor outlet, then plug your light into the timer. Small pins or segments on the dial let you set the on and off times. They’re reliable and simple, but usually only work for simple schedules.
Digital Plug-in Timers
Digital timers use a screen and buttons. You can set multiple on/off times, different settings for weekdays and weekends, and sometimes even random modes for extra security. These are great if you want more options.
In-wall Timer Switches
These timers replace your regular light switch on the wall. You’ll need to do some basic electrical work, but once installed, you can program the schedule directly on the wall. These look neat and are good for permanent outdoor lighting, like porch or garage lights.
Photocell Timers
A photocell senses light and automatically switches your outdoor lights on at dusk and off at dawn. Some models also allow you to set a timer so the light turns off a few hours after dark. These are very hands-off and good for people who don’t want to adjust settings often.
Smart Timers
Smart timers connect to your Wi-Fi or smart home system. You can control them from your phone, set complex schedules, or use voice commands. These are more expensive and may need a hub or app, but they give you the most control.
Non-obvious insight: Some outdoor smart plugs combine timer, remote, and photocell features in one device. If you want flexibility, look for models that support all three modes.
Credit: www.homedepot.com
How To Choose The Right Outdoor Light Timer
Not all timers are right for every situation. Here are the main things to think about before you buy:
- Outdoor rating: Make sure your timer is rated for outdoor use. It should be weatherproof and have a strong casing.
- Power capacity: Check that the timer can handle the wattage of your lights. Most outdoor timers support up to 1800 watts or 15 amps, but always check the label.
- Type of light: Plug-in timers are best for string lights and plug-in lamps. In-wall timers are for hardwired lights.
- Schedule needs: If you want different schedules for different days, pick a digital or smart timer.
- Ease of use: If you don’t like apps or electronics, stick with a mechanical or photocell timer.
- Wi-Fi and app support: For smart homes, make sure your timer works with your system (Alexa, Google Home, etc. ).
- Backup battery: Some digital timers lose their settings during a power outage. Look for one with battery backup if you live in an area with unreliable power.
Common mistake: Many people buy indoor timers for outdoor use. These are not weatherproof and can fail quickly or even cause electrical hazards.
Tools And Materials Needed
Before starting, gather everything you’ll need. The exact tools depend on your timer type.
For plug-in timers:
- The timer unit
- Outdoor extension cord (if needed)
- Outdoor-rated electrical outlet
For in-wall timer switches:
- Timer switch
- Screwdriver (flat and Phillips)
- Wire stripper/cutter
- Voltage tester
- Electrical tape
- Wire nuts
- Flashlight (if the location is dark)
For smart timers:
- Wi-Fi network details (name and password)
- Smartphone or tablet
- Timer and any needed app
Safety tip: Always turn off power at the breaker when working with wires.
Step-by-step: Setting A Mechanical Plug-in Timer
Mechanical timers are popular because they’re simple and cheap. Here’s how to set one up:
- Plug the timer into an outdoor outlet. Make sure the outlet is outdoor-rated and protected from rain.
- Set the current time. Turn the dial until the arrow points to the current time. Many dials show AM and PM.
- Set on/off times. Push down or pull up the segments or pins for the times you want the light on. For example, push down pins from 6 PM to 11 PM.
- Plug in your outdoor light. Use an outdoor extension cord if needed.
- Test your setup. Turn the dial slowly by hand to check that the light turns on and off at the right times.
Extra tip: Some mechanical timers have an override switch so you can turn lights on manually if needed.
Step-by-step: Setting A Digital Plug-in Timer
Digital timers let you set more complex schedules. Here’s a typical setup:
- Plug in the timer. Make sure it’s secure and protected from moisture.
- Set the current time and date. Use the “clock” or “set” button.
- Choose your program. Most timers have “P1,” “P2,” etc. For different on/off times.
- Enter on and off times. Use the hour and minute buttons. Some allow you to pick specific days.
- Plug in your light.
- Activate the timer mode. Many digital timers have “auto” or “timer” mode. Make sure this is selected.
- Test by setting an on time a few minutes ahead. Wait to see if the light responds.
Non-obvious insight: Many people forget to select “auto” mode after programming. The timer won’t work unless you do this step.
Step-by-step: Installing And Setting An In-wall Timer Switch
This timer replaces your light switch. It’s more advanced and should only be installed if you’re comfortable with basic wiring.
- Turn off power at the breaker. Double-check the switch has no power with a voltage tester.
- Remove the old switch. Unscrew the faceplate and carefully pull the switch out.
- Note the wiring. Take a photo or label wires so you know which is which.
- Connect the timer switch. Usually, you’ll have wires for line (power in), load (power out), ground, and sometimes neutral. Match wires using wire nuts and follow the instructions.
- Secure the timer in the box. Attach with screws and replace the faceplate.
- Turn the power back on.
- Set the timer schedule. Use the buttons or dial to set on/off times. Some models have daylight-saving and random mode options.
- Test the light. Make sure it turns on and off as programmed.
Practical tip: If your wall box doesn’t have a neutral wire, look for timers that work without one. Not all homes have this wire.
Step-by-step: Setting A Photocell Timer
Photocell timers are very easy to use. Here’s how:
- Plug the timer into an outdoor outlet.
- Position the sensor. Make sure the photocell faces open sky, not a porch or other light source.
- Set the mode. Most have a switch for “dusk to dawn” or “dusk plus timer.” For example, “dusk + 4 hours” means the light stays on 4 hours after sunset.
- Plug in your lights.
- Test at night. Check that the lights turn on when it gets dark.
Non-obvious insight: Avoid placing the sensor where your light will shine on it. This can make the timer turn on and off repeatedly (a common beginner mistake).
Step-by-step: Setting A Smart Outdoor Light Timer
Smart timers are the most flexible, but setup is a bit more complex.
- Plug in or install the smart timer.
- Download the required app (e.g., Kasa, TP-Link, Meross).
- Connect to Wi-Fi. Follow the app instructions. You may need to be close to your router.
- Name your device. This helps if you have multiple timers.
- Set up schedules. Most apps let you pick exact times, sunset/sunrise, or even random settings.
- Integrate with voice assistants if you want (Alexa, Google Home, etc. ).
- Test your setup. Try turning the light on/off from your phone.
Extra tip: If Wi-Fi signal is weak outside, use a Wi-Fi extender to avoid connection drops.
Setting Timers For Different Outdoor Lighting Setups
Timers are useful for many outdoor situations. Here’s how they fit with different lighting types:
For Porch And Entry Lights
These lights are often hardwired. An in-wall timer is a good choice, or a smart switch if you want remote control. Set them to turn on at sunset and off at bedtime.
For Garden And Landscape Lighting
Most landscape lights use plug-in transformers. Use a plug-in digital or mechanical timer, or a photocell timer for automatic dusk-to-dawn lighting.
For Pathway And Driveway Lights
If these use low-voltage systems, plug-in timers work well. For solar pathway lights, timers are not needed—they use built-in sensors.
For Holiday And String Lights
Plug-in timers are best. Set them for the hours you want lights on, usually early evening to midnight.
For Security Floodlights
Many floodlights have built-in motion sensors, but adding a timer helps if you want lights on for a set time each night. Smart timers let you adjust schedules easily.
Common mistake: Don’t overload a timer by plugging in too many lights. Add up the total wattage to stay within the timer’s rating.

Credit: thechristmaslightemporium.com
Timer Features And Comparison
Choosing the right features can save you trouble later. Here’s a quick comparison of common timer features:
| Feature | Mechanical | Digital | Photocell | Smart |
|---|---|---|---|---|
| Multiple on/off times | No | Yes | No | Yes |
| Daylight tracking | No | Some | Yes | Yes |
| Remote control | No | No | No | Yes |
| Battery backup | No | Some | No | No (settings in app) |
| Vacation/random mode | No | Some | No | Yes |
Practical advice: If you travel often, a timer with random mode can make your home look lived in and reduce the risk of break-ins.
Troubleshooting Common Timer Problems
Even with the best setup, things can go wrong. Here’s how to fix common issues:
Timer Doesn’t Turn On Or Off
- Check power: Is the outlet working? Test with another device.
- Double-check settings: Are the on/off times correct? Is AM/PM set right?
- Manual override: Is the switch set to “auto” or “timer” mode, not “on” or “off”?
- Loose connections: For in-wall timers, check wiring.
Timer Loses Its Settings
- Power outage: Some digital timers lose their schedule if power goes out. Use a timer with battery backup.
- Replace batteries: If your timer has a battery, change it every year.
Timer Turns On And Off Repeatedly
- Photocell sensor placement: The light from your fixture may be shining on the sensor. Move the sensor or adjust the light’s direction.
- Wiring errors: For in-wall timers, double-check your wiring.
Timer Not Responding To App Commands
- Check Wi-Fi: Is the signal strong enough? Move your router or add a Wi-Fi extender.
- Update app: Make sure your app is current.
- Reset the timer: Unplug for 30 seconds, then set up again.
Non-obvious insight: Many timers have a “reset” button hidden under a small hole. Use a paperclip to press it if nothing else works.
Safety Tips For Outdoor Light Timers
Safety is very important when working with outdoor electricity.
- Always use outdoor-rated timers and cords. Indoor products are not safe outside.
- Check for GFCI outlets. Outdoor outlets should have Ground Fault Circuit Interrupters. They help prevent shocks.
- Seal all connections. Use weatherproof covers and outdoor-rated extension cords.
- Don’t overload outlets. Add up your lights’ watts and check timer limits.
- Work with power off. If installing in-wall timers, always shut off power at the breaker.
Extra tip: If you’re unsure about electrical work, hire a licensed electrician. It’s worth the cost for safety.
Maximizing The Benefits Of Outdoor Light Timers
Setting a timer is just the start. You can get more from your outdoor lights with these ideas:
- Pair with motion sensors: Some timers can work with motion sensors, so lights come on at set times and also when someone approaches.
- Use dusk/sunset settings: Smart timers can follow the real sunset time, so your lights always come on at the right time.
- Change schedules seasonally: Adjust on/off times as the days get longer or shorter.
- Group lights: Some smart systems let you control all your outdoor lights together. This saves time and keeps your lighting consistent.
- Monitor energy use: Some smart plugs show how much power your lights use. Look for this if you want to track savings.
- Combine with security systems: Timers work well with cameras and alarms for a full security package.
Practical tip: Don’t forget to check your timer every few months. Power surges, storms, or changes in daylight can affect schedules.
Real-life Example: Setting A Timer For A Porch Light
Let’s say you want your front porch light to turn on at sunset and off at 11 PM every night. Here’s how you’d do it with three timer types:
- Mechanical timer: Set the dial to match the current time. Push down pins for 6 PM to 11 PM.
- Digital timer: Program the on time as sunset (if supported) or 6 PM, and the off time as 11 PM. Set for all days of the week.
- Smart timer: Use the app to set “on at sunset” and “off at 11 PM.” The app will adjust automatically as sunset changes.
If you leave for vacation, switch to “random” mode so the light turns on and off at slightly different times. This helps deter burglars.
When To Call A Professional
Most plug-in timers are easy for anyone to install. But if you’re dealing with complex wiring, or something doesn’t work right, it’s best to call an electrician. Here’s when to get help:
- You’re not comfortable working with wires.
- The timer or light doesn’t turn on after installation.
- Outlets or switches spark or feel hot.
- You want a system installed with many lights or advanced controls.
A professional can install heavy-duty outdoor timers, connect them to your main electrical panel, or set up smart home automation.

Credit: lumazlife.com
Environmental And Cost Impact
Using timers is good for your wallet and the planet. Here’s why:
- Reduced energy use: Lights only run when needed. If you cut usage by 6 hours a night, you save over 2,000 hours per year.
- Lower bills: Running a single 60-watt outdoor light for 8 hours a night costs about $17/year. Cut that to 4 hours, and you save half.
- Longer bulb life: Less use means fewer replacements. LED bulbs last up to 25,000 hours, but only if not left on all night.
Data point: According to the US Department of Energy, lighting accounts for about 15% of home electricity use. Using timers can drop this by up to 20%.
For more on energy savings, see the U.S. Department of Energy’s guide.
Frequently Asked Questions
What Timer Is Best For Outdoor Christmas Lights?
A plug-in digital timer is often best for Christmas lights. It lets you set different on and off times, handles outdoor weather, and can control large loads. Look for one with multiple outlets if you have many strings of lights.
Can I Use An Indoor Timer Outside If I Cover It?
No. Indoor timers are not designed to handle moisture, cold, or outdoor dust. Even with a cover, they can short out or become a fire hazard. Always use timers labeled for outdoor use.
How Do I Set My Outdoor Light Timer For Daylight Saving Time?
Most digital and smart timers have daylight saving settings. Check your manual—there’s often a button or menu option. Mechanical timers must be adjusted manually by moving the dial one hour forward or back.
Do Timers Work With Led Outdoor Lights?
Yes, but check that your timer is compatible with LED lights. Some older timers may not work well with low-wattage LEDs, causing flickering or failure to turn on. Most new timers are LED-friendly.
Why Does My Timer Keep Resetting Or Losing Time?
This usually means a power outage or the timer’s backup battery is dead. Replace the battery if needed. If the timer keeps resetting, try a different outlet or check for wiring problems if it’s an in-wall timer.
Whether you want to save energy, boost security, or just enjoy your garden at night, setting a timer on your outdoor lights is a smart, simple upgrade. With the right timer, good installation, and a little regular maintenance, you’ll enjoy years of reliable, automatic outdoor lighting.