
Installing a motion sensor light outdoors is one of the best ways to make your home safer and more convenient. Outdoor motion lights help protect your property by lighting up when someone moves nearby. They also save energy since they only turn on when needed, unlike regular lights that stay on all night.
Many homeowners feel unsure about the installation process, but you don’t need to be an electrician to do it yourself. With the right tools, a bit of patience, and careful planning, you can install a motion sensor light outside your house and enjoy better security and peace of mind.
Let’s walk through every step so you can confidently install your motion sensor light, avoid common mistakes, and choose the best location for maximum effectiveness. Along the way, you’ll learn how to pick the right light for your needs, prepare your workspace, and understand the wiring basics—plus some tips that most beginners miss.
By the end, you’ll have a safe, reliable motion sensor light ready to protect your home.
Understanding Motion Sensor Lights
Motion sensor lights use special sensors to detect movement. When the sensor detects motion, it turns the light on automatically. The most common sensor type is Passive Infrared (PIR), which senses body heat. Some advanced models also use microwave or dual sensors for better accuracy.
These lights are popular for outdoor use because they help:
- Increase home security
- Reduce energy costs
- Light up walkways, driveways, and yards
Key Benefits
- Deters intruders: Sudden light scares off trespassers or animals.
- Convenience: No need to search for switches in the dark.
- Safety: Helps prevent trips and falls in poorly lit areas.
- Energy efficiency: Only uses electricity when needed.
Common Features
Modern motion sensor lights come with adjustable settings:
- Sensitivity: Controls how much motion triggers the light.
- Duration: Sets how long the light stays on after activation.
- Range: Determines how far the sensor can detect movement.
- Angle: Adjusts the detection area (usually between 100°–180°).
Some models include extra features such as dusk-to-dawn sensors, remote controls, and smart connectivity.
Choosing The Right Motion Sensor Light
Picking the best motion sensor light for outdoor installation depends on your needs and the location. Here’s what you should consider before buying:
Type Of Light
- Floodlights: Bright, wide coverage—ideal for driveways or backyards.
- Wall-mounted: Smaller, often used near doors or patios.
- Spotlights: Focused beam, good for highlighting specific areas.
Power Source
- Hardwired: Connects directly to your home’s electrical system.
- Battery-powered: Easier to install, but batteries need replacement.
- Solar-powered: Eco-friendly, but depends on sunlight exposure.
Weather Resistance
Outdoor lights must be weatherproof. Look for IP ratings:
- IP65: Resistant to dust and water jets.
- IP44: Protects against splashing water.
Lumens And Brightness
Higher lumens mean brighter light. For outdoor security, look for at least 700–2000 lumens.
Sensor Range And Angle
Choose a model with a detection range of 20–70 feet and an angle of 100°–180° to cover most walkways and yards.
Durability
Metal or high-quality plastic housing lasts longer. Check customer reviews for reliability.
Popular Brands
Some well-known brands are Ring, Heath Zenith, Lithonia Lighting, and LUTEC.
Comparison Of Power Sources
Here’s a quick look at the main power options:
| Power Source | Installation Difficulty | Maintenance | Pros | Cons |
|---|---|---|---|---|
| Hardwired | Medium-High | Low | Reliable, no battery | Requires wiring |
| Battery | Low | Medium | Easy install | Batteries need replacement |
| Solar | Low | Low | Eco-friendly | Needs sunlight |
Preparing For Installation
Before you start, careful preparation will make the process smoother and safer.
Tools And Materials You Need
- Motion sensor light (chosen based on your needs)
- Screwdriver (flathead and Phillips)
- Drill (with masonry bit if mounting on brick/concrete)
- Wire stripper/cutter
- Voltage tester
- Electrical tape
- Mounting hardware (usually included)
- Ladder (for high locations)
- Safety gear: Gloves, goggles
Check Local Regulations
In some areas, electrical work must be done by a licensed professional. Always check local codes and permits before starting.
Turn Off Power
Safety is crucial. Locate the circuit breaker for the area and turn off the power. Use a voltage tester to confirm no electricity is flowing.
Plan Your Location
Motion sensor lights work best when placed:
- Near entry doors
- Along driveways or walkways
- At the corners of the house
- Over garages
Avoid placing lights facing busy streets or trees, as false triggers can happen.
Position For Maximum Effectiveness
Most beginners forget to consider blind spots. To reduce them:
- Place lights 6–10 feet above the ground
- Angle sensors downward and outward
- Avoid obstacles like fences, bushes, or gutters
Removing Old Fixtures (if Needed)
If you’re replacing an old outdoor light, remove it first. Here’s how:
- Turn off power at the breaker.
- Remove screws holding the fixture.
- Disconnect wires. Mark them (black/hot, white/neutral, green/ground).
- Inspect the junction box for damage or corrosion.
- Clean the area before installing the new fixture.
Old wiring can sometimes be brittle. If you notice damaged insulation, call an electrician for repair.

Credit: www.familyhandyman.com
Step-by-step Installation Guide
Here’s how to install a hardwired motion sensor light. If you’re using battery or solar, skip the wiring steps.
1. Mount The Bracket
Most lights come with a mounting bracket. Attach it to the electrical box or wall using screws.
- Use a level to ensure it’s straight.
- For brick or concrete, use masonry anchors.
2. Connect The Wires
You’ll usually see three wires:
- Black (hot)
- White (neutral)
- Green or bare (ground)
Connect the wires:
- Black to black
- White to white
- Green/bare to the ground screw
Twist wire nuts tightly, wrap with electrical tape for extra safety.
3. Attach The Fixture
Place the light over the bracket. Secure it with the provided screws.
- Make sure wires are tucked safely inside the junction box.
- Don’t pinch or damage wires.
4. Adjust Sensor Angle
Set the sensor to cover your desired area. Most models allow you to tilt or rotate the sensor.
- Avoid aiming at moving trees or busy roads to reduce false alarms.
5. Restore Power And Test
Turn the circuit breaker back on. Test the light:
- Walk in front of the sensor to check activation.
- Adjust sensitivity and duration as needed.
6. Set Light Duration And Sensitivity
Most models have small dials or buttons:
- Duration: Choose how long the light stays on after motion (30 seconds–10 minutes).
- Sensitivity: Set how much movement triggers the light.
Start with medium sensitivity. If the light turns on too often, reduce it.
7. Weatherproofing
Seal around the fixture with silicone caulk to prevent water leaks. This step is often missed but is vital for long-term durability.
8. Final Checks
- Make sure the light is secure and stable.
- Test at night to confirm brightness and coverage.
- Adjust sensor angle for best performance.
Installing Solar Or Battery-powered Models
These models are simpler to install. Here’s how:
- Choose a sunny location for solar models.
- Mount using screws or adhesive pads.
- Insert batteries (if needed).
- Adjust sensor and settings.
- Test activation.
No wiring is required, but check battery life or solar charging regularly.
Common Mistakes And How To Avoid Them
Even experienced DIYers make mistakes. Here are some you should watch out for:
- Not turning off power: Always use a voltage tester.
- Loose wire connections: Can cause flickering or failure.
- Mounting too low or high: Reduces detection range.
- Ignoring weatherproofing: Leads to water damage.
- Overlooking blind spots: Leaves areas unprotected.
- Wrong sensor angle: Causes false triggers or misses movement.
Troubleshooting Tips
If your motion sensor light doesn’t work as expected, try these solutions:
Light Doesn’t Turn On
- Check power source and circuit breaker.
- Confirm correct wire connections.
- Replace bulbs if needed.
Light Stays On
- Reduce sensitivity.
- Clean sensor lens.
- Check for moving objects (trees, cars).
Light Doesn’t Detect Motion
- Adjust sensor angle.
- Increase sensitivity.
- Remove obstacles blocking sensor.
Flickering Light
- Tighten wire connections.
- Replace bulb or fixture if damaged.
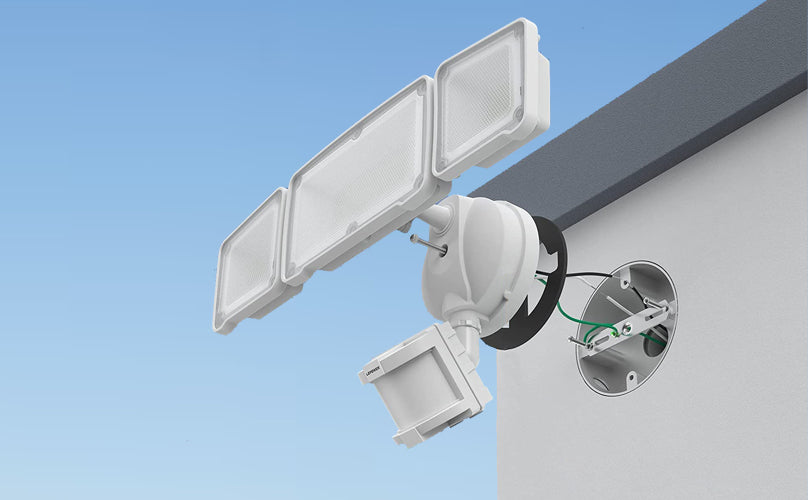
Credit: www.lepower-tec.com
Setting Up Multiple Motion Sensor Lights
For larger properties, you may want to install several lights. Here’s how to coordinate them:
- Space lights evenly to avoid overlap.
- Use models with adjustable sensors to cover different areas.
- For hardwired setups, connect each light to the same or separate circuits as needed.
A good practice is to test each light after installation and walk around your property to check coverage.
Advanced Features And Upgrades
Some motion sensor lights offer smart features:
- Integration with home automation systems (Alexa, Google Home)
- Remote control via smartphone apps
- Adjustable color temperature
- Camera integration for extra security
These features can improve convenience but often require Wi-Fi and app setup.
Comparison Of Basic Vs Smart Motion Sensor Lights
| Feature | Basic Model | Smart Model |
|---|---|---|
| Remote Control | No | Yes (App/Wi-Fi) |
| Integration | No | Smart Home Systems |
| Adjustable Color | No | Yes |
| Price Range | $20–$60 | $60–$150 |
Practical Tips For Reliable Performance
To get the most out of your outdoor motion sensor light, keep these tips in mind:
- Clean sensor lens every few months to prevent dust buildup.
- Check and tighten mounting screws yearly.
- Update settings seasonally (e.g., adjust duration in winter).
- Use LED bulbs for longer life and lower energy use.
- If using solar, trim branches to keep panels clear.
A non-obvious tip: Test the sensor during both day and night. Some sensors behave differently in bright sunlight versus darkness.
Real-life Example
Let’s look at a typical installation scenario:
Maria lives in a suburban home. She wants to light up her driveway and front door. She chooses a hardwired floodlight with a PIR sensor. Maria prepares her tools, turns off the power, mounts the bracket, connects wires, and seals the fixture. She tests the light after restoring power and adjusts the angle to cover her driveway. Over the next week, she fine-tunes the sensitivity to avoid false triggers from passing cars. Maria’s light works reliably, deterring late-night visitors and making her walk to the mailbox safer.
Safety Reminders
Always prioritize safety when working with electricity:
- Wear rubber-soled shoes and gloves.
- Never touch wires with wet hands.
- If unsure, hire a licensed electrician.
Statistics show that over 30,000 home electrical injuries occur in the US each year. Proper safety steps greatly reduce risk.
Maintenance And Longevity
Motion sensor lights last longer with regular care:
- Inspect fixtures for rust or cracks each season.
- Change bulbs promptly when they burn out.
- For battery models, check battery life every 3–6 months.
- For solar models, clean panels regularly.
Most LED motion sensor lights last up to 50,000 hours. With proper maintenance, you can expect many years of reliable use.
Cost And Value Analysis
Motion sensor lights range from $20–$150 depending on features and brand. Installation costs vary:
- DIY installation: Free except for tools.
- Professional installation: $100–$250 (depending on complexity).
Over time, using motion sensor lights saves money on energy bills. A typical outdoor light left on overnight uses about 1 kWh per night. A motion sensor light, on average, uses 70–80% less energy.
Comparison Of Installation Methods
Here’s a summary of installation methods:
| Method | Time Required | Tools Needed | Complexity |
|---|---|---|---|
| Hardwired | 1–2 hours | Drill, screwdriver, tester | Medium–High |
| Battery-powered | 30–45 minutes | Screwdriver | Low |
| Solar-powered | 30–45 minutes | Screwdriver | Low |
Environmental Impact
Choosing LED and solar-powered motion sensor lights helps reduce your carbon footprint. LEDs use up to 85% less energy than incandescent bulbs. Solar models use renewable energy, lowering both your bills and environmental impact.
According to the US Department of Energy, using motion sensor lights can reduce outdoor lighting energy use by over 60%.
Final Checklist Before You Finish
Before you call the project complete, make sure:
- All wiring is secure and covered.
- Fixture is weatherproofed.
- Sensor is adjusted for best coverage.
- Power is restored and the light works as expected.
- You tested the light during day and night.
Where To Find More Information
If you want to learn more about motion sensor lighting, installation tips, and product reviews, visit the U.S. Department of Energy for official guidance and energy-saving ideas.
Frequently Asked Questions
What Is The Best Location For Outdoor Motion Sensor Lights?
The best spots are near entry doors, garages, and along walkways. Place the light about 6–10 feet high and angle the sensor downward. Avoid aiming at roads or moving trees to reduce false triggers.
How Do I Prevent My Motion Sensor Light From Turning On Too Often?
Reduce sensitivity and adjust the sensor angle to avoid areas with regular movement like streets or branches. Clean the sensor lens to avoid false triggers from dust or insects.
Can I Install A Motion Sensor Light Without Any Electrical Experience?
Yes, if you choose battery-powered or solar models. For hardwired installations, basic knowledge of wiring is helpful, but careful planning and safety steps allow most homeowners to do it themselves. If unsure, consult a professional.
How Long Do Motion Sensor Lights Last?
LED motion sensor lights can last up to 50,000 hours. With regular maintenance, most fixtures provide 5–10 years of reliable service. Battery and solar models may need parts replaced sooner.
Are Motion Sensor Lights Effective For Security?
Yes. The sudden light startles most trespassers and alerts homeowners. Studies show that homes with outdoor lighting have up to 39% fewer break-ins compared to unlit homes.
Installing a motion sensor light outdoors is a practical project that brings security, safety, and savings. With careful planning, the right tools, and smart choices, you can enjoy reliable performance and peace of mind for years to come.

Credit: www.familyhandyman.com