
Growing sweet potato slips at home is one of the most rewarding ways to start your own sweet potato plants. Sweet potatoes aren’t grown from seeds, but from slips—shoots that sprout from mature sweet potato tubers. If you’re new to gardening, slips might sound strange, but they’re simple to produce and lead to healthy, productive plants. Whether you want to save money, grow unique varieties, or just experience the thrill of starting your own food from scratch, making sweet potato slips at home is a skill worth learning. With the right approach, you can produce dozens of slips from a single sweet potato, ensuring a strong start for your garden.
Let’s walk through everything you need to know, from choosing the right tubers to planting slips in your garden. You’ll discover practical steps, helpful tips, and some common mistakes to avoid. By the end, you’ll have the confidence to grow sweet potato slips successfully—even if you’ve never done it before.
Understanding Sweet Potato Slips
Sweet potato slips are the young shoots that grow from the tuber itself. Unlike regular potatoes, which are often planted as “seed potatoes,” sweet potatoes require slips. These slips are removed from the tuber, rooted, and then transplanted into soil. This method ensures healthy, vigorous plants and helps prevent disease.
One key difference is that sweet potatoes belong to the morning glory family, not the potato family. This means their growing requirements and propagation methods are unique. Knowing this helps you avoid treating them like regular potatoes, which can lead to poor results.
You may hear some gardeners talk about “eyes” on potatoes. Sweet potatoes don’t have eyes—they produce slips from the tuber skin. Each slip can become a full plant, capable of producing several pounds of sweet potatoes in one season.
Choosing The Right Sweet Potatoes
The quality of your slips begins with the sweet potato tuber you select. Not all sweet potatoes are equal, and picking the right one is crucial.
What To Look For
- Healthy, unblemished tubers: Avoid tubers with cuts, bruises, or rot. Damaged tubers can carry disease and produce weak slips.
- Organic or untreated: Many store-bought sweet potatoes are treated with sprout inhibitors. Choose organic or locally grown tubers, or ask your supplier if their tubers are untreated.
- Preferred variety: If you want a specific sweet potato type (like Beauregard, Jewel, or Japanese), source that variety from a trusted supplier. Each variety has unique flavor, color, and growing habits.
Where To Get Tubers
- Local farmers markets often sell untreated tubers.
- Garden centers sometimes offer certified sweet potato starts.
- Online seed companies sell sweet potatoes for slip production.
If you’re unsure, ask your supplier directly about sprout inhibitors and variety. This simple question can save weeks of frustration.
Why Sprout Inhibitors Matter
Sprout inhibitors are chemicals sprayed on tubers to keep them from sprouting in storage. If your sweet potatoes don’t start to grow after several weeks, sprout inhibitors are likely the cause. Always double-check before buying.
Preparing Sweet Potatoes For Slips
Once you have the right tuber, preparation is key. Sweet potatoes need warmth and moisture to produce slips.
Cleaning
Wash the tuber gently with lukewarm water. Remove any dirt, but avoid scrubbing too hard—sweet potatoes have delicate skin. Dry with a towel.
Cutting (optional)
You can grow slips from whole tubers or cut tubers. Cutting is optional, but it can speed up slip production and increase the number of slips per tuber.
- Cut large tubers into halves or quarters.
- Ensure each piece is at least 2 inches across.
- Let cut pieces air dry for 24 hours before starting slips to prevent rotting.
Starting Methods
There are two main ways to start sweet potato slips:
- Water Method: Place tubers in water so half is submerged.
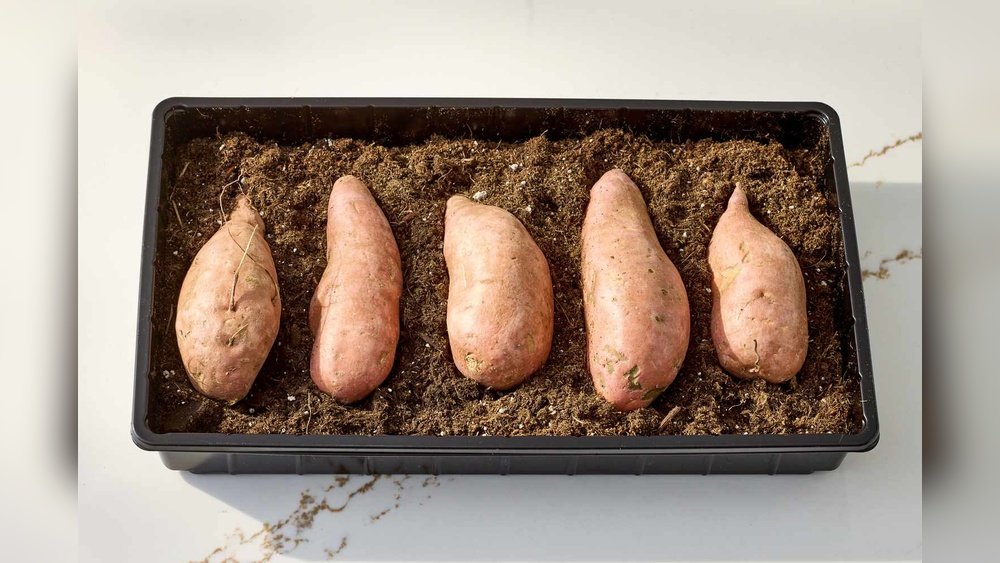
- Soil Method: Bury tubers halfway in moist soil.
Both methods work well. The water method is easier for beginners and lets you watch slips form. The soil method is used by experienced gardeners for larger-scale production.
How To Start Sweet Potato Slips: Step-by-step
Let’s break down the two main methods, so you can choose what suits your home best.
Water Method
This is the most popular and beginner-friendly way.
Supplies Needed
- Sweet potato tuber(s)
- Clean glass jars or cups
- Toothpicks
- Water (room temperature)
Steps
- Insert toothpicks around the middle of the tuber. Space them evenly so they act as supports.
- Fill a jar or cup with water.
- Place the tuber in the jar, using toothpicks to suspend it. Ensure half the tuber is below water, half above.
- Set the jar in a warm spot with indirect sunlight. Ideal temperature: 70–80°F (21–27°C).
- Change water every 2–3 days to prevent mold and bacteria.
- Wait for slips to appear. First slips usually emerge in 2–4 weeks.
Practical Tips
- If your tuber floats, try using more toothpicks or a wider jar.
- Don’t use chlorinated water. Tap water is fine, but let it sit for 24 hours before using.
- If slips appear slower than expected, check the room temperature. Sweet potatoes need warmth to sprout.
Soil Method
The soil method is preferred by gardeners who want more slips or faster production.
Supplies Needed
- Sweet potato tuber(s)
- Shallow container or tray
- Potting mix or garden soil
- Water
Steps
- Fill the tray with moist potting mix, about 3–4 inches deep.
- Bury tubers halfway, leaving half exposed.
- Water lightly to moisten soil—not soggy.
- Place tray in warm spot (70–80°F).
- Keep soil moist. Check daily.
- Slips should appear in 2–3 weeks.
Practical Tips
- Avoid overwatering; soggy soil leads to rot.
- Use a seed starting mix for best results.
- Cover the tray with plastic wrap or a clear lid to create humidity, but remove daily for air circulation.
Comparison: Water Vs Soil Method
Here’s a quick look at the differences:
| Method | Pros | Cons |
|---|---|---|
| Water | Easy to monitor, great for beginners, slips visible | Fewer slips per tuber, slower growth |
| Soil | Faster slip production, more slips per tuber | Harder to monitor roots, requires more space |
Choose the method that fits your space and preference.
Caring For Developing Slips
Once slips start to grow, attention to detail makes the difference between weak and strong plants.
What Slips Look Like
Slips are leafy sprouts emerging from the tuber. They grow quickly once started, reaching 4–8 inches in length.
When To Remove Slips
Slips are ready to remove when they are 6–8 inches long and have several leaves. Don’t wait too long—slips left on the tuber can become tangled or stressed.
How To Remove Slips
- Grasp the slip gently near the base.
- Wiggle and pull to remove. If it resists, use a clean knife to cut at the base.
- Remove slips with a small section of the tuber if possible; this helps rooting.
Rooting Slips
After removal, slips need to grow roots before planting.
Rooting In Water
- Place slips in a cup of water, submerging the lower inch.
- Set in bright, indirect light.
- Change water every 2–3 days.
- Roots will appear in 7–10 days.
Rooting In Soil
- Plant slips in small pots with moist potting mix.
- Keep soil damp and warm.
- Roots appear in 7–14 days.
Rooting in water is easier for monitoring root growth, but rooting in soil produces stronger roots.
Comparison: Rooting Methods
Here’s a breakdown of rooting options:
| Method | Rooting Speed | Root Strength |
|---|---|---|
| Water | Fast (7–10 days) | Fine roots, easy to transplant |
| Soil | Moderate (10–14 days) | Stronger roots, better for direct planting |
If you’re new, water rooting is ideal. For larger gardens, soil rooting saves time.
Preparing Slips For Transplanting
Once slips have roots (about 1–2 inches long), they’re ready for the garden or containers.
Hardening Off
Before planting outside, slips must be hardened off—gradually exposed to outdoor conditions.
- Move slips outdoors for 1–2 hours daily, increasing over a week.
- Protect from direct sun and wind at first.
- Water slips before and after hardening.
This step prevents transplant shock and helps slips adjust to real garden conditions.
Timing
Sweet potatoes need warm soil. Wait until soil temperature is above 65°F (18°C) and all danger of frost is gone. In most areas, this is late spring or early summer.
Planting too early is a common beginner mistake. Cold soil slows growth and can kill slips.

Credit: empressofdirt.net
Planting Sweet Potato Slips
Now that your slips are strong and rooted, it’s time to plant them.
Site Selection
Choose a spot with:
- Full sun (at least 8 hours daily)
- Loose, well-drained soil
- Space for vines to spread (sweet potato vines can grow 10 feet or more)
Soil Preparation
- Loosen soil to 8–12 inches deep.
- Mix in compost or well-rotted manure.
- Test pH: Sweet potatoes prefer pH 5.5–6.5.
- Remove rocks or debris.
Planting Steps
- Dig holes 12–18 inches apart, rows 3 feet apart.
- Place slips in holes, burying roots and lower stem.
- Firm soil around slips.
- Water well after planting.
If growing in containers, use at least a 5-gallon pot per slip. Ensure good drainage.
Practical Planting Tips
- Mulch after planting to keep soil warm and moist.
- Avoid planting slips too deep; 2–3 inches is enough.
- Water slips regularly for the first 2 weeks.
Caring For Sweet Potato Plants
Sweet potato vines grow fast and need the right care for a strong harvest.
Watering
- Water slips after planting.
- Keep soil moist but not soggy.
- After 2 weeks, water weekly—about 1 inch per week.
Too much water can rot roots; too little slows growth.
Fertilizing
- Apply balanced fertilizer after 4 weeks.
- Avoid too much nitrogen; it causes leafy growth but fewer tubers.
- Use organic fertilizers (compost, manure) for best results.
Pest And Disease Management
Common issues:
- Sweet potato weevils: Tiny pests that damage tubers.
- Fungal diseases: Black rot, stem rot.
Control:
- Rotate crops yearly.
- Use clean, disease-free slips.
- Mulch and keep vines off the ground.
Pruning And Training
Sweet potatoes don’t need much pruning, but you can train vines to stay in their area. If vines grow too wild, gently redirect them.

Credit: www.youtube.com
Harvesting Sweet Potatoes
Sweet potatoes are ready to harvest 90–120 days after planting slips. Here’s how to know when to dig up your tubers:
Signs Of Readiness
- Leaves yellow and die back.
- Skin on tubers is firm and colored.
Harvest Steps
- Gently dig around the base of the plant.
- Use hands or a garden fork, avoid cutting tubers.
- Lift tubers from soil, brush off dirt.
Curing Sweet Potatoes
After harvest, cure tubers for best flavor and storage:
- Place in warm (85°F), humid spot for 7–10 days.
- After curing, store in cool, dry place.
Curing helps convert starches to sugars, making sweet potatoes sweeter.
Common Mistakes And How To Avoid Them
Many beginners face challenges when growing sweet potato slips. Here are some frequent mistakes and tips to prevent them:
- Using treated tubers: Always check for sprout inhibitors.
- Starting slips in cold rooms: Sweet potatoes need warmth.
- Overwatering: Both slips and plants dislike soggy conditions.
- Planting slips too early: Wait for warm soil.
- Skipping hardening off: Slips can suffer shock without this step.
- Ignoring pests: Inspect plants regularly for bugs and disease.
- Crowding slips: Give enough space for vines to spread.
Avoiding these issues saves time and gives better results.
Advanced Tips For Maximizing Slip Production
If you want to produce many slips, try these methods:
Multiple Tubers
Start several tubers at once—each can give 20–30 slips.
Staggered Starts
Begin slips in batches, 2 weeks apart. This gives a steady supply for planting and replacement.
Use Heat Mats
If your home is cool, use a seedling heat mat. Slips form faster at 75–80°F.
Select Unique Varieties
Try purple, white, or orange sweet potatoes. Each variety offers different taste and nutrition.
Propagate From Vines
After slips grow, you can propagate more slips from vine cuttings. Cut 12-inch pieces, root in water, and plant.
These techniques help you scale up production, especially for larger gardens.
Sweet Potato Slip Production Data
For gardeners who like numbers, here’s what you can expect:
| Tuber Size | Average Slips Produced | Time to First Slip |
|---|---|---|
| Small (4 oz) | 8–12 | 3–4 weeks |
| Medium (8 oz) | 20–25 | 2–3 weeks |
| Large (16 oz) | 30–40 | 2 weeks |
Large tubers give more slips, but even small tubers are productive.
Unique Varieties Worth Trying
Sweet potatoes come in many varieties. If you want to grow something special, consider these types:
- Beauregard: Orange flesh, classic flavor, high yield.
- Japanese (Murasaki): Purple skin, white flesh, sweet taste.
- Hannah: Tan skin, creamy texture, less sweet.
- Purple (Okinawan): Deep purple flesh, rich antioxidants.
Each variety has different slip growth rates and flavors. Try several to find your favorite.
How To Store And Save Slips
If you produce more slips than you can plant, you can save them for later.
Short-term Storage
- Keep slips in water for up to 2 weeks.
- Change water regularly.
Long-term Storage
- Root slips in soil, keep indoors until planting time.
- For winter, store tubers in cool, dry place; start new slips next spring.
Saving slips lets you stagger planting or share with friends.
Environmental Benefits Of Growing Sweet Potato Slips
Growing slips at home has several advantages:
- Reduces waste: You use every part of the tuber.
- Promotes biodiversity: Grow rare or heirloom varieties.
- Saves energy: No need for shipping slips from afar.
- Supports local food: Home-grown sweet potatoes are fresher and tastier.
By growing slips yourself, you control quality and variety.
Troubleshooting Sweet Potato Slip Problems
If slips don’t grow, or plants fail, here’s what to check:
- No slips after 4 weeks: Tubers may be treated, too cold, or too dry.
- Slips rot: Too much water or poor air circulation.
- Roots don’t form: Slips too small, low light, or poor water quality.
- Plants wilt after transplant: Not hardened off, soil too cold, or root damage.
Most issues are solved by adjusting warmth, moisture, and starting with healthy tubers.
Real-world Example
One gardener in Texas started 5 organic sweet potatoes in water jars in early March. By mid-April, she had over 60 slips ready to plant. After hardening off and planting, her garden produced over 100 pounds of sweet potatoes by October.
She credited success to using untreated tubers, keeping slips in a warm spot, and rooting slips in water before transplanting.
Additional Resources
If you want more information or variety-specific advice, the University of California Agriculture & Natural Resources offers detailed guides on sweet potato cultivation. Check their site for region-specific tips: University of California ANR.
:max_bytes(150000):strip_icc()/SPR-how-to-grow-sweet-potato-slips-8622741-01-94ba7693f6804763b06865317984649b.jpg)
Credit: www.thespruce.com
Frequently Asked Questions
How Long Does It Take To Grow Sweet Potato Slips?
It usually takes 2–4 weeks for slips to appear after starting tubers, depending on temperature and tuber health. Slips grow faster in warm, humid conditions.
Can I Use Store-bought Sweet Potatoes For Slips?
Yes, but only if they are untreated. Many store-bought tubers have sprout inhibitors. Look for organic, locally grown, or ask your supplier.
How Many Slips Can One Sweet Potato Produce?
A single sweet potato can produce 20–40 slips or more, depending on size and variety. Large tubers give the most slips.
Do Slips Need To Be Rooted Before Planting?
Yes, slips should be rooted in water or soil before transplanting. Rooted slips are stronger and less likely to fail after planting.
What’s The Best Time To Plant Sweet Potato Slips?
Plant slips when soil temperature is above 65°F (18°C) and all frost danger is gone. Late spring is ideal for most regions.
Growing sweet potato slips at home is simple once you know the steps. Start with healthy tubers, use the right method, and care for your slips as they grow. With patience and attention, you’ll produce strong plants and enjoy a sweet, home-grown harvest.
Whether you have a small patio or a large garden, sweet potatoes offer high yields and great taste—beginning with slips you grow yourself.