
Are you ready to grow your own delicious potatoes right in your garden? Planting potato seeds might sound tricky, but with the right steps, you can enjoy a bountiful harvest that tastes better than anything from the store.
Whether you have a small backyard or a spacious garden, learning how to plant potato seeds will give you the confidence to start growing this versatile vegetable yourself. In this guide, you’ll discover simple, proven methods to get your potatoes off to a strong start and watch them thrive.
Keep reading to unlock the secrets to planting potatoes that will make your garden—and your meals—truly special.
Choosing Seed Potatoes
Choosing the right seed potatoes is the first step to a healthy potato harvest. Seed potatoes are not regular potatoes. They are specially grown to be disease-free and strong. Picking good seed potatoes helps your plants grow better and produce more tubers. Here’s how to choose the best ones for your garden.
Certified Seed Potatoes
Certified seed potatoes come from official growers. They are tested to be free from diseases. These potatoes are healthy and reliable. Using certified seed potatoes reduces the risk of spreading pests or infections in your garden. They also grow true to their variety, giving you predictable results.
Selecting Potato Pieces With Eyes
Potato pieces must have “eyes” or buds to sprout. Choose pieces with at least two or three healthy eyes. The eyes look like small dimples or sprouts on the potato surface. Cut large seed potatoes into smaller pieces with eyes. Let them dry for a day before planting to avoid rotting.
Avoiding Grocery Store Potatoes
Grocery store potatoes are not suitable for planting. They are often treated to prevent sprouting. These potatoes might carry diseases harmful to your garden. They also may not grow true to the variety. Always use seed potatoes from garden centers or trusted suppliers for best results.

Credit: www.gardenary.com
Preparing The Soil
Preparing the soil is the first step to growing healthy potatoes. Good soil helps the potato plants grow strong and produce many tubers. It needs to be loose, rich in nutrients, and well-drained. Spend time preparing the soil well before planting your seed potatoes.
Soil Type And Drainage
Potatoes grow best in sandy loam or loamy soil. This type of soil drains water well but still holds enough moisture. Avoid heavy clay soil because it holds too much water. Poor drainage can cause potatoes to rot. Make sure the soil is slightly acidic, with a pH between 5.0 and 6.5.
Clearing And Loosening Soil
Remove weeds, rocks, and debris from the planting area. These can block the growth of potato tubers. Use a garden fork or tiller to loosen the soil up to 12 inches deep. Loose soil allows roots to spread and tubers to grow easily. Break large clumps into small pieces for better texture.
Adding Compost And Fertilizer
Mix compost or well-rotted manure into the soil to improve fertility. Organic matter helps soil hold moisture and nutrients. Spread a 2-3 inch layer over the soil surface and mix it in well. Use a balanced fertilizer with nitrogen, phosphorus, and potassium. Follow the package instructions for the right amount.
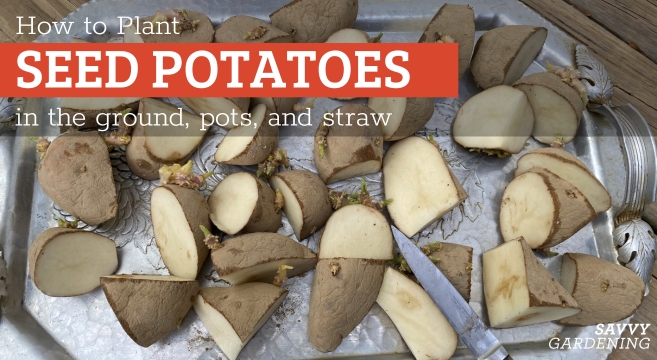
Cutting And Curing Seed Potatoes
Cutting and curing seed potatoes is a vital step before planting. It helps prepare the tubers for healthy growth. Proper cutting divides the seed potatoes into manageable pieces, each with at least one eye. Curing then allows the cut surfaces to heal and reduces the risk of rotting. This process improves the chances of a strong potato crop in your garden.
Cutting Into Pieces
Use a clean, sharp knife to cut seed potatoes. Each piece should have at least one or two eyes. Eyes are small buds where sprouts will grow. Cut the potatoes into pieces about 1.5 to 2 inches wide. Avoid cutting too small pieces, as they may not grow well. Larger pieces provide more energy for sprouting and root development.
Healing Cut Surfaces
After cutting, leave the pieces to dry in a warm, dark place. This step is called curing or healing. It allows the cut surfaces to form a protective layer. The layer helps prevent infection and rotting once planted. Let the pieces cure for about 2 to 3 days. Keep the air flowing to avoid moisture buildup.
Timing Before Planting
Cut and cure seed potatoes about one week before planting. This timing ensures the healing process completes. It also encourages sprouting from the eyes. Planting too soon after cutting can cause rot. Waiting too long may dry out the seed pieces. Plan your cutting and curing to match your garden’s planting schedule.
Planting Techniques
Planting potato seeds correctly ensures healthy growth and a good harvest. Proper techniques help tubers develop strong roots and stems. Follow these simple steps to plant potatoes successfully in your garden.
Planting Depth And Orientation
Plant seed potatoes about 4 inches deep. Bury them with the eyes facing upward. The eyes are small buds where shoots grow. This orientation helps sprouts emerge easily. Cover the seed potatoes gently with soil to protect them.
Spacing Between Plants And Rows
Space seed potatoes 12 inches apart in rows. Keep rows about 30 inches apart. This spacing allows enough room for tubers to grow underground. It also improves air circulation, reducing disease risk. Proper spacing makes harvesting easier too.
Ideal Planting Time In Austin, Texas
Plant potatoes in early February to March in Austin. The soil should be workable and not frozen. Planting during this time avoids the hot summer heat. Cool weather helps sprouts grow strong before warm days arrive. Monitor the local forecast for best results.
Caring For Growing Potatoes
Caring for growing potatoes is key to a healthy harvest. Potatoes need the right balance of water, soil care, and weed control. Each step helps the plants grow strong and produce plenty of tubers. Pay attention to these simple tasks to keep your potato garden thriving.
Watering Needs
Potatoes need consistent moisture, especially while tubers form. Water the plants deeply once or twice a week. Avoid watering the leaves to prevent disease. Use a drip system or water at the base of the plant. Too much water can cause rot. Too little water makes tubers small and dry.
Hilling Soil Around Plants
Hilling means piling soil around the potato stems. Do this when plants are about 6 inches tall. Cover the lower stems and some leaves. This protects tubers from sunlight, which turns them green and toxic. Hilling also supports the plant and helps keep moisture. Repeat hilling every few weeks as the plants grow.
Weed Control
Weeds compete with potatoes for nutrients and water. Keep the garden bed free of weeds by hand-pulling regularly. Mulch with straw or grass clippings to block weed growth. Avoid using strong herbicides near potatoes. Clean soil helps potatoes grow better and reduces pest problems.

Credit: www.youtube.com
Managing Pests And Diseases
Managing pests and diseases is crucial for a healthy potato garden. Pests can damage leaves, stems, and tubers. Diseases may stunt growth or ruin the entire crop. Early detection and proper care help keep these problems under control. Use the right methods to protect your plants and improve yields.
Common Potato Pests
Potato beetles are the most common pests. They eat leaves and weaken plants quickly. Aphids suck sap from stems and spread viruses. Wireworms burrow into tubers, causing holes and rot. Keep an eye on your plants for any signs of these pests. Remove pests by hand or use natural controls to reduce damage.
Preventing And Treating Diseases
Potatoes often face blight, a serious fungal disease. It causes dark spots on leaves and stems. Use disease-resistant potato varieties to reduce risk. Avoid planting potatoes in the same spot every year to prevent soil diseases. Remove and destroy infected plants immediately. Fungicides can help if disease appears early.
Using Organic Methods
Organic methods protect plants without chemicals. Neem oil repels many common pests like beetles and aphids. Companion planting with marigolds or garlic can deter pests naturally. Mulching keeps soil moist and reduces weeds that harbor pests. Introduce beneficial insects like ladybugs to control aphid populations. These methods keep your garden healthy and eco-friendly.
Harvesting Potatoes
Harvesting potatoes is an exciting step in growing your own food. It shows the results of your care and patience. Knowing when and how to harvest ensures you get the best yield and quality. Proper harvesting also helps your potatoes last longer during storage. Follow these simple steps to enjoy your fresh potatoes.
Signs Of Readiness
Potatoes are ready to harvest when the plant leaves turn yellow and die back. The stems will become dry and brittle. Check the days since planting; most varieties take 70 to 120 days. Gently dig near the plant to see the size of the tubers. If the potatoes are large enough, you can start harvesting.
Harvesting Techniques
Use a garden fork or spade to dig carefully around the plant. Start digging at least 12 inches away from the stem to avoid damaging potatoes. Lift the soil gently to expose the tubers. Remove the potatoes by hand, shaking off excess dirt. Avoid bruising or cutting the potatoes during harvest. Collect the potatoes in a basket or container with ventilation.
Curing And Storing
After harvesting, cure potatoes by drying them in a dark, cool, and well-ventilated place. Keep them at about 50-60°F (10-15°C) for one to two weeks. This process helps toughen the skin and heal small cuts. Once cured, store potatoes in a cool, dark, and humid area around 40°F (4°C). Avoid storing near onions or in plastic bags. Check stored potatoes regularly and remove any that show signs of rot.
Growing From True Potato Seeds
Growing potatoes from true seeds is an exciting way to cultivate new varieties. These seeds come from small, tomato-like berries on the potato plant. Unlike planting tubers, true seeds produce diverse plants with unique traits. This method takes more time but offers a chance to experiment and develop fresh potato types.
True seed growing needs patience and careful attention. The process starts with collecting seeds and ends with nurturing young plants. Understanding each step helps gardeners succeed and enjoy the full cycle of growing potatoes from seeds.
Collecting And Storing Seeds
Harvest the small berries from mature potato plants. Wait until berries turn dark and soft. Cut the berries open and scoop out the seeds. Rinse seeds with water to remove pulp. Spread seeds on a paper towel to dry. Store seeds in a cool, dry place inside a sealed envelope. Label the seeds with the date and variety. Proper storage keeps seeds viable for months.
Planting And Care
Start seeds indoors 8 to 10 weeks before last frost. Use seed trays filled with light, well-draining soil. Plant seeds shallowly, about ¼ inch deep. Keep soil moist but not wet. Place trays in warm, bright spots. Transplant seedlings outdoors when they have 3-4 leaves. Space plants 12 inches apart in loose, fertile soil. Water regularly and watch for pests. Hill soil around plants as they grow.
Expecting Variability
True seeds create plants with varied traits. Not all potatoes will look or taste the same. Some may be better or worse than the parent plant. This variability offers chances to discover new varieties. Save seeds from the best plants for future planting. Accept differences as part of the growing adventure. This method suits gardeners who enjoy experimenting and learning.
Credit: savvygardening.com
Frequently Asked Questions
Can You Grow Potatoes From Potato Seeds?
Yes, you can grow potatoes from true seeds found in berries, but it’s rare and slow. Most gardeners use seed potatoes, tuber pieces with eyes, for faster, reliable growth. Seed potatoes clone the parent plant, while true seeds create varied new plants and take longer to mature.
Can I Plant Potatoes In October?
You can plant potatoes in October in mild climates with frost-free soil. Use certified seed potatoes and ensure well-drained soil. In colder regions, October planting may risk frost damage. Consider local climate and soil temperature before planting for best results.
What Are Common Problems With Seed Potatoes?
Common problems with seed potatoes include disease, rot, poor sprouting, pests, and damage during storage or planting.
How Long Does It Take To Grow A Potato From A Seed?
Growing potatoes from seed potatoes takes about 70 to 120 days to harvest, depending on the variety and conditions. True seed potatoes require two years for a full harvest. Most gardeners use seed tubers for faster, reliable growth within one growing season.
Conclusion
Planting potato seeds in your garden is simple and rewarding. Choose healthy seed potatoes with visible eyes. Plant them in loose, well-drained soil about 4 inches deep. Water regularly and hill soil around plants as they grow. Watch for sprouts and enjoy fresh potatoes in a few months.
With patience and care, you can grow a great potato crop at home. Happy gardening!