Replacing the fuel line on your leaf blower can feel intimidating. But with the right tips, anyone can do it safely and quickly. If your leaf blower sputters, leaks gas, or won’t start, a damaged fuel line is often the cause. Learning how to replace this part saves money and keeps your tool running strong. In this guide, you’ll find detailed steps, smart tips, and expert advice to make the job easier—even if you’re new to small engine repair.
Many people make mistakes when changing a fuel line for the first time. Some buy the wrong size, others forget safety steps, and a few damage nearby parts. This article helps you avoid these problems. You’ll also learn how to spot early signs of fuel line wear, choose the best replacement materials, and keep your leaf blower in top shape.
Whether you have a gas-powered hand-held blower or a backpack model, these tips work for almost every brand.
Understanding Leaf Blower Fuel Lines
Before you grab your tools, it’s important to know what the fuel line does. This flexible tube carries gasoline from the tank to the carburetor. If the line cracks, hardens, or gets clogged, your leaf blower won’t work properly.
Most leaf blowers use rubber or vinyl fuel lines. Over time, ethanol in gasoline can damage these materials. Exposure to heat, UV light, and vibration also causes wear. Even small cracks or leaks can affect engine performance or cause dangerous spills.
Common Signs Of Fuel Line Problems
Look for these signs:
- Hard starting or engine won’t start
- Visible cracks or splits in the tubing
- Gasoline smell or wet spots near the fuel line
- Engine stalls soon after starting
- Reduced power or rough idling
If you notice any of these symptoms, inspect your fuel line right away. Sometimes, the problem is obvious; other times, you may need to remove the line and check for blockages.
Why Fuel Line Maintenance Matters
A damaged fuel line can cause more than engine trouble. It can lead to fire hazards, environmental pollution, or expensive repairs if fuel leaks onto electrical parts. Keeping your fuel system in good condition is essential for both safety and performance.
Tools And Materials You’ll Need
Gather these items before starting:
- Replacement fuel line (check diameter and length for your blower)
- Flathead screwdriver
- Phillips screwdriver
- Needle-nose pliers
- Utility knife or scissors
- Fuel filter (recommended for full replacement)
- Protective gloves
- Clean rags
- Small container for old fuel
Optional:
- Compressed air for cleaning debris
- Safety goggles
Having everything ready saves time and prevents last-minute trips to the store. Always use original parts or high-quality aftermarket replacements. Cheap tubing can crack or leak faster, costing you more in the long run.
Example: Fuel Line Sizes
Here is a comparison of common fuel line sizes for popular leaf blower brands:
| Brand | Inner Diameter (inches) | Outer Diameter (inches) | Material |
|---|---|---|---|
| Stihl | 0.08 | 0.14 | Rubber |
| Echo | 0.09 | 0.17 | Vinyl |
| Husqvarna | 0.08 | 0.14 | Rubber |
| Ryobi | 0.07 | 0.13 | Vinyl |
Check your owner’s manual or measure the old line to match the correct size. Using the wrong diameter can cause leaks or fuel starvation.
Credit: cater2.co.uk
Preparing For Fuel Line Replacement
Safety comes first. Gasoline is flammable, so work in a well-ventilated area away from open flames. Wear gloves to protect your hands from fuel and sharp parts.
- Disconnect the spark plug: This prevents accidental engine starts while you work.
- Drain the fuel tank: Pour leftover gas into a container, or let the blower run until empty. Never work with a full tank.
- Clean the area: Use a rag to remove dirt and debris around the fuel line. This keeps contaminants out of the engine.
Many beginners forget to disconnect the spark plug. This is risky, since some leaf blowers can fire even with little fuel inside. Always remove the plug wire first.
Step-by-step Guide: Replacing The Fuel Line
Follow these steps for a smooth, safe replacement. The process may vary slightly for different brands, but these directions cover most models.
Removing The Old Fuel Line
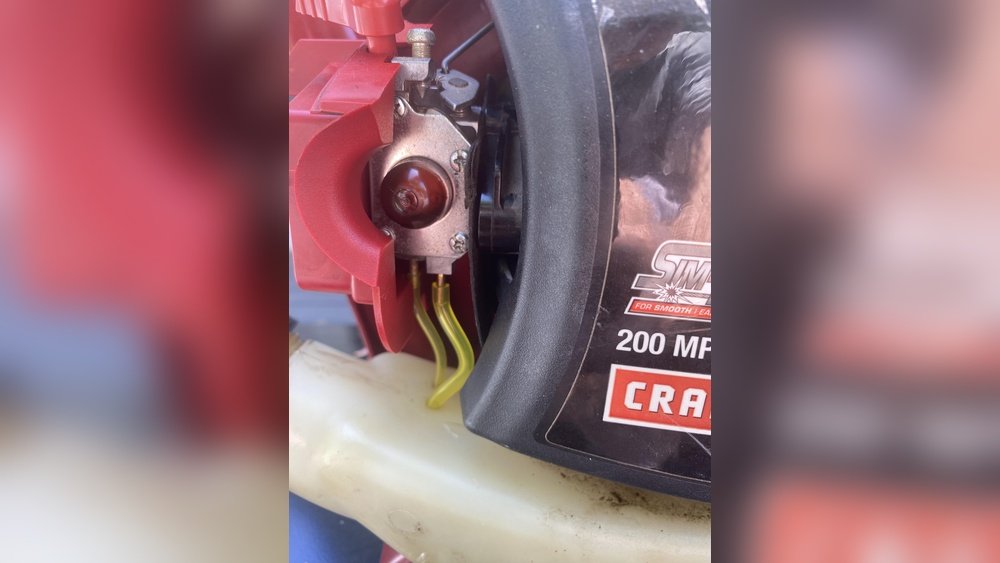
- Locate the fuel line: Usually, it runs from the fuel tank to the carburetor, passing through a small hole in the tank. Some blowers have two lines—one for fuel supply, one for return.
- Use pliers to pull the line: Grip the end gently and pull it free from the carburetor and tank. If the line is stuck, wiggle it or use a screwdriver to loosen.
- Remove the fuel filter: Often attached to the end inside the tank. Pull it out with pliers or a hook.
- Inspect the connectors: Check for cracks or wear. Replace if necessary.
Tip: Take a photo before removing parts, so you remember the routing and connections.
Cutting And Installing The New Fuel Line
- Measure the new line: Cut to match the length of the old line. Too short or too long can cause issues.
- Insert the new line: Push one end through the tank hole until it reaches the inside. Pull gently with pliers if needed.
- Attach the fuel filter: Push the filter onto the inside end of the line.
- Connect to the carburetor: Attach the other end to the carburetor inlet. Make sure it fits tightly.
- Check for kinks or bends: The line should be smooth, not twisted or pinched.
If your blower uses two lines, repeat the process for both. Double-check that each line is routed correctly and attached firmly.
Securing And Testing
- Secure the line: Some models use clips or clamps. If so, reinstall these for a tight fit.
- Reconnect the spark plug: Once everything is in place, reconnect the plug wire.
- Add fresh gasoline: Fill the tank with clean fuel.
- Prime and start the blower: Use the primer bulb to move fuel through the new line. Start the engine and check for leaks.
If you see any leaks or smell gas, turn off the blower immediately. Recheck connections and clamps. A tight fit is essential for safety.
Expert Tips For A Smooth Replacement
Replacing a fuel line isn’t just about following steps. Small details can make the job easier and prevent future problems.
Choosing The Right Fuel Line Material
Not all tubing is equal. Ethanol-resistant rubber lasts longer, especially if you use gas with ethanol. Vinyl is cheaper, but can harden quickly. Always select tubing rated for small engines.
Avoiding Common Mistakes
Many beginners make these errors:
- Using the wrong diameter: This causes leaks or poor fuel flow.
- Cutting the line too short: Leads to tension and possible disconnection.
- Forgetting to replace the fuel filter: Old filters can clog new lines.
- Missing clamps or clips: Without these, lines can slip off under vibration.
Quick Comparison: Fuel Line Materials
Here’s a look at the pros and cons of common fuel line options:
| Material | Durability | Resistance | Cost |
|---|---|---|---|
| Rubber | High | Good (ethanol) | Medium |
| Vinyl | Medium | Low (ethanol) | Low |
| Polyurethane | Very High | Excellent (all fuels) | High |
If possible, choose polyurethane for the longest-lasting results. It resists cracking and can handle modern fuels.
Practical Tips For Tight Spaces
Some leaf blowers have small tank openings. If you struggle to push the line through, try these tricks:
- Lubricate the end with a drop of oil or water
- Angle the cut: Cut the tip at a slant for easier insertion
- Use needle-nose pliers to grab the line inside the tank
These steps prevent frustration and help avoid damaging the new tubing.
Maintenance After Replacement
After changing the fuel line, take a few extra steps to keep your blower running smoothly.
- Check for leaks regularly: Inspect after each use for the first week.
- Replace fuel filters yearly: Old filters block flow and stress new lines.
- Store with empty tank: Gas left in the tank can degrade lines, especially over winter.
- Inspect all connections: Make sure lines stay tight and clamps are secure.
A simple monthly check can prevent future breakdowns. Many owners ignore maintenance until something fails, but regular care extends the life of your blower.
Example: Maintenance Schedule
Here’s a sample routine for leaf blower care:
| Task | Frequency | Notes |
|---|---|---|
| Inspect fuel lines | Monthly | Look for cracks/leaks |
| Replace fuel filter | Annually | Use original parts |
| Empty fuel tank | Before storage | Prevents degradation |
| Clean carburetor | Twice a year | Improves performance |
Following a routine like this keeps your equipment reliable and efficient.

Credit: www.youtube.com
Troubleshooting: When Things Go Wrong
Even with careful work, you may face problems after replacing the fuel line. Here’s how to handle common issues.
Engine Won’t Start
If the engine doesn’t start, check:
- Fuel line connection: Make sure both ends are secure.
- Fuel filter: Ensure it’s not clogged.
- Primer bulb: If it won’t fill, the line may be kinked.
Fuel Leaks
If you spot a leak:
- Check clamps: Tighten or replace.
- Inspect the tubing: Look for pinches or cracks.
- Replace faulty connectors: Sometimes, the plastic fittings break.
Poor Performance
If the engine runs rough or stalls:
- Check for air bubbles: This indicates a loose fit.
- Re-seat the line: Remove and push it back firmly.
- Examine the carburetor: Dirt or debris can block fuel flow.
Sometimes, new lines need to “settle” after installation. Run the blower for a few minutes and recheck for leaks or loose connections.
How To Extend Fuel Line Life
A good fuel line can last several years with proper care. Here’s how to make yours last longer:
- Use ethanol-free gasoline: Ethanol damages rubber and vinyl.
- Store in a cool, dry place: Heat and sun degrade tubing.
- Empty the tank after use: Prevents fuel breakdown.
- Inspect regularly: Early detection prevents big repairs.
- Replace with quality tubing: Cheap lines rarely last.
Many people overlook storage conditions. Keeping your leaf blower in a garage or shed—away from sunlight and heat—dramatically extends the life of all fuel system parts.

Credit: www.youtube.com
Real-world Example: Homeowner Success
Sarah, a homeowner in Texas, struggled with a blower that wouldn’t start. After watching several videos and reading guides, she realized the fuel line was cracked. She bought a polyurethane line, followed the steps above, and replaced both the supply and return lines.
Her blower started easily and ran better than before.
What Made Sarah Successful?
- She measured the old line carefully
- She replaced the filter at the same time
- She checked connections twice before adding fuel
Many beginners miss these simple but critical steps. With patience and attention to detail, you can get professional results at home.
Cost And Time Estimates
Replacing a fuel line is one of the cheapest repairs for a leaf blower. Most parts cost between $5–$15. If you add a new filter or clamps, the total may reach $20.
Time required:
- Beginner: 45–60 minutes
- Experienced user: 20–30 minutes
Paying a repair shop can cost $50–$100, so doing it yourself saves money. Even if you make mistakes, the risk is low—as long as you check for leaks and follow safety steps.
How To Choose The Right Replacement Kit
Many stores sell fuel line replacement kits. Here’s what to look for:
- Correct diameter and length
- Ethanol-resistant material
- Includes filter and clamps
- Clear instructions
Avoid kits with generic tubing that isn’t rated for small engines. If unsure, ask for advice at a local hardware store or check reviews online.
Example: Popular Replacement Kits
Here are some popular kits for leaf blower fuel lines:
- Stihl OEM Kit: Includes rubber tubing, filter, and clamps
- Echo Universal Kit: Polyurethane line, filter, two clamps
- Husqvarna Kit: Vinyl tubing, filter, instructions
Reading reviews helps you spot quality kits. Some buyers report poor fits or low durability with cheap kits, so always check compatibility with your blower model.
Environmental Impact Of Fuel Line Replacement
Changing your fuel line isn’t just about performance. Leaking gasoline harms soil and water, and improper disposal of old tubing adds to plastic waste.
Dispose of old fuel and tubing responsibly:
- Take old fuel to a hazardous waste facility
- Recycle tubing if possible, or throw in household trash
- Never pour fuel on the ground or into drains
Many cities offer free hazardous waste days. Check your local guidelines for safe disposal.
Safety Reminders
Never rush fuel line repairs. Gasoline is dangerous, and even small spills can cause fires or health hazards. Always:
- Work outdoors or in a well-ventilated space
- Wear gloves and eye protection
- Keep a fire extinguisher nearby
- Wash hands thoroughly after handling fuel
If you feel dizzy or smell strong fumes, stop work and get fresh air. Safety is more important than speed.
Frequently Asked Questions
How Often Should I Replace My Leaf Blower Fuel Line?
Most experts recommend changing the fuel line every 2–3 years, or sooner if you notice cracks, leaks, or performance issues. If you use ethanol gas or store your blower in hot conditions, replace it more frequently.
What Is The Best Material For Leaf Blower Fuel Lines?
Polyurethane is the top choice for durability and resistance to modern fuels. Rubber is also good, but may degrade with ethanol. Vinyl is cheapest, but often fails early.
Can I Use Any Tubing From The Hardware Store?
No. Only use tubing rated for small engines and gasoline. General-purpose tubing may not fit well or resist fuel chemicals. Always check size and material compatibility.
Do I Need To Replace The Fuel Filter When Changing The Fuel Line?
Yes, it’s best to change the fuel filter at the same time. Old filters can clog new lines and reduce performance. Most kits include a new filter.
Is It Safe To Repair A Fuel Line With Tape Or Glue?
No. Tape or glue won’t withstand gasoline and vibration. Always replace damaged lines completely. Temporary fixes can cause dangerous leaks.
Final Thoughts
Replacing a leaf blower fuel line is easier than most people think. With good preparation, the right parts, and careful attention to detail, you can fix your blower in less than an hour. This simple repair saves money, improves performance, and keeps your yard work on schedule.
Remember to choose quality materials, follow safety steps, and check your work before using the blower. With these expert tips, you’ll enjoy a reliable, efficient leaf blower for years to come.
For more information about small engine repairs and safe practices, visit EPA Safer Choice.