Laying stepping stones in your lawn is a simple way to add both function and beauty. A well-laid path keeps your shoes clean, reduces lawn wear, and guides visitors to your door or garden. But if you’ve never set stepping stones before, you might worry about getting the job right.
Don’t let that stop you—this guide will show you clear, easy steps for success, along with expert tips that even many DIYers miss. With a bit of planning and some basic tools, you can make a path that looks professional and lasts for years.
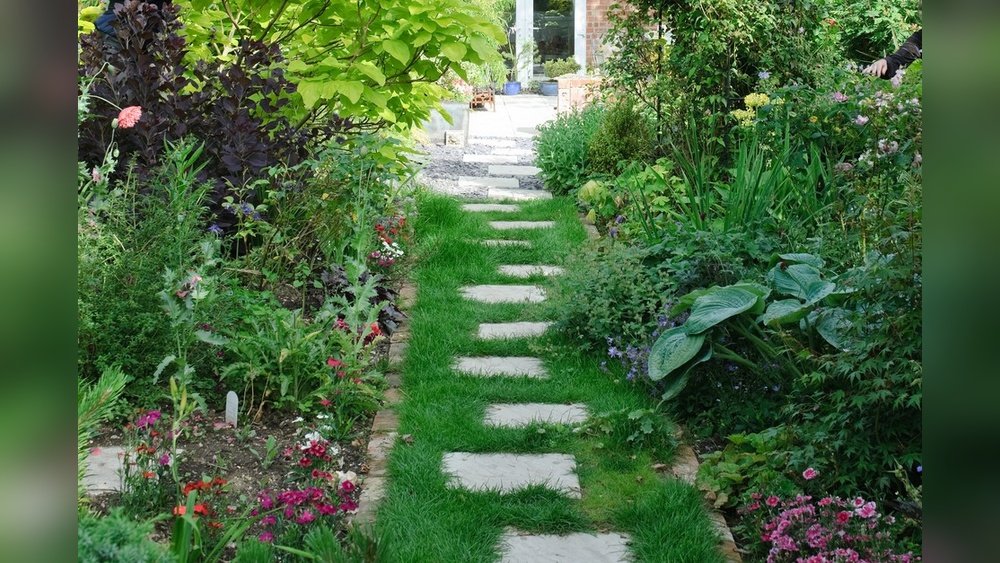
Why Add Stepping Stones To Your Lawn?
Stepping stones do more than just create a walkway. They protect your grass from foot traffic, which can turn even the best lawn patchy and muddy. They also offer a visual break in your yard, leading the eye and creating interest.
Stepping stones are perfect for areas that get wet or muddy since they give you a dry place to walk. They can connect different zones of your yard or highlight a special feature like a fountain or garden bench.
Besides practical benefits, stepping stones can add style. Choose from natural stone, concrete, or decorative pavers to match your home’s look. Laying them yourself also lets you decide on the path’s shape and feel—straight and formal, or gently curved and relaxed.
Planning Your Stepping Stone Path
Setting up a successful path starts with good planning. The right decisions now will save you time, money, and frustration later.
Choosing The Best Route
Think about where people naturally walk in your yard. Is there a shortcut from the back door to the shed? Do you always step off the patio in a certain spot? Walk those routes and look for worn grass or mud—that’s usually the best place for a path.
Try using a garden hose or string to mark out different path options. Move it around until you find a shape that feels comfortable. Remember, paths don’t have to be straight. Gentle curves look more natural and inviting, especially in informal gardens.
Deciding On Shape And Style
Different path shapes suit different gardens. A straight path feels formal and directs people quickly from A to B. A curved or irregular path slows the pace and adds charm. Consider your garden’s size too—large stones and wide gaps work well in spacious yards, while small, tightly spaced stones suit compact spaces.
Picking The Right Stepping Stones
The material you choose will affect both the path’s look and how easy it is to walk on. Here are some common options:
| Material | Appearance | Durability | Cost |
|---|---|---|---|
| Natural stone | Earthy, unique | High | $$$ |
| Concrete pavers | Uniform, modern | Very high | $$ |
| Gravel-filled forms | Casual, rustic | Medium | $ |
| Brick | Classic, neat | High | $$ |
Tip: If you want an easy walk, pick stones with a textured, non-slip surface—especially important in shady, damp spots.
Measuring And Spacing
A comfortable path matches the way people walk. The average adult step is about 24 inches from heel to heel. Lay out your stones so each one matches a natural stride. For children or in tight spaces, shorten the distance to 18-20 inches.
Lay out the stones on the lawn first, and walk along them. Adjust as needed until the steps feel natural. Odd numbers of stones usually look better than even numbers.
Calculating How Many Stones You Need
To estimate, measure the total path length in inches. Divide by your chosen stride distance (usually 24 inches). For example, a 20-foot path is 240 inches; 240 ÷ 24 = 10 stones.
Pro insight: Buy one or two extra stones in case of breakage or future repairs.

Credit: www.gardenersworld.com
Gathering Tools And Materials
Before you start, gather your supplies. Having everything on hand makes the job smoother.
You’ll need:
- Stepping stones of your choice
- Tape measure
- Long rope, hose, or string (for layout)
- Garden spade or shovel
- Hand trowel
- Level
- Rubber mallet
- Sand (builders’ sand is best)
- Landscape fabric (optional, prevents weeds)
- Wheelbarrow (for moving soil)
- Gloves and knee pads (for comfort)
For heavy stones, a pry bar or dolly can help move them safely.
Pro tip: Use a flat, sharp spade for neater holes—this keeps the grass around each stone looking tidy.
Preparing The Lawn For Stepping Stones
Preparing your site well is key for a lasting, level path. Rushing this step is the most common mistake for beginners.
Marking The Path
Place your stones on top of the grass in your planned layout. Adjust until you’re happy with the spacing and direction. Step from stone to stone to test comfort.
Use spray paint, flour, or a garden trowel to mark around each stone. This outline shows you where to dig.
Digging Holes
Remove each stone and set it aside. Use your spade to cut around the outline, then remove the turf and some soil. The hole should be about 2 inches deeper than the stone’s thickness.
For example: If your stone is 2 inches thick, dig a hole 4 inches deep. This leaves room for a sand base under the stone.
Non-obvious insight: Save the sod you remove in a shady spot. If you make a mistake or change the path, you can patch up the area easily.
Adding A Sand Base
Pour 2 inches of sand into each hole. Level it with your hand or a small board. Sand helps the stone sit flat, and it drains water away so the stone won’t sink.
If you have a problem with weeds, add landscape fabric under the sand layer. Cut it to fit each hole.
Expert note: Using sand is much better than just soil. Soil shrinks and shifts with rain, while sand stays stable.

Credit: www.youtube.com
Placing The Stepping Stones
Now comes the satisfying part—setting your stones into place.
Setting The Stones
Put each stone into its prepared hole. Use a level to check that the top surface is flat and even with the surrounding grass. The stone should sit about 1/4 inch above the soil. This allows for settling and helps keep the stone visible.
If the stone is too low, add more sand underneath. If it’s too high, remove some sand. Tap the stone gently with a rubber mallet to set it firmly.
Checking Alignment
Once all stones are set, walk the path. Make sure each stone feels stable and at the right height. Adjust as needed for comfort and safety.
Non-obvious insight: If your lawn is sloped, angle the stones slightly so water runs off them, not onto the path.
Filling Gaps
Fill any gaps around the stone with leftover soil or sand. Press the grass edges around each stone to help them blend in.
If you want a more decorative look, plant low-growing groundcover (like creeping thyme or moss) in the gaps. These plants fill in over time and soften the look of the stones.
Finishing Touches For A Professional Look
Details matter. Here are extra steps to make your path look and last like a pro’s.
Watering And Settling
Water the stones and surrounding soil lightly. This helps the sand and soil settle. Check the stones again after a few days and tap down any that have shifted.
Keeping The Path Clear
Cut the grass around each stone regularly. This stops the lawn from growing over the edges and hiding the path. Use grass shears or a string trimmer for the best results.
Sealing Stones (optional)
For some types of stone (like porous concrete or sandstone), consider sealing them with a clear outdoor stone sealer. This helps protect against stains and moss growth.
Pro tip: Always test sealers on a small area first—some can change the stone’s color or texture.
Common Mistakes (and How To Avoid Them)
Even careful DIYers can make errors when laying stepping stones. Here are common pitfalls and how to prevent them.
- Skipping the sand base: Stones set on bare soil will wobble and sink.
- Poor spacing: Stones too far apart feel awkward to walk on; too close, and they look crowded.
- Uneven height: Stones set too high trip people; too low, and they disappear under the grass.
- Ignoring drainage: In wet areas, water can pool around stones. Add extra sand or gravel for drainage.
- Wrong type of stone: Smooth or polished stones become slippery when wet. Always choose textured surfaces for safety.
- Not testing the path: Walk on your laid-out stones before digging holes, especially if different people will use the path.
- Using heavy stones without help: Large stones can cause injury—use a dolly or ask a friend for assistance.
Keeping Stepping Stones Looking Great
Maintenance is simple but important. Here’s how to keep your path safe and attractive year after year.
Cleaning
Sweep the stones regularly to remove leaves and dirt. For stubborn stains or moss, scrub with a brush and mild soapy water. Avoid harsh chemicals, which can harm nearby grass and plants.
Re-leveling
Over time, some stones may settle unevenly, especially after heavy rain. Lift the stone, add more sand underneath, and reset it.
Edging
Keep grass from creeping over the edges by trimming around each stone every few weeks. If you planted groundcover, trim it to keep the path visible.
Winter Care
In areas with snow, clear the stones gently with a plastic shovel. Avoid salt, which can damage both stone and grass.
Comparing Stepping Stone Installation Methods
There are a few ways to install stepping stones, each with pros and cons. Here’s a comparison to help you choose what’s best for your yard:
| Method | Pros | Cons | Best For |
|---|---|---|---|
| Sand base in lawn | Natural look, low cost, easy DIY | May need occasional re-leveling | Most lawns, informal paths |
| Concrete set | Very stable, lasts decades | Harder to install, less flexible | Heavy traffic, formal gardens |
| Gravel surround | Good drainage, decorative | Gravel can shift, needs edging | Wet areas, rustic style |
Expert guidance: For most home lawns, the sand base method offers the best balance of looks, ease, and flexibility.
Creative Ideas For Your Stepping Stone Path
A stepping stone path can be much more than just functional. Try these ideas to add personality to your yard.
- Mix stone shapes and sizes: Alternate round and square stones for a playful look.
- Incorporate mosaic stones: Add a few colorful tiles or stones with patterns for a unique touch.
- Glow-in-the-dark stones: Some pavers absorb sunlight and glow softly at night, improving safety.
- Engraved stones: Personalize your path with stones engraved with names, dates, or favorite quotes.
- Plant between stones: Use creeping thyme or Irish moss for a lush, green border around each step.
- Border your path: Add bricks or small stones along the edge for a neat, finished appearance.
Tip: If you have children, let them help place the stones or decorate a few with handprints or paint for a family memory.

Credit: www.youtube.com
Environmental And Safety Considerations
Stepping stones can help keep your lawn healthy by limiting soil compaction and erosion. But there are a few things to keep in mind for the environment and safety.
- Use local stone when possible to reduce transport emissions.
- Check for underground utilities before digging. Call your local utility locator service.
- Choose non-slip surfaces for safety, especially near water features or in shady spots.
- Avoid chemical sealers that may run off into your lawn or garden beds.
- Allow for water drainage—never set stones flush with or below ground level in wet areas.
Cost Breakdown For Laying Stepping Stones
Knowing the typical costs can help you plan your budget. Here’s what to expect:
| Item | Average Cost (USD) | Notes |
|---|---|---|
| Stepping stones (each) | $5–$30 | Varies by material and size |
| Sand (per bag) | $4–$8 | One bag covers about 4–6 stones |
| Landscape fabric | $10–$20 per roll | Optional, for weed control |
| Tools | $0–$50 | Most tools can be rented or borrowed |
A simple, 10-stone path using concrete pavers and sand base will usually cost $70–$200 in total, depending on your choices.
Money-saving tip: Check local recycling centers or building supply yards for leftover stones at a discount.
When To Call A Professional
Most homeowners can lay a basic stepping stone path themselves. However, consider hiring a pro if:
- You want a long, curved, or complex path
- The area is on a steep slope or has poor drainage
- You’re using very large, heavy stones
- You want a path set in concrete for high traffic
A professional landscaper can also help design a path that fits your yard’s style and solve drainage or grading issues.
Frequently Asked Questions
How Deep Should I Set Stepping Stones In My Lawn?
Most stones should be set so their top is level with or just above the grass—about 1/4 inch higher. Dig a hole about 2 inches deeper than the stone’s thickness, and fill with sand for stability.
Can I Lay Stepping Stones Directly On Grass?
It’s best not to. Stones set on top of grass will shift, sink, and become uneven. Removing the grass and setting the stone on sand creates a safer, longer-lasting path.
What’s The Best Material For Stepping Stones?
Concrete pavers are strong and affordable, while natural stone offers a unique, upscale look. For most lawns, choose textured surfaces to prevent slipping. For more ideas, visit the Wikipedia page on stepping stones.
How Do I Keep Weeds From Growing Between Stepping Stones?
Use landscape fabric under the sand base to block weeds. For extra protection, brush polymeric sand or fine gravel into the gaps, which hardens and stops weed growth.
Do Stepping Stones Damage My Lawn?
Not if installed properly. Stepping stones protect high-traffic areas and can actually improve lawn health by reducing soil compaction and preventing muddy spots.
Final Thoughts
Creating a stepping stone path in your lawn is a satisfying project that pays off every time you walk outside. With careful planning, the right materials, and attention to detail, you can lay a path that looks great and makes life easier.
Remember to test your layout, use a sand base, and keep everything level. With a little maintenance, your path will welcome visitors—and keep your lawn healthy—for years to come.