
Upgrading your Jeep with LED rock lights is one of the most effective ways to boost both its appearance and off-road capability. Whether you’re tackling dark trails, showing off at a car meet, or simply want better underbody illumination, installing LED rock lights on a Jeep 2026 is a smart project. Many Jeep owners find the process manageable with the right tools, parts, and guidance—even if they have little experience with vehicle wiring.
This guide will walk you through every step, from choosing the best kit to final testing. You’ll find practical tips, warnings about common mistakes, and advice on how to make your installation last for years. With clear instructions and useful tables for comparison, you’ll be ready to light up your next adventure.
Why Install Led Rock Lights On Your Jeep 2026?
LED rock lights have become a must-have accessory for Jeep lovers. They do more than just make your Jeep look cool.
Key benefits include:
- Improved visibility: Light up the ground beneath your Jeep. This helps you see rocks, ruts, and other trail hazards at night.
- Style upgrade: Change the color or use patterns to give your Jeep a custom look.
- Safety boost: Illuminated underbody reduces tripping risks when getting in or out at night.
- Better photos/videos: Well-lit vehicles look more dramatic in pictures and social media posts.
LED rock lights are energy-efficient, last longer than traditional bulbs, and are often waterproof and shock-resistant—perfect for off-road conditions.
Choosing The Right Led Rock Light Kit
Not all LED rock lights are the same. Picking the wrong kit can mean poor brightness, quick failures, or a tough installation. Here’s what to look for:
Light Output And Color
- Lumens: This tells you how bright the lights are. For off-roading, aim for at least 1000 lumens per pod.
- Color options: RGB lights offer millions of colors, while single-color lights are usually brighter.
Waterproof Rating
- IP67 or IP68: These ratings mean the lights are dustproof and can handle water, mud, and rain.
Control Method
- Bluetooth app: Control colors and patterns from your phone.
- Remote control: Handy if you don’t want to use your phone.
- Simple switch: Just on/off, usually for single-color kits.
Number Of Pods
- 4 pods: Covers basic underbody lighting.
- 8 pods: Full coverage for larger Jeeps or brighter effects.
Wiring And Power
- Plug-and-play: Easier to install, but wires may be shorter.
- Custom wiring: More work, but lets you route wires where you want.
Warranty And Support
- At least 1-year warranty: Shows the company stands behind their product.
- Customer support: Helpful if you have questions or need replacements.
Comparing Popular Kits
Here’s a quick comparison of three popular LED rock light kits for the Jeep 2026:
| Brand | Lumens/Pod | Color Options | Pods Included | Waterproof Rating | Control | Warranty |
|---|---|---|---|---|---|---|
| Rough Country | 1200 | RGB | 8 | IP68 | Bluetooth App | 2 Years |
| Nilight | 1000 | Single Color | 4 | IP67 | Switch | 1 Year |
| OPT7 Aura | 1100 | RGB | 8 | IP68 | Bluetooth + Remote | 1 Year |
Pro tip: Don’t just buy the cheapest kit. Saving $30 now can lead to headaches later if the lights fail or wiring doesn’t reach.
What You’ll Need
Gather your tools and materials before starting. This saves frustration during installation.
Essential items:
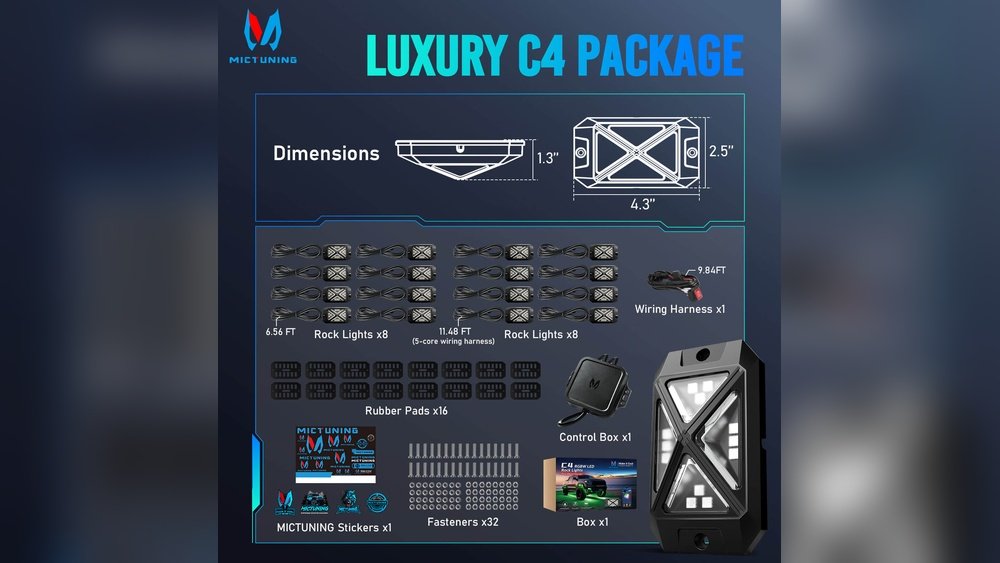
- Your LED rock light kit (with controller, pods, wiring)
- Drill with assorted bits (for mounting pods)
- Self-tapping screws or stainless steel bolts (often included)
- Zip ties and adhesive mounts (for wire management)
- Wire stripper/crimper tool
- Electrical tape and/or heat shrink tubing
- 12V test light or multimeter (for checking power)
- Fuse tap or add-a-circuit kit (for safe power connection)
- Safety glasses and gloves
Optional but helpful:
- Silicone sealant (for extra waterproofing)
- Soldering iron (for permanent, strong wire connections)
- Plastic wire loom (protects wires from sharp edges and heat)
Important insight: Many kits claim “plug and play,” but Jeeps have unique underbody layouts. Be ready to extend wires or use extra zip ties.
Planning Your Install
Before you start drilling, plan where everything will go. Taking 10–15 minutes now can prevent mistakes that take hours to fix later.
Decide On Pod Locations
For a Jeep 2026 (like the Wrangler or Gladiator), the most common spots are:
- Front wheel wells (one per side)
- Rear wheel wells (one per side)
- Mid-chassis, under doors (optional for 6–8 pod kits)
- Front and rear bumpers (optional, adds glow at ends)
Mark each location with a piece of tape. Check that nothing blocks the light (like suspension arms or mud flaps) and that wires can reach without stretching.
Plan Your Wiring Route
LED rock lights need wires to run from each pod to a central control box, then to a power source. Look for:
- Existing holes or grommets in the body or frame
- Safe paths away from the exhaust, driveshaft, or moving parts
- Areas where you can zip-tie wires securely
Beginner mistake: Running wires too close to hot parts (like the exhaust). Heat can melt wire insulation and cause shorts.
Choose Your Power Source
Most kits draw power from the Jeep’s battery or an accessory fuse in the fuse box. Decide if you want the lights to work only when the key is on, or any time.
Battery: Lights can be used anytime, but risk draining the battery if left on.
Accessory fuse: Lights only work when ignition is on, safer for daily drivers.
Pro tip: Always use a fuse. Never connect directly to the battery without protection.

Credit: store.xkglow.com
Step-by-step Installation Guide
With your plan ready, it’s time to get hands-on. These steps work for most modern Jeep models, but always check your kit’s instructions for special notes.
1. Prepare Your Jeep
- Park on a flat surface and set the emergency brake.
- Disconnect the negative battery terminal. This prevents short circuits or sparks.
- Clean the underbody where pods and wires will go. Dirt can stop adhesive or cause rust around drilled holes.
2. Test The Rock Light Kit
Before mounting anything, connect the system on the ground:
- Plug all pods into the controller box.
- Temporarily connect the power leads to the battery.
- Turn on the lights using the app, remote, or switch.
- Check that all pods light up and respond to color changes.
If a pod doesn’t work now, it’s easier to return or replace before installation.
3. Mount The Led Pods
- Use the kit’s mounting brackets or directly screw the pods into the plastic wheel well liners or metal frame.
- Drill pilot holes if needed, but avoid drilling into brake lines, fuel lines, or wires behind the panel.
- Secure pods so they point down and slightly outward for the best light spread.
- Use silicone sealant around screws for extra rust protection.
Non-obvious insight: Don’t overtighten screws—this can crack plastic wheel wells or strip threads in soft metal.
4. Route And Secure Wiring
- Run each pod’s wire along the frame or factory wiring harnesses.
- Use zip ties every 8–12 inches to keep wires snug and away from moving parts.
- If wires must cross metal edges, cover them with plastic wire loom or wrap with electrical tape.
- Leave some slack at each end to allow for suspension movement.
Common mistake: Leaving wires too tight. The Jeep’s suspension flexes—tight wires can pull loose or break.
5. Connect To The Controller Box
- Place the controller box in a dry, hidden spot (like under the hood or behind a fender liner).
- Use double-sided tape or screws to mount the box securely.
- Plug each pod’s wire into the correct port. Some kits label each port for location—front left, rear right, etc.
6. Connect To Power And Ground
- Route the controller’s power wire to your chosen source (battery or fuse box).
- Use a fuse tap or add-a-circuit kit if connecting to the fuse box. Match the fuse rating to your kit’s needs.
- Crimp or solder all connections. Cover with heat shrink or electrical tape for water resistance.
- Connect the ground wire to a clean, unpainted metal spot on the chassis.
7. Final Testing
- Reconnect the Jeep’s battery.
- Turn on the LED rock lights. Test all colors, brightness, and patterns.
- Check for flickering or pods that don’t light—these may have loose connections.
- Inspect under the Jeep while moving the suspension (rock the Jeep or lift slightly) to ensure wires don’t stretch or rub.
8. Tidy Up And Protect
- Bundle extra wire length with zip ties.
- Spray a little silicone or WD-40 on connectors to help prevent corrosion.
- Save the kit’s wiring diagram and app instructions in your glove box for future reference.
Second non-obvious insight: Write down which fuse you tapped and where the controller box is mounted. You’ll thank yourself if you ever need to troubleshoot.
Example: Typical Wiring Path For Jeep 2026
Most newer Jeeps have wide, flat frame rails with factory wire channels. Here’s a typical wiring route for an 8-pod RGB kit:
| Pod Location | Mounting Surface | Wire Route | Controller Port |
|---|---|---|---|
| Front Left Wheel Well | Plastic Liner | Along fender, inside engine bay | Port 1 |
| Front Right Wheel Well | Plastic Liner | Across radiator support, inside engine bay | Port 2 |
| Mid Left Underbody | Frame Rail | Factory wire channel, zip-tied | Port 3 |
| Mid Right Underbody | Frame Rail | Factory wire channel, zip-tied | Port 4 |
| Rear Left Wheel Well | Plastic Liner | Over fuel tank guard, into cargo floor | Port 5 |
| Rear Right Wheel Well | Plastic Liner | Over axle, into cargo floor | Port 6 |
| Front Bumper | Steel Bumper | Behind grille, zip-tied to support | Port 7 |
| Rear Bumper | Steel Bumper | Behind bumper cover, zip-tied | Port 8 |
This routing keeps wires safe from heat and moving parts while giving full underbody coverage.
Tips For A Professional, Long-lasting Install
Anyone can bolt on a few lights—but a factory-quality install takes more care. Here’s how to make your system last:
- Use heat shrink tubing on all wire connections, especially under the vehicle.
- Seal all drilled holes with silicone to prevent rust.
- Check local laws: Some states ban certain colors (like red or blue) on public roads.
- Hide wires as much as possible. This not only looks better but protects from rocks and water.
- Test before finishing: Cycle through all colors and patterns. Some Bluetooth apps are buggy—restart your phone if needed.
Beginner mistake: Forgetting to add a fuse. A short circuit can damage your Jeep’s electrical system or even cause a fire.
Troubleshooting Common Problems
Even with care, issues can pop up. Here’s a quick guide to solving the most common headaches:
Lights Won’t Turn On
- Check the fuse: Blown fuse means a short or too much load.
- Test power at the controller: Use a test light or multimeter.
- Check app/remote batteries: Sometimes it’s just a dead remote.
Only Some Pods Light Up
- Loose connections: Unplug and re-seat each connector.
- Damaged wires: Inspect for cuts or pinches, especially near zip ties.
- Wrong port: Double-check each pod is in the correct controller port.
Flickering Or Dim Lights
- Poor ground: Move the ground wire to a different spot—bare, unpainted metal only.
- Low voltage: Check battery health. Weak batteries cause dim lights.
- App glitches: Reinstall or update the control app.
Water Inside Pods
- Seal failure: Remove, dry, and reseal with silicone. If still foggy, request a warranty replacement.
Non-obvious tip: Take photos of your wiring and pod locations. This helps if you need to ask for support from the kit manufacturer.

Credit: loyo-led.com
Jeep 2026-specific Considerations
The Jeep 2026 models bring some new features and challenges:
- More sensors and cameras: Avoid mounting near ADAS sensors or cameras (usually near bumpers).
- Thicker fender liners: You may need longer screws or bolts.
- Hybrid/electric models: Never tap high-voltage orange wires. Always use standard 12V accessory circuits.
For the best results, reference your owner’s manual for fuse locations and wire routing tips.
Maintenance And Care
LED rock lights are tough, but a little care helps them last for years.
- Wash off mud and salt: After off-roading, hose down the pods and underbody.
- Check wires monthly: Look for loose zip ties or worn insulation.
- Test colors and brightness: Fading may mean a pod is failing.
- Update your app: New app versions often fix bugs and add features.
If you notice rust around mounting points, touch up with paint or add more sealant.
Credit: mictuning.com
Legal And Safety Reminders
While rock lights are legal for off-road use almost everywhere, laws for street use vary:
- Most states ban red or blue underglow on public roads (reserved for emergency vehicles).
- Driving with lights on while moving on the highway can get you a ticket.
- Use white or amber for safest street use, and switch to colors only off-road or parked.
Always check your local DMV or police website for the latest rules.
Cost And Time: What To Expect
Installing LED rock lights on a Jeep is a medium-difficulty project. Here’s what to expect:
| Factor | Details | Average Range |
|---|---|---|
| Kit Cost | 4-8 pod RGB kit | $60 – $200 |
| Tools/Supplies | Drill, wire tools, zip ties | $20 – $60 |
| DIY Time | First-time installer | 3 – 5 hours |
| Professional Install | Shop labor | $100 – $250 |
Pro tip: If you’re new to vehicle wiring, allow extra time and patience. Rushing leads to mistakes.
When To Ask A Pro For Help
Most Jeep owners can do this install with care, but you should call a pro if:
- You’re not comfortable with drilling into your Jeep.
- You don’t know how to use a multimeter.
- Your Jeep is still under full warranty (some dealers are picky about wiring changes).
- You want a custom light show synced with music or other advanced features.
Many off-road shops offer package deals on rock lights and install.
Enjoy Your Jeep’s New Look
Once installed, LED rock lights transform how your Jeep looks and works at night. You’ll see obstacles before you hit them, impress your friends, and enjoy your Jeep in a whole new way. Plus, you’ll have the skills and confidence for future wiring projects—like light bars, winches, or upgraded sound systems.
Remember, every Jeep is a little different. Take your time, follow each step, and double-check your work for a safe, reliable, and awesome upgrade.
If you want to see how different kits look in action, check out MotorTrend’s guide with photos and detailed reviews.
Frequently Asked Questions
How Long Do Led Rock Lights Typically Last?
Most quality LED rock lights last 30,000–50,000 hours. This means years of use for most Jeep owners. Cheaper kits may fail sooner due to poor waterproofing or heat management.
Can I Install Rock Lights Without Drilling Holes?
Yes, some kits include strong adhesive mounts. However, for off-road use, screws or bolts are more secure. Adhesive mounts can fail if exposed to mud, water, or vibration.
Will Rock Lights Drain My Jeep’s Battery?
If wired directly to the battery and left on, rock lights can drain your battery overnight. Using an accessory fuse or adding a relay ensures the lights only work when the Jeep is on.
Is It Legal To Use Colored Rock Lights On Public Roads?
Laws vary by state, but most ban red and blue underglow on public roads. White or amber is usually safe. Check your local laws before driving with colored lights on.
Do Rock Lights Work With Lifted Or Modified Jeeps?
Yes, rock lights are great for lifted or modified Jeeps. You may need longer wires for taller vehicles, and it’s important to route wires safely around aftermarket suspension parts.
With this guide, you’re ready to tackle your LED rock light installation on the Jeep 2026. Take your time, enjoy the process, and get ready to light up the trails like never before!