Hostas are among the most beloved shade-loving plants for gardens around the world. Their lush leaves, variety of colors, and forgiving nature make them a top choice for both beginners and experienced gardeners. But while hostas are hardy, planting them incorrectly can lead to weak growth, pest problems, or even plant death. Getting the basics right from the start is the best way to enjoy healthy, beautiful hostas for years. This guide will walk you through every important detail of how to plant hostas correctly, with clear tips, practical examples, and insights that even many gardeners overlook.
What Makes Hostas Unique?
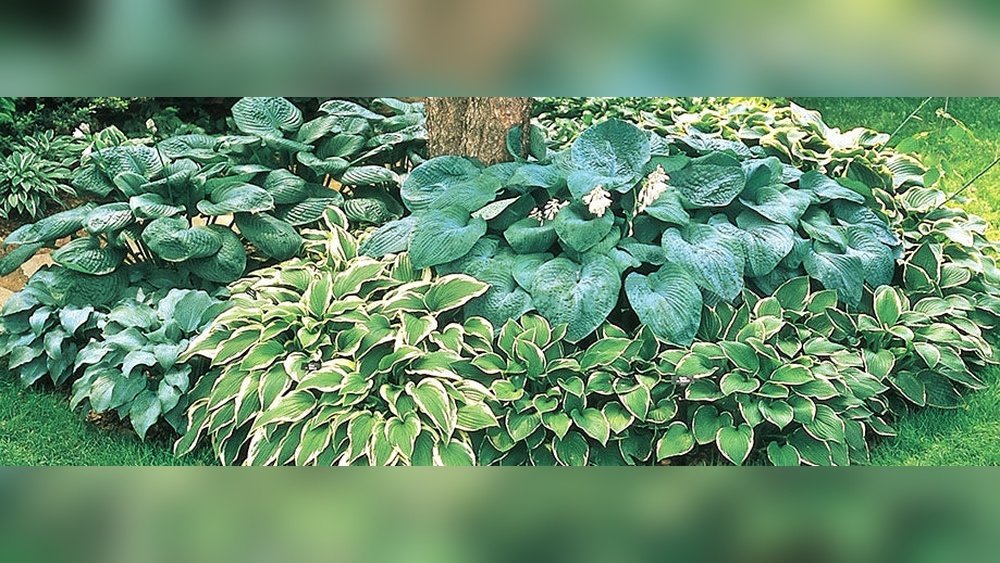
Hostas, also known as plantain lilies, are mostly grown for their leaves. These come in greens, blues, yellows, and creamy variegated patterns. Hostas thrive in shade, and many are surprisingly tough, surviving cold winters and returning every year. Their flowers, though less showy than the leaves, attract pollinators like bees and hummingbirds.
Unlike many perennials, hostas are not fussy about soil, but they do best with thoughtful planting. Some varieties can grow over 3 feet wide, while others stay under 6 inches. Understanding the basics of hosta biology is the first step to planting success.
Choosing The Right Hosta For Your Garden
With over 6,000 named varieties, picking the right hosta can be overwhelming. Consider these factors:
- Mature size – Hostas range from tiny miniatures to giants like ‘Empress Wu’ (up to 4 feet tall and wide).
- Leaf color and pattern – Blue, green, gold, or variegated leaves create different moods.
- Sun tolerance – Most hostas prefer shade, but some tolerate more sun.
- Flower characteristics – Some offer fragrant blooms, others unusual flower colors.
- Pest resistance – Certain varieties are less attractive to slugs and deer.
Common Hosta Varieties And Their Features
| Variety | Leaf Color | Mature Size | Sun Tolerance | Special Features |
|---|---|---|---|---|
| ‘Patriot’ | Green with white edge | 18-24 in. tall, 36 in. wide | Partial shade | Showy foliage, easy care |
| ‘June’ | Blue-green with gold center | 16 in. tall, 36 in. wide | Shade to part sun | Slug resistance |
| ‘Empress Wu’ | Dark green | 48 in. tall, 60 in. wide | Partial shade | Giant size, dramatic presence |
| ‘Stained Glass’ | Gold with green edge | 15 in. tall, 36 in. wide | Sun tolerant | Fragrant flowers |
| ‘Blue Mouse Ears’ | Blue-green | 8 in. tall, 12 in. wide | Shade | Miniature, good for containers |
Credit: hydrangea.com
When Is The Best Time To Plant Hostas?
Timing plays a major role in hosta success. The best windows are:
- Spring: When the ground is workable and before leaves fully unfurl. This lets roots settle before summer heat.
- Early fall: At least 4-6 weeks before first frost. Roots grow well in cool soil.
Planting in high summer can stress the plants, especially if you’re dividing or moving mature hostas. If you must plant in summer, water deeply and shade the new plant for a few weeks.
Site Selection: Where Should You Plant Hostas?
Hostas are shade lovers, but not all shade is the same. Here’s what matters:
- Light: Dappled shade or morning sun with afternoon shade is ideal. Too much sun can scorch leaves, but too little can make colors dull. Blue-leaved hostas need more shade to keep their color, while gold or yellow varieties often need some sun to look their best.
- Soil: Hostas thrive in rich, loose, well-drained soil. Heavy clay holds water and can rot roots; pure sand dries out too quickly. The best pH is slightly acidic to neutral (6.0–7.5).
- Air flow: Good circulation helps prevent diseases like crown rot or fungal spots.
- Space: Give each hosta enough room to reach its mature size. Crowded plants compete for water and nutrients, and are more prone to pests.
A common mistake is planting hostas under dense trees with shallow roots. These trees compete fiercely for water. If you must plant near trees, water more often and use extra compost.
Preparing The Planting Area
Before you dig, take time to prepare the soil. This is one step many gardeners rush, but it affects your hosta for years.
How To Improve Soil For Hostas
- Remove weeds and grass from the planting site. These rob nutrients and water.
- Loosen the soil to a depth of 12-15 inches. Hostas have deep, spreading roots. Use a shovel or garden fork.
- Mix in compost or aged manure. Aim for 2-4 inches mixed into the top 8-12 inches of soil. This adds nutrients and improves drainage.
- Check drainage. Fill the hole with water. If it drains in less than 1 hour, it’s good. If not, add more compost or create a raised bed.
- Add slow-release fertilizer if your soil is poor. Avoid high-nitrogen lawn fertilizers, which can burn hosta roots.
Quick Soil Comparison For Hostas
| Soil Type | Hosta Performance | How to Improve |
|---|---|---|
| Heavy clay | Poor drainage, root rot risk | Add compost, sand, or leaf mold |
| Sandy soil | Dries out, low nutrients | Add compost, peat moss, or loam |
| Loam (ideal) | Excellent growth | Maintain with compost each year |
How To Plant Hostas: Step-by-step
Getting the planting process right makes a big difference. Here are the steps:
- Dig a hole twice as wide and slightly deeper than the root ball or container.
- Loosen roots gently if the plant is pot-bound. This encourages new root growth.
- Set the hosta so the crown (where roots meet stems) is at soil level. Planting too deep can cause rot.
- Backfill with improved soil, firming gently to remove air pockets.
- Water deeply right after planting. This settles the soil and helps roots connect.
- Mulch around the base with 2–3 inches of shredded bark or compost. Keep mulch a few inches from the crown to prevent rot.
Planting Bare-root Hostas
Bare-root hostas are cheaper and ship well, but need special handling:
- Soak roots in lukewarm water for 30–60 minutes before planting.
- Spread roots out in the hole, fanning them gently.
- Fill the hole, water well, and mulch.
Non-obvious tip: Even small bare-root hostas can take a season to fully “wake up.” Don’t assume they’re dead if growth is slow the first year.

Credit: www.iscapeit.com
Watering And Mulching For Success
Consistent moisture is key for hostas, especially in their first year. Here’s how to get it right:
- Water deeply once or twice a week, aiming for 1 inch of water (including rain). Shallow, frequent watering leads to weak roots.
- Early morning is best, so leaves dry by night. Wet leaves overnight can invite fungus.
- In hot, dry spells, increase watering. Hostas wilt quickly if the soil dries out.
- Mulch helps keep soil cool, holds moisture, and stops weeds. Organic mulches like shredded bark, leaf mold, or pine needles are ideal.
Beginner mistake: Over-mulching, especially with thick layers, can smother roots or invite slugs. Keep mulch no more than 3 inches deep and away from stems.
Spacing: How Far Apart Should You Plant Hostas?
Hostas vary widely in size, so spacing depends on the variety. Crowded plants struggle and invite pests.
Spacing Guide For Common Hosta Types
| Hosta Size | Spacing | Example Varieties |
|---|---|---|
| Miniature | 8-12 inches | ‘Blue Mouse Ears’, ‘Tiny Tears’ |
| Small | 15-18 inches | ‘Golden Tiara’, ‘Lakeside Little Tuft’ |
| Medium | 24-36 inches | ‘June’, ‘Patriot’ |
| Large/Giant | 36-60 inches | ‘Sum and Substance’, ‘Empress Wu’ |
Pro tip: If you want a dense look, plant a bit closer, but be ready to divide in a few years.
Fertilizing Hostas: What Works Best?
Hostas are not heavy feeders, but good nutrition helps them reach their full potential.
- Compost: A yearly top-dressing in spring boosts growth and soil health.
- Balanced slow-release fertilizer (like 10-10-10): Sprinkle around the root zone in early spring. Avoid direct contact with leaves or crowns.
- Liquid fertilizer: Useful for containers or quick recovery after division.
Do not over-fertilize. Too much nitrogen makes lush leaves but weakens the plant overall, making it more vulnerable to slugs and disease.
Hidden insight: Hostas can struggle in compacted, nutrient-poor soil even with fertilizer. Improving soil is more important than feeding.
Dividing And Transplanting Hostas
Dividing is not just for making more plants—it keeps old clumps healthy. Hostas can stay undisturbed for years, but if they become crowded or flower poorly, it’s time to divide.
How To Divide A Mature Hosta
- Water the plant well the day before.
- Dig up the entire clump, taking as much root as possible.
- Use a sharp knife or spade to slice the root mass into sections, each with at least 1-2 eyes (growing points).
- Replant divisions at the correct depth, water well, and mulch.
Best times: Early spring or early fall, when weather is cool and moist.
Non-obvious tip: Don’t be afraid to cut through thick roots. Hostas recover quickly.
Common Planting Mistakes (and How To Avoid Them)
Even experienced gardeners make errors. Here are the big ones:
- Planting too deep: Causes crown rot. Always keep the crown at soil level.
- Planting in full sun: Most hostas scorch easily. Only a few gold-leaved types tolerate strong sun.
- Poor soil preparation: Hostas in clay or sand without compost grow weakly.
- Neglecting water: New hostas need steady moisture until established.
- Ignoring spacing: Overcrowded hostas suffer from pest and disease problems.
- Using the wrong mulch: Stones or thick wood chips can cause root problems or attract slugs.
Protecting Hostas From Pests And Diseases
Hostas are famous for attracting slugs and snails. Deer and rabbits also love their leaves. Other problems include crown rot, leaf spot, and viruses (rare).
Slug And Snail Control
- Hand-pick slugs in the evening.
- Use organic slug baits (iron phosphate is safe for pets).
- Try barriers like crushed eggshells or copper tape.
- Keep mulch thin and avoid watering late in the day.
Deer And Rabbit Defense
- Use fencing or repellents if these animals are common.
- Plant less tasty varieties (thick-leaved hostas are less appealing).
Disease Prevention
- Plant in well-drained soil.
- Keep leaves dry overnight.
- Remove old leaves in fall to stop disease cycles.
Hidden insight: Don’t compost diseased hosta leaves. Trash them to prevent spreading problems.
Caring For Hostas After Planting
Once planted, hostas need ongoing care to look their best.
- Water regularly, especially in dry periods.
- Top up mulch each year but avoid burying crowns.
- Fertilize lightly in spring.
- Remove flower stalks after bloom, unless you want seeds (they rarely grow true).
- Divide every 3–5 years or when growth slows.
In cold climates, hostas go dormant after a hard frost. Leaves die back—leave them until spring for winter protection, or cut them back in fall to reduce pests.
Hostas In Containers: Special Tips
Hostas grow well in pots, especially small or miniature varieties. Here’s what to know:
- Use a large enough pot (at least 12 inches wide) for root growth.
- Fill with high-quality potting mix and compost.
- Water more often—pots dry out faster than ground soil.
- Fertilize lightly every 6–8 weeks during the growing season.
- Move pots to a sheltered spot in winter, or bury the container to protect roots from cold.
Note: In warm climates, containers can overheat. Shade the pot, not just the plant.
Creative Hostas Planting Ideas
Hostas aren’t just for borders. Try these ideas:
- Mix with ferns, astilbe, or heuchera for lush shade gardens.
- Plant in drifts of different leaf colors for a painterly effect.
- Use miniature hostas in rock gardens or troughs.
- Place large hostas as dramatic focal points.
- Edge walkways with compact varieties.
Troubleshooting: Why Aren’t My Hostas Thriving?
If your hostas look sickly, check these issues:
- Yellow leaves: Often water stress (too much or too little), or root rot.
- Brown edges: Sunburn or drought.
- Holes in leaves: Slugs, snails, or hail.
- Stunted growth: Crowding, poor soil, or root competition with trees.
Test your soil, adjust watering, and check for pests. Most hostas recover quickly once the problem is fixed.
Hostas And Companion Plants
Choosing the right neighbors helps hostas shine. Good companions include:
- Ferns – Similar needs and soft textures.
- Heuchera (coral bells) – Colorful foliage.
- Astilbe – Feathery flowers add contrast.
- Pulmonaria – Early blooms and spotted leaves.
- Brunnera – Heart-shaped, silver leaves.
Avoid aggressive groundcovers or thirsty shrubs that crowd or shade hostas too much.
Sustainable And Eco-friendly Tips
Hostas are great for eco-friendly gardens:
- Organic mulch and compost feed soil life.
- Drip irrigation or soaker hoses save water.
- Shade gardens need less water and fertilizer than sun beds.
- Hostas support pollinators with their flowers.
For more on sustainable gardening, see the Royal Horticultural Society’s guide.
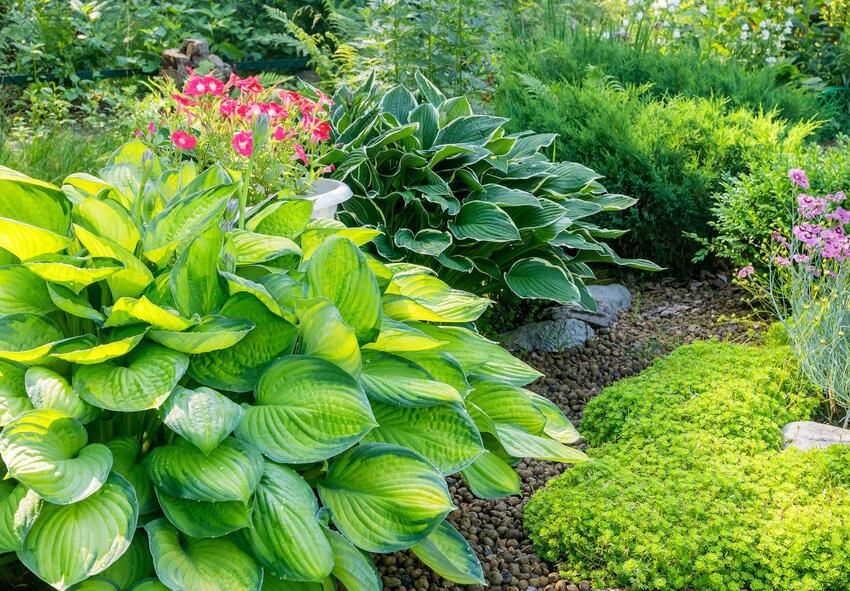
Credit: blog.dutch-bulbs.com
Frequently Asked Questions
How Long Do Hostas Live?
Healthy hostas can live for 30 years or more with good care. Many become more beautiful as they age.
Can I Grow Hostas From Seeds?
Yes, but seed-grown hostas rarely look like the parent plant. Most gardeners buy divisions or starter plants for reliable results.
Why Are My Hosta Leaves Turning Yellow?
Yellow leaves can mean too much sun, not enough water, or root problems. Check for soggy soil or pests, and adjust the growing conditions.
Do Hostas Need Winter Protection?
In most climates, hostas survive winter just fine. In zones colder than USDA Zone 3, mulch heavily and avoid late-season fertilizer to help them harden off.
When Should I Divide Hostas?
The best times are early spring (as leaves emerge) or early fall (at least a month before frost). Avoid dividing during hot summer weather.
Planting hostas correctly is simple if you follow the steps above. Take your time, prepare the site well, and your hostas will reward you with years of beauty and easy care. Even small improvements—like better soil or thoughtful spacing—make a big difference.
Whether you’re new to gardening or have decades of experience, hostas are a forgiving, satisfying choice that can transform any shady spot into a lush green haven.