When heavy snow covers your driveway or sidewalk, even the best snow blower can lose grip on icy surfaces. If your machine keeps slipping or struggles to move forward, you need a solution that boosts traction and safety. Tire chains for snow blowers are a simple upgrade that can make a huge difference. They help your snow blower grab onto snow and ice, so you can clear your property more easily and safely.
Adding tire chains may sound tricky, especially if you’ve never done it before. But with a clear guide and a little patience, anyone can do it at home. This article will show you exactly how to install tire chains on a snow blower, what tools you need, and how to avoid common mistakes.
You’ll also learn practical tips, safety advice, and answers to the most common questions. Whether you’re new to snow blowers or looking to improve your winter routine, this guide will help you get the best results.
Why Tire Chains Matter For Snow Blowers
Snow blowers are powerful machines, but traction problems can make them frustrating to use. When tires spin without grip, you waste time, energy, and even risk injury. Tire chains solve this by giving your machine extra grip on slippery surfaces.
Key Benefits Of Tire Chains
- Better Traction: Chains dig into ice and packed snow, helping your snow blower move forward instead of spinning in place.
- Improved Safety: Less slipping means fewer accidents, especially on sloped driveways.
- More Efficient Clearing: With better control, you can finish the job faster and with less effort.
- Longer Machine Life: Less wheel spinning means less wear on your blower’s drive system.
When Are Tire Chains Necessary?
You might not need tire chains every winter, but they’re essential in these situations:
- Frequent heavy snowfall
- Icy or steep driveways
- Packed or wet snow that’s hard to clear
- Using a snow blower on gravel or uneven surfaces
Some snow blower models come with aggressive tread tires that handle light snow well. But for icy conditions, chains almost always provide a big improvement.
Choosing The Right Tire Chains For Your Snow Blower
Not all tire chains are the same. It’s important to pick chains that match your machine and the conditions you face.
How To Find The Correct Size
Your snow blower tire size is usually printed on the sidewall of the tire. It looks like “4. 80-8” or “13×5. 00-6”. You need this number to buy the right chains.
| Tire Size | Chain Size Needed | Typical Snow Blower Models |
|---|---|---|
| 4.10-6 | 4.10-6 Chains | Compact, single-stage |
| 13×5.00-6 | 13×5.00-6 Chains | Medium, dual-stage |
| 16×6.50-8 | 16×6.50-8 Chains | Large, heavy-duty |
Pro tip: Double-check your tire size before ordering. Tire chains that are too big or too small will not fit properly, making installation difficult or even damaging your tires.
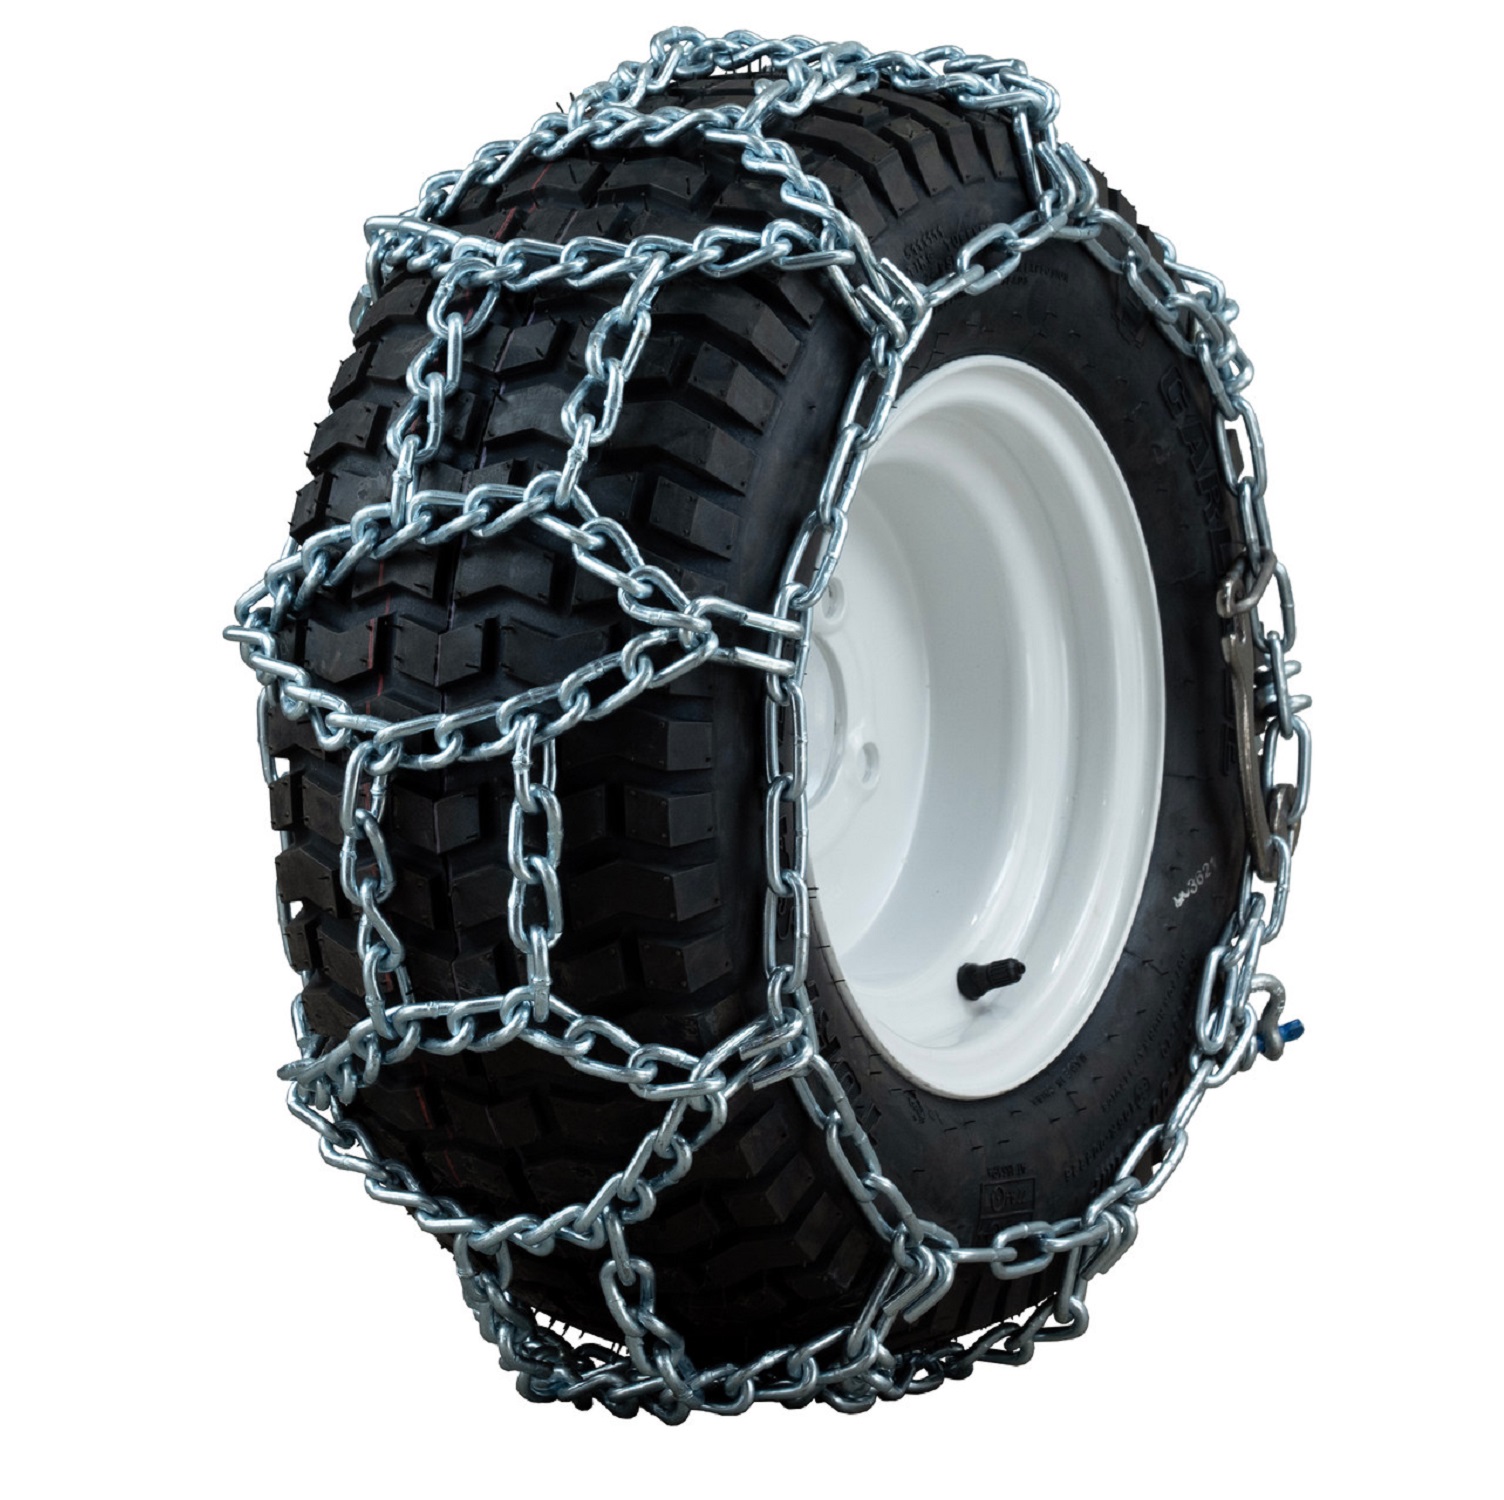
Types Of Tire Chains
- Standard Ladder Chains: The most common type, great for most residential snow blowers. They have a ladder pattern that sits across the tire.
- V-Bar Chains: Have small “V” shaped bars for extra grip on thick ice. Best for very slick or hilly areas.
- Diamond Pattern Chains: Offer smoother ride and more points of contact. Usually found on larger or commercial machines.
Material And Build Quality
Look for hardened steel chains. They last longer and resist rust better than cheaper materials. Stainless steel is best if you use your blower often or store it in a damp place.
Common Mistakes When Buying
- Guessing your tire size instead of checking the sidewall
- Buying chains made for cars, not snow blowers
- Choosing the cheapest option without checking quality
Tools And Materials Needed
Before starting, gather everything you need. This will make the process much faster.
- Tire chains (correct size)
- Work gloves (chains can be sharp and cold)
- Flathead screwdriver or small pry bar
- Needle-nose pliers
- Air pump (to check tire pressure)
- Tire pressure gauge
- Flashlight (if working in a dim area)
- Tarp or old mat (to protect the ground and your knees)
Having all tools ready prevents frustration and keeps your hands warm by reducing time spent outside.
Preparing Your Snow Blower For Chain Installation
A little preparation makes the chain installation much easier and safer.
Clean The Tires
Remove any packed snow, ice, or mud from the tires. Dirt makes it harder for the chains to grip and can cause them to slip off.
Check Tire Pressure
Chains fit best on properly inflated tires. Use a tire pressure gauge to check each tire. Most snow blower tires should be around 15-20 psi (check your owner’s manual for the exact number). Inflate or deflate as needed.
Position The Snow Blower
Move your snow blower onto a flat, dry surface. If you have a garage, this is ideal. Otherwise, lay a tarp or mat outside to keep the chains clean and protect your knees.
Engage The Parking Brake
If your snow blower has a parking brake or wheel lock, engage it. This keeps the machine from moving while you work.
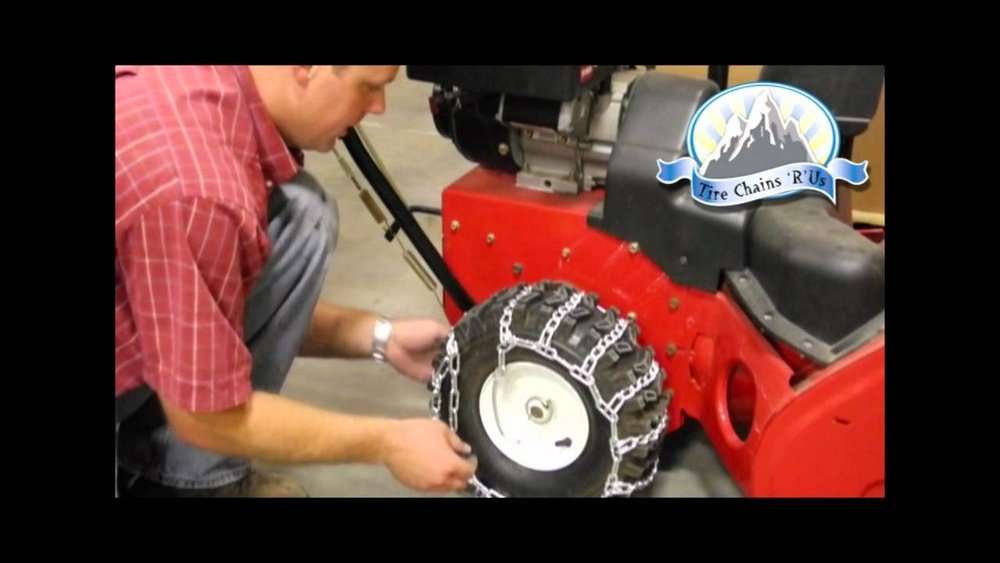
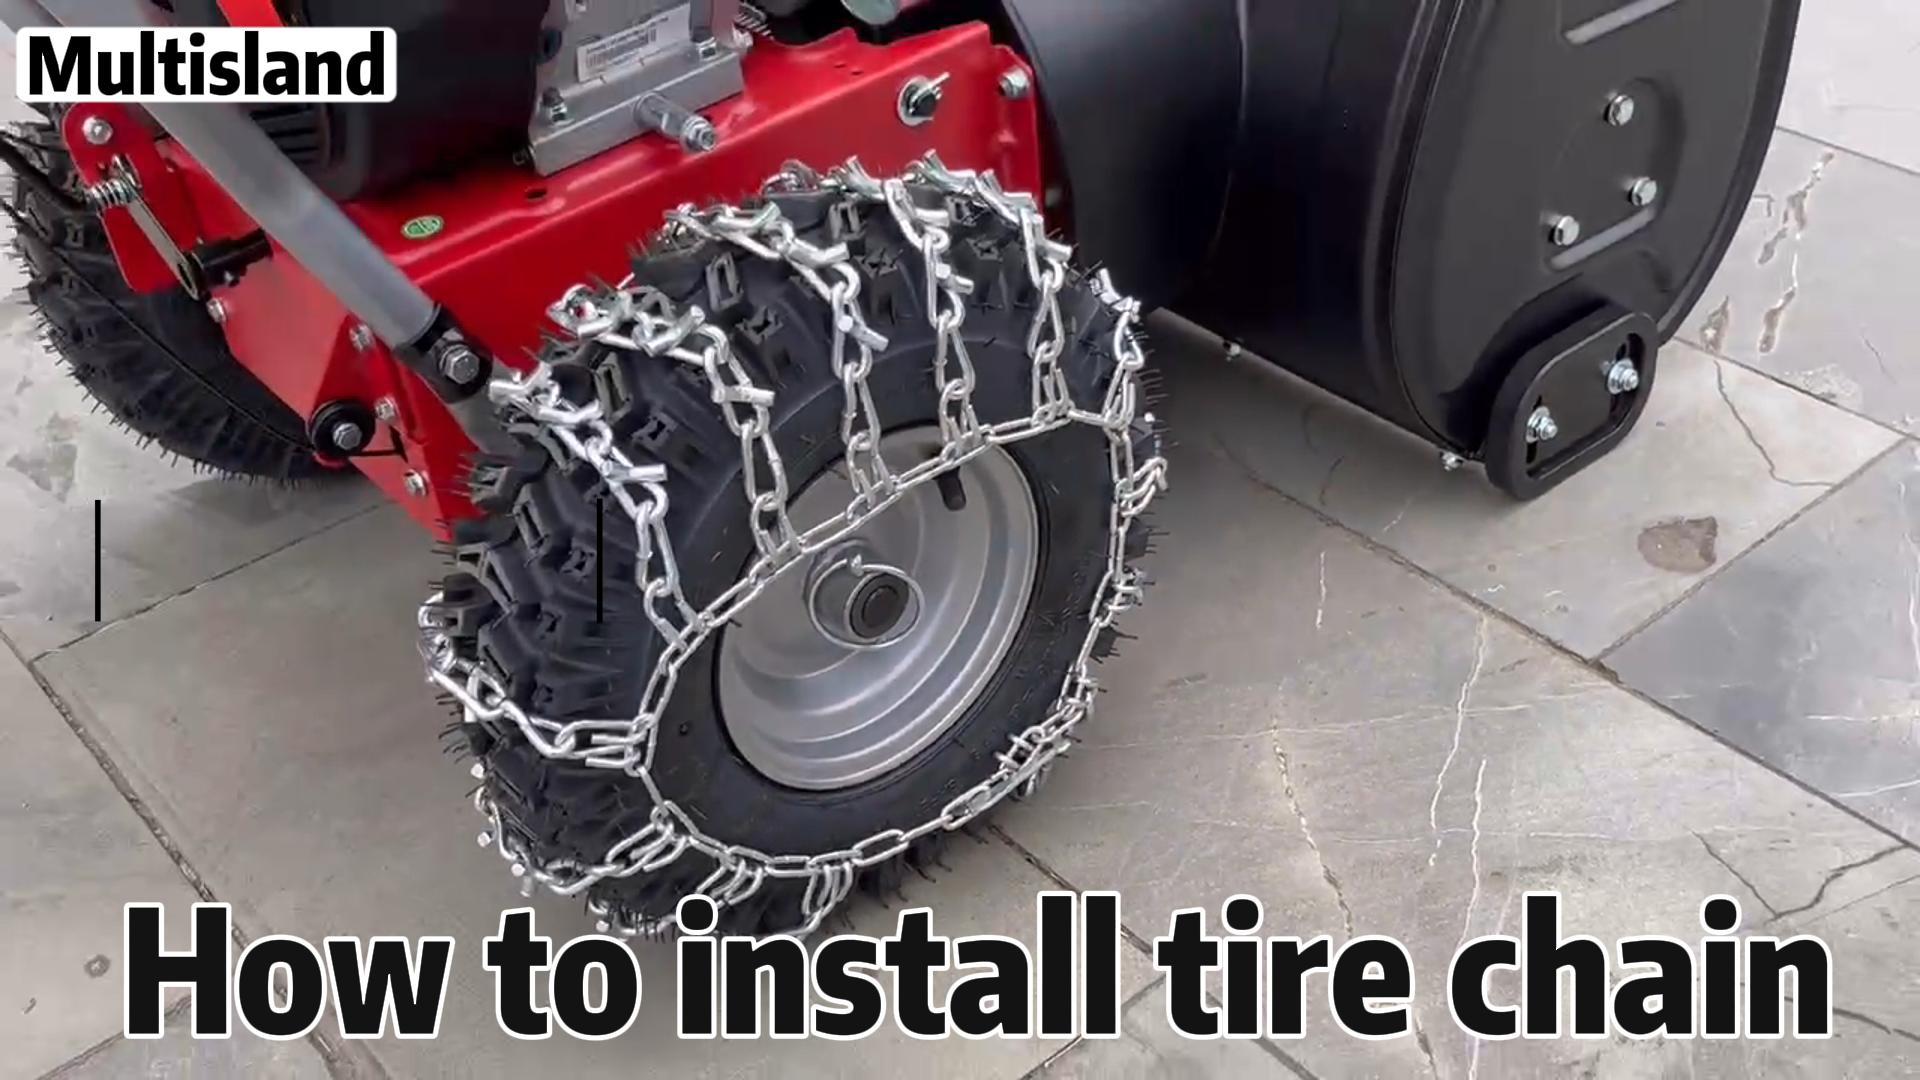
Step-by-step: How To Add Tire Chains To Snow Blower
Now you’re ready to install the chains. The process is similar for most brands, including Ariens, Toro, Husqvarna, Craftsman, and Cub Cadet. If you have a rare or unusual model, check the manual for any special instructions.
Step 1: Lay Out The Chains
Unpack the chains and lay them flat on the ground. Shake them out and untangle any knots. Make sure the open hooks or locking clasps are facing up, and the smooth side of the cross chains will rest against the tire.
Step 2: Position The Chains Behind The Tire
Push the end of the chain behind the tire, with the outside clasp near the outside edge of the tire. The chains should be centered so they will cover the tread evenly.
Step 3: Drape The Chains Over The Tire
Lift each end of the chain and drape it over the top of the tire. The cross chains should be evenly spaced across the tread. Double-check that no sections are twisted or lying under the tire.
Step 4: Connect The Inside Fastener
Reach behind the tire and hook the inside fastener or clasp first. This is usually a small hook or lever that connects the two ends of the chain. It may be tight—use a flathead screwdriver for leverage if needed.
Step 5: Connect The Outside Fastener
With the inside fastener secure, pull the outside ends of the chain together and connect the outside fastener. The chain should be snug but not so tight that it deforms the tire.
Step 6: Adjust And Center The Chains
Rotate the tire by hand (or roll the snow blower forward a few feet) to help the chains settle. If the chains shift off-center, loosen and reposition them, then reconnect the fasteners.
Step 7: Tighten The Chains
Many tire chains come with a small tensioner or extra links. Use a pair of pliers to pull the chain as tight as possible and hook the tensioner or extra link. For even better fit, use rubber chain tensioners—these are small stretchy bands that hold the chains snugly in place.
Step 8: Repeat On The Other Tire
Install chains on both tires for best results. Repeat all steps for the second tire.
Step 9: Final Inspection
Once both chains are installed, check that:
- Chains are centered on both tires
- All hooks and fasteners are secure
- Chains are snug but not overly tight
- No sharp points are sticking out toward the tire or the machine
Step 10: Test The Snow Blower
Start your snow blower and slowly drive forward a few feet. Listen for unusual noises and check that the chains stay in place. If you hear loud clanking or see the chain slipping off, stop and adjust the fit.
Safety tip: Never run the machine at full speed until you’re sure the chains are secure. Loose chains can damage your snow blower or even cause injury.
Tips For Smooth Installation
Adding tire chains gets easier with practice. Here are some extra tips to help you succeed the first time:
- Warm up the chains indoors before installing. Cold metal is harder to handle and less flexible.
- Use a headlamp if you’re working outside in the dark. Good lighting helps you spot missed hooks or twisted links.
- Mark the ends of the chains with colored tape for easier identification next time.
- Lubricate fasteners with a little machine oil to make hooking easier in freezing weather.
Common Mistakes And How To Avoid Them
Even experienced users make mistakes when installing snow blower tire chains. Here are the most common problems and how to avoid them:
- Installing on under-inflated tires: This causes the chains to loosen as soon as you inflate the tire, which can lead to slipping or chain loss.
- Chains too loose or too tight: Loose chains can fall off or damage the machine. Over-tightened chains can deform the tire or break.
- Skipping the test drive: Always check your work before full use. This helps prevent accidents and equipment damage.
- Forgetting to check clearance: On some machines, chains can rub against the fender or drive parts. Always check for at least 1/2 inch of clearance around the tire.
- Using car chains or wrong-size chains: These can damage the tires, drive system, or even void your warranty.
Maintaining And Storing Tire Chains
Good maintenance keeps your chains working for years. After winter ends, don’t just toss them in the garage. Here’s how to keep them in top shape:
- Clean the chains: Rinse off all salt, dirt, and debris. Salt can cause rust and weaken the links.
- Dry completely: Leave them in a warm, dry place for a day before storing.
- Check for damage: Look for broken links or worn fasteners. Replace damaged chains before next season.
- Store in a dry bag or box: Moisture and humidity can cause rust, so keep them off the ground and away from water.
Extra insight: Some users forget to check chain condition after a season. A rusty or weakened chain is more likely to snap, which can damage your snow blower or cause injury.
Safety Tips For Using Snow Blower Tire Chains
While chains improve grip, there are a few safety points to remember:
- Never touch the chains while the snow blower is running.
- Wear gloves when handling chains to protect your hands from sharp edges.
- Don’t use chains on bare pavement—they can damage both the chains and the surface.
- Check chains after the first use—sometimes they settle and need tightening.
- Store chains away from children and pets. They can be heavy and have sharp points.
Troubleshooting: What To Do If Chains Don’t Fit Or Work Properly
If you’re having trouble with your tire chains, here’s how to solve the most common issues.
Chains Are Too Tight Or Too Loose
- Double-check your tire size and chain size.
- Try adjusting the tire pressure slightly for a better fit.
- Use extra links or tensioners if needed. Most chains have adjustable links for fine-tuning.
Chains Keep Slipping Off
- Chains may not be centered on the tire. Reinstall, making sure they are even.
- Tires may be under-inflated—add air.
- Check for worn or stretched chains and replace if needed.
Loud Noises Or Vibration
- Make sure all hooks and fasteners are secure.
- Remove any ice or snow packed under the chain.
- Chains that are too loose can slap against the fender—tighten them and check for proper clearance.
Chains Rubbing On The Machine
- Some snow blowers have tight wheel wells. If the chains rub, try smaller chains or add spacers to the wheel.
- Check your owner’s manual for guidance on chain compatibility.
Chains Won’t Stay Tight
- Rubber tensioners help keep chains snug.
- If the chains are old and stretched out, it might be time to replace them.
Performance Comparison: Tires With Vs. Without Chains
How much difference do tire chains actually make? Here’s a simple comparison to help you see the benefits.
| Condition | No Tire Chains | With Tire Chains |
|---|---|---|
| Flat, packed snow | Some slipping, slow progress | Good traction, smooth movement |
| Steep, icy driveway | Stuck or slides backward | Climbs easily, stays straight |
| Wet snow, uneven surface | Tires spin, hard to control | Firm grip, easier steering |
Insight: Many first-time users are surprised at how much easier their snow blower is to steer and control with chains, especially on slopes or after a freeze.
Additional Upgrades To Improve Snow Blower Traction
Chains aren’t the only way to boost traction. If you want even better results, consider these upgrades:
- Tire weights: Some models let you add small weights to the wheels for more grip.
- Non-slip mats: Place these under your snow blower when starting on icy ground.
- Studded tires: Some manufacturers offer tires with built-in metal studs for extra grip.
- Upgraded tread tires: If your tires are old or worn, replacing them with deeper-tread models can help.
Still, tire chains offer the best balance of cost, performance, and ease of installation for most users.
Real-world Example: Installing Chains On An Ariens Deluxe 28
Let’s walk through a real example—putting chains on the popular Ariens Deluxe 28 snow blower.
- Check tire size: The Ariens Deluxe 28 usually uses 16×6.50-8 tires.
- Order matching chains: Buy a set of 16×6.50-8 ladder chains in hardened steel.
- Prepare tools: Gather gloves, pliers, air pump, and a flashlight.
- Clean and inflate tires: Make sure both tires are at 18 psi.
- Lay out chains: Untangle, and check for broken links.
- Install as described above: Follow steps for draping, fastening, tightening, and testing.
- Test drive: After a short drive, chains settle and need a final tension adjustment.
After installation, users report a 40–60% improvement in snow blower control and speed—especially on uphill driveways.
Environmental Impact And Chain Alternatives
Using tire chains is safe for most snowy or icy surfaces, but they can damage delicate landscaping or decorative stone. If your property has pavers or a heated driveway, test the chains in a small area first. For sensitive surfaces, look into polymer-based traction mats or tire socks as a less abrasive alternative.
Credit: www.amazon.com
Local Regulations And Legal Considerations
In some regions, using tire chains on public sidewalks or streets is subject to local laws. Always check your city’s regulations before using chains in areas maintained by the city or shared with neighbors.
Some homeowner associations also restrict the use of metal chains on certain surfaces. If unsure, contact your local authority or association office.
For more about the safety and legal use of tire chains, you can check resources such as the NHTSA Tire Chains Guide.
Cost And Value: Are Tire Chains Worth It?
A quality set of snow blower tire chains usually costs $30–$80 per pair, depending on size and material. For most homeowners, this is a small investment compared to the time, effort, and safety risks of using a snow blower without enough traction.
Non-obvious insight: Skimping on chain quality to save a few dollars often leads to frustration. Cheap chains rust quickly or break under heavy use. Spending a bit more for hardened steel chains pays off over many winters.
Credit: www.countryhomeproducts.com
Quick Reference: Do’s And Don’ts
Do:
- Check tire size before buying
- Inflate tires before installing chains
- Use gloves and good lighting
- Test fit before using at full speed
Don’t:
- Use car tire chains on a snow blower
- Run chains on bare pavement
- Over-tighten or leave chains too loose
- Ignore strange noises or vibration
Frequently Asked Questions
What Size Chains Do I Need For My Snow Blower Tires?
Find the size printed on your tire’s sidewall (e. g. , 13×5. 00-6). Buy chains that match this number exactly. If you’re unsure, check your snow blower’s manual or the manufacturer’s website.
Can I Use Car Tire Chains On My Snow Blower?
No, car chains are too heavy and the wrong size for most snow blower tires. They can damage your machine and make it hard to steer. Always use chains made specifically for snow blowers.
Credit: www.tirechainsrus.com
How Tight Should Snow Blower Tire Chains Be?
Chains should be snug, so they don’t slip or bang against the machine. You should be able to push a finger under the cross chain, but not much more. Use tensioners if the chains seem loose after installation.
Will Tire Chains Damage My Driveway?
Chains can scratch soft surfaces like pavers or freshly sealed driveways. On normal concrete or packed snow, they’re usually safe. Avoid using chains on bare pavement when possible.
How Long Do Snow Blower Tire Chains Last?
Quality chains made from hardened steel can last 5–10 years if cleaned and stored properly. Cheaper chains may rust or break after just one or two seasons, especially if not maintained.
Adding tire chains to your snow blower isn’t just about getting the job done—it’s about doing it safely, efficiently, and with less stress. With the right tools, careful installation, and a little maintenance, you’ll be ready for whatever winter brings.
Whether you’re facing your first big storm or just want to clear your driveway without slipping, tire chains are a smart, reliable upgrade for every snow blower owner.