Creating a backyard movie screen transforms your outdoor space into a private cinema. Imagine relaxing under the stars, surrounded by friends and family, watching your favorite films. It’s not only fun, but also a memorable experience. While setting up a backyard movie screen might seem complicated, it’s actually a project that anyone can tackle with the right guidance.
Whether you want a temporary setup for a party or a permanent addition for regular movie nights, this article will walk you through every step. You’ll learn how to choose the right screen, projector, sound system, and seating, plus discover tips that beginners often overlook.
By the end, you’ll have a complete blueprint for your own backyard theater.
Choosing The Right Movie Screen
The screen is the centerpiece of your outdoor cinema. Picking the best option depends on your budget, space, and how often you plan to use it.
Types Of Backyard Movie Screens
There are three main types of screens for outdoor use:
- Inflatable screens: These are popular for their quick setup and portability. They come in various sizes, often ranging from 10 to 20 feet wide. Inflatable screens use a blower to keep them upright. They’re ideal for occasional movie nights and larger gatherings.
- DIY fabric screens: Using white blackout cloth or canvas, you can build your own screen. This is budget-friendly and customizable. You’ll need a frame made from PVC pipes, wood, or metal. Fabric screens are perfect for those who want a permanent fixture or enjoy DIY projects.
- Commercial fixed screens: These are professional-grade, weather-resistant screens mounted on a frame. They’re expensive but offer the best image quality and durability.
Comparing Screen Types
Here’s a comparison to help you decide:
| Screen Type | Setup Time | Cost | Durability | Best For |
|---|---|---|---|---|
| Inflatable | 10-15 mins | $150-$500 | Moderate | Large groups, parties |
| DIY Fabric | 1-2 hrs | $50-$200 | High (depends on materials) | Permanent setups, DIY lovers |
| Commercial Fixed | 1-2 hrs (installation) | $400-$2,000 | Very High | Frequent use, premium experience |
Screen Size And Placement
Screen size should match your backyard and audience size. For small gatherings, a 100-inch diagonal screen (about 8 feet wide) is enough. For larger groups, look for screens 12-16 feet wide. Place the screen where there’s minimal ambient light, away from street lamps or porch lights.
Make sure it’s stable and secure, especially if windy.
Non-obvious insight: Many beginners forget to check their projector’s throw ratio. This is the distance needed between the projector and screen for the desired image size. Always confirm your space allows the projector to fill your screen.
Selecting The Right Projector
A projector is essential for outdoor movies. The right model depends on your screen, ambient light, and movie preferences.
Key Features To Consider
- Brightness (Lumens): Outdoor viewing needs higher brightness. Aim for at least 2,000 lumens for twilight; 3,000+ lumens if there’s any ambient light.
- Resolution: Full HD (1080p) is the standard for crisp images. 4K projectors are available but expensive and sometimes unnecessary for backyard use.
- Throw Ratio: Determines how far the projector must be from the screen. Short throw projectors work well in tight spaces.
- Connectivity: HDMI is standard. Check for wireless options or streaming compatibility.
Projector Comparison
| Projector Type | Brightness | Resolution | Price Range | Best For |
|---|---|---|---|---|
| Standard Home | 2,000-3,000 lumens | 1080p | $300-$900 | Small groups, budget setups |
| Short Throw | 2,500-3,500 lumens | 1080p/4K | $700-$1,500 | Limited space, easy setup |
| Portable Mini | 500-1,500 lumens | 720p/1080p | $150-$500 | Ultra-portable, kids’ movies |
Placement And Setup
Position the projector so it’s centered with the screen. Use a small table or tripod. Ensure it’s protected from dew and moisture. If you’re using extension cords, choose outdoor-rated cables.
Non-obvious insight: Projectors generate heat. Avoid placing them on grass, which can block vents and cause overheating. Use a solid surface and check airflow.
Setting Up Audio For Outdoor Movies
Audio is often overlooked, but it’s crucial for a good experience. Built-in projector speakers are usually weak. Invest in external speakers for clear, loud sound.
Speaker Options
- Bluetooth speakers: Easy to use, portable, but can have lag. Choose models with minimal audio delay.
- Wired speakers: Offer the best quality and reliability. Use weather-resistant speakers if they’ll be outside often.
- Soundbars: A good balance between quality and portability. Some models run on battery power for outdoor use.
Audio Placement Tips
Place speakers near the screen, facing the audience. For larger crowds, use two or more speakers spaced evenly. Keep cables tidy to avoid tripping hazards.
Dealing With Outdoor Acoustics
Outdoor sound spreads out, so volume must be higher than indoors. The lack of walls can cause sound to dissipate. Test audio before your event, and adjust placement as needed.
Non-obvious insight: Wireless speakers sometimes lose connection or have delays. Always check for sync issues between video and sound before guests arrive.
Powering Your Outdoor Theater
Electronics need reliable power. Plan ahead to avoid interruptions.
Power Options
- Extension cords: Use heavy-duty, outdoor-rated cords. Avoid running cables across walkways.
- Portable power stations: Battery-powered units can run a projector and speakers for several hours. Useful if outlets are far away.
- Generators: Only for large setups. Choose quiet models to avoid disturbing the movie.
Managing Power Safely
Keep all connections dry. Use waterproof covers and cable protectors. Never overload outlets—check the total wattage of your devices. If you’re unsure, consult a professional.
Creating Comfortable Seating
Watching movies outdoors is much more enjoyable with good seating. Comfort and visibility are key.
Seating Ideas
- Folding chairs: Easy to set up and move. Arrange in rows with enough space between.
- Bean bags: Great for kids and relaxed settings.
- Blankets and pillows: Lay out thick blankets and scatter pillows for a cozy, picnic-style vibe.
- Outdoor sofas: For permanent setups, use weatherproof furniture.
Arranging Seats
Place seats at a slight angle to the screen, forming a gentle curve. This improves visibility for everyone. Leave space between rows for easy movement.
Non-obvious insight: Avoid placing seats directly on grass in damp weather. Moisture can seep through blankets and cushions, making guests uncomfortable. Use waterproof mats under seating.
Enhancing The Viewing Experience
Small touches make your backyard movie night special. Think about lighting, snacks, and extras.
Ambient Lighting
Use soft, indirect lighting around the seating area. Solar lanterns, string lights, or LED candles create a warm atmosphere without ruining the image quality.
Snacks And Drinks
Set up a snack station with popcorn, candy, and drinks. For larger gatherings, consider a cooler with bottled water and soda. If you want to go further, rent a popcorn machine or set up a concession stand.
Bug Control
Mosquitoes can ruin the fun. Use citronella candles, bug zappers, or spray the area before guests arrive.
Non-obvious insight: If you live in a humid area, dew forms on grass after dark. This makes blankets and shoes wet. Provide mats or ask guests to bring waterproof footwear.
Weatherproofing Your Setup
Outdoor equipment needs protection from the elements.
Tips For Weatherproofing
- Check the weather forecast before your movie night. Have a backup plan in case of rain.
- Use waterproof covers for projectors and speakers.
- If wind is expected, secure screens and speakers with stakes or weights.
- Store electronics indoors when not in use.
Permanent Setup Considerations
If you plan regular movie nights, build a permanent shelter or awning over the screen and projector. Use weatherproof materials and ensure good ventilation.
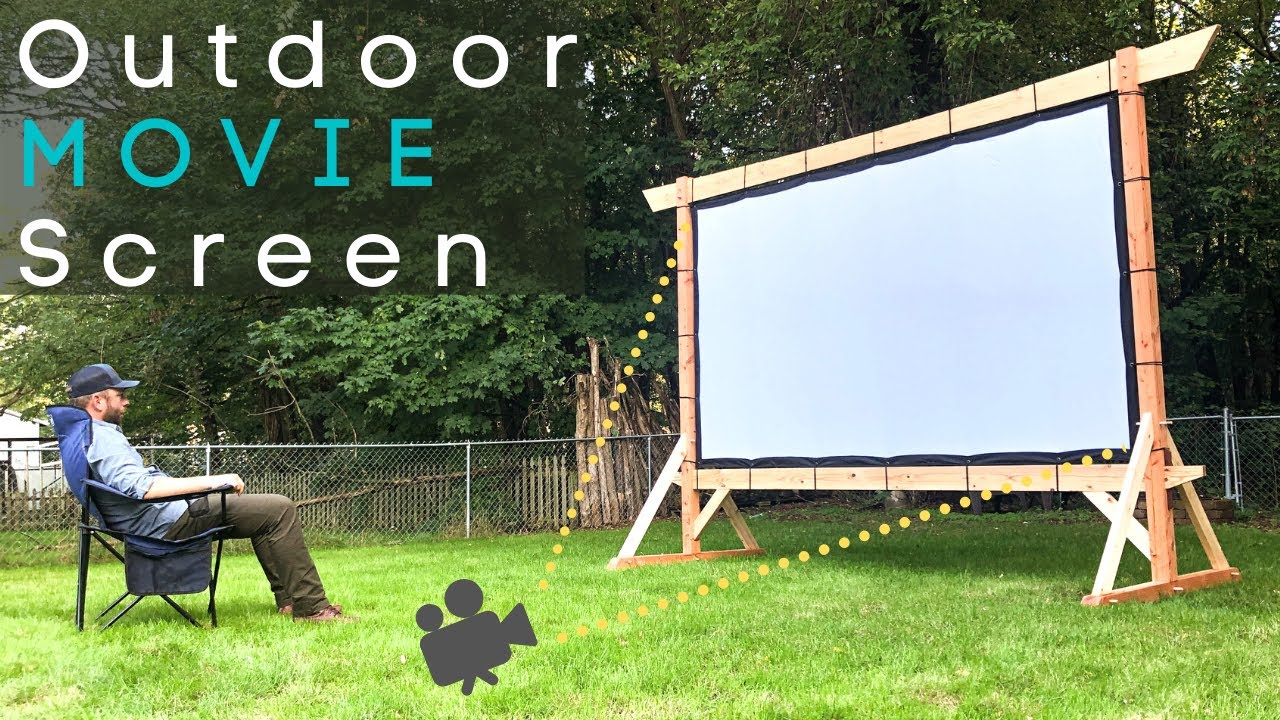
Building A Diy Backyard Movie Screen
If you prefer a custom solution, building your own screen is simple and affordable.
Materials Needed
- White blackout cloth (recommended for sharp images)
- PVC pipes or wood for the frame
- Bungee cords or zip ties
- Screws and brackets (for wooden frames)
- Hammer and measuring tape
Step-by-step Instructions
- Measure your desired screen size. Most backyard screens are 8-12 feet wide.
- Build the frame using PVC or wood. Make sure it’s sturdy and level.
- Stretch the blackout cloth tightly across the frame. Attach with bungee cords or zip ties.
- Anchor the frame to the ground using stakes or weights.
- Test the screen with a projector to ensure no wrinkles or sagging.
Practical tip: If you use PVC, fill the pipes with sand for extra stability.
Cost Savings
DIY screens can cost less than $100, compared to $400+ for commercial options. Plus, you can customize size and shape.

Credit: www.blesserhouse.com
Planning Movie Night Logistics
A smooth event needs planning. Consider these factors:
Invitations
Send invites early. Use digital invitations or group texts. Mention start time, suggested attire, and what guests should bring (blankets, bug spray, etc. ).
Movie Selection
Pick family-friendly films or ask guests for preferences. Streaming services make it easy, but check copyright rules if hosting a public event.
Schedule
Begin the movie at dusk for best visibility. Allow time for guests to arrive, settle, and grab snacks. Have a backup film in case of technical issues.
Restroom Access
Let guests know where restrooms are. If your home isn’t accessible, rent a portable restroom for larger gatherings.
Non-obvious insight: Keep extra batteries for remotes and wireless devices. Technical issues are common, and backup power avoids interruptions.
Common Mistakes And How To Avoid Them
Learning from others’ mistakes can save you time and frustration.
- Choosing the wrong screen size: Too big for the space, or too small for the audience.
- Underestimating power needs: Devices shut off mid-movie due to insufficient power.
- Ignoring projector throw ratio: Projector can’t fill the screen, resulting in a tiny or blurry image.
- Weak audio setup: Guests can’t hear dialogue, especially in windy conditions.
- Poor seating arrangement: Some guests have obstructed views or sit too close.
- No bug control: Mosquitoes and insects disrupt the experience.
- Not checking weather: Rain or wind ruins the night.
- Forgetting backup equipment: No spare cables, remotes, or batteries.
Practical advice: Make a checklist before your event. Test all equipment in advance, and walk through your setup as if you’re a guest.

Credit: www.blesserhouse.com
Permanent Vs. Temporary Outdoor Movie Setups
Decide if you want a permanent installation or a setup that’s easy to pack away.
Permanent Setup Pros
- Always ready for movie nights
- Higher quality screen and audio
- Weatherproofing possible
Permanent Setup Cons
- Higher cost
- Requires more space
- Needs maintenance
Temporary Setup Pros
- Flexible, portable
- Lower cost
- Easy to store
Temporary Setup Cons
- Setup and teardown required each time
- Equipment can wear out faster
| Setup Type | Initial Cost | Maintenance | Flexibility | Best For |
|---|---|---|---|---|
| Permanent | $1,000+ | Medium | Low | Frequent movie nights |
| Temporary | $200-$800 | Low | High | Occasional events |
Safety Considerations
Safety is vital, especially when dealing with electronics outdoors.
- Keep all power cords away from walkways.
- Use only outdoor-rated extension cords.
- Secure screens and speakers so they can’t tip over.
- Supervise children around cables and equipment.
- Store all gear safely after the event.
Practical tip: Invest in cable covers or mats to prevent tripping.
Credit: www.youtube.com
Troubleshooting Common Issues
Even with planning, issues can arise. Here are solutions to frequent problems:
Projector Not Bright Enough
If the image is too dim, move the projector closer or use a smaller screen. Increase brightness settings and start the movie only after sunset.
Audio Sync Problems
Wireless speakers sometimes lag. Switch to wired connections or adjust sync settings in your projector’s menu.
Poor Image Quality
Clean the projector lens and screen. Adjust focus and keystone settings. If the image is still blurry, check your projector’s resolution or distance.
Wi-fi Streaming Problems
If streaming movies, place your projector near the router or use a Wi-Fi extender. Download movies beforehand to avoid buffering.
Bugs And Insects
Spray the area, use bug repellents, and keep snacks covered.
Practical advice: Always have a backup film on a USB drive or DVD in case streaming fails.
Real-world Examples And Inspiration
Many people have created backyard movie screens that suit their space and budget. Here are a few inspiring setups:
- Family Movie Night: A family in Texas used a DIY screen and portable projector for weekly movie nights. They added bean bags and string lights for comfort.
- Neighborhood Gatherings: In California, a group installed a permanent commercial screen for monthly community events. They used weatherproof speakers and a popcorn machine.
- Kids’ Birthday Parties: One parent in Florida rented an inflatable screen for a birthday party, paired with Bluetooth speakers and themed snacks.
You can find ideas and tutorials online. The WikiHow Outdoor Movie Screen Guide offers step-by-step instructions and helpful visuals.
Budgeting Your Backyard Movie Setup
Costs vary based on your choices. Here’s a rough breakdown:
- Screen: $50-$2,000 (DIY to commercial)
- Projector: $150-$1,500
- Speakers: $50-$400
- Seating: $0-$500 (using existing furniture or buying new)
- Lighting and extras: $20-$150
Most people spend $400-$1,000 for a complete, quality setup. Renting can be cheaper for one-time events.
Practical tip: Look for deals on used equipment or bundle packages.
Maintenance And Storage Tips
Proper care extends the life of your equipment.
- Clean the screen regularly with a soft cloth.
- Store projectors and speakers indoors.
- Cover outdoor furniture and screens when not in use.
- Check power cords and connections before each use.
- Recharge portable batteries after every event.
Non-obvious insight: Moisture and dust are common outdoors. Invest in airtight storage bins for electronics.
Frequently Asked Questions
How Big Should My Backyard Movie Screen Be?
For most backyards, an 8–12 foot wide screen works well. If you have a large space and many guests, you can go bigger. Make sure the projector can fill the screen, and that everyone has a clear view.
Can I Use A Regular Indoor Projector Outside?
Yes, but it must have high brightness (at least 2,000 lumens). Protect it from moisture and dust. If you plan frequent outdoor use, consider a weather-resistant model.
What’s The Best Way To Avoid Bugs During Movie Night?
Use citronella candles, bug zappers, and spray the area ahead of time. Provide bug spray for guests. Cover snacks and drinks to prevent attracting insects.
Do I Need Special Speakers For Outdoor Movies?
While regular speakers work, weather-resistant outdoor speakers are best for permanent setups. For temporary events, portable Bluetooth or wired speakers are fine. Always test sound before the movie.
How Do I Keep My Equipment Safe From Rain?
Check the weather forecast before your event. Use waterproof covers for electronics. Store all gear indoors when not in use. For permanent installations, build a shelter or awning.
Creating your own backyard movie screen is easier than you might think. With careful planning and the right equipment, you can turn any outdoor space into a private cinema. Remember to consider screen size, projector brightness, sound quality, and comfort.
Don’t forget practical touches like bug control and weatherproofing. Test everything before guests arrive, and make a checklist to ensure nothing is missed. By following these steps, you’ll enjoy unforgettable movie nights under the stars for years to come.