Are you tired of wasting water and money on your sprinkler system? Switching from sprinklers to a drip irrigation system could be the smart move your garden needs.
Drip systems deliver water directly to your plants’ roots, saving water and promoting healthier growth. If you’ve been wondering how to convert your sprinkler to a drip system without starting from scratch, this guide is for you. You’ll learn simple, step-by-step methods to transform your existing setup quickly and effectively.
Keep reading to discover how easy it is to upgrade your watering routine and enjoy a lush, thriving garden with less effort and lower water bills.

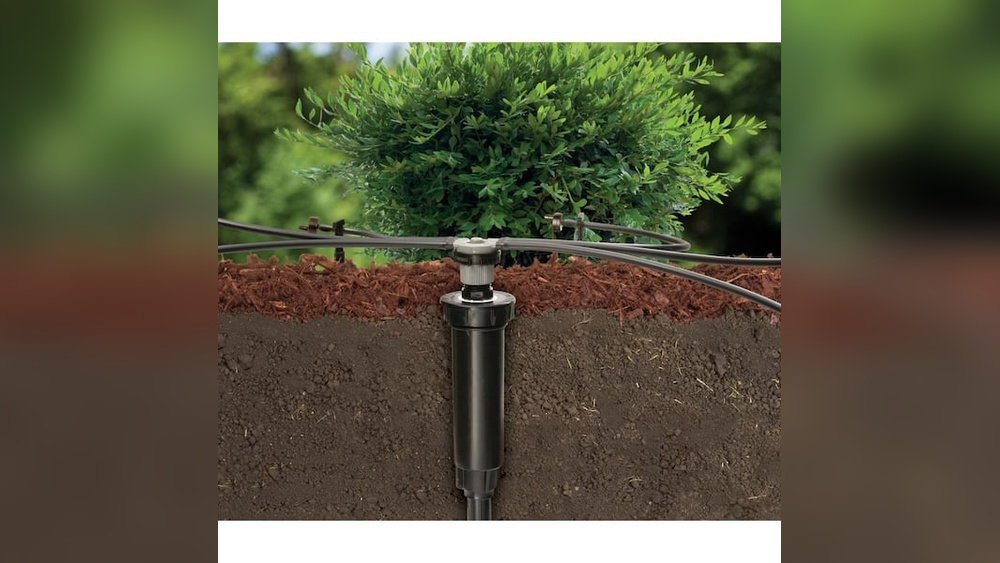
Credit: store.rainbird.com
Benefits Of Drip Irrigation
Switching from a sprinkler system to drip irrigation offers many advantages. Drip irrigation delivers water directly to the plant roots. This method uses less water and helps plants grow better. It creates a healthy environment for plants and reduces problems like weeds. Below are key benefits of using drip irrigation in your garden.
Water Savings
Drip irrigation uses water efficiently. It delivers water slowly and directly to plants. Less water evaporates or runs off. This method saves a lot of water compared to sprinklers. It helps lower water bills and conserves resources.
Improved Plant Health
Plants get water exactly where they need it. Drip irrigation avoids wetting leaves and stems. This lowers the chance of diseases. Roots grow deep and strong with steady moisture. Plants stay healthier and produce better flowers or crops.
Reduced Weed Growth
Water goes only to your plants, not the surrounding soil. Weeds get less water, so they grow slower. This means less time spent pulling weeds. Your garden looks neat and plants get more nutrients.
Assessing Your Existing System
Before converting your sprinkler system to a drip system, it is important to assess your existing setup carefully. This step helps you plan the conversion smoothly and avoid surprises. Understanding how your current system works makes the transition easier. Start by examining key parts of your sprinkler system and how they operate.
Identify Zones To Convert
Your sprinkler system is divided into zones, each covering a different area. Identify which zones you want to convert to drip irrigation. Not all zones may need conversion. Focus on garden beds, flower beds, or shrubs that benefit most from drip watering. Mark these zones clearly for easy reference during conversion.
Check Water Pressure
Drip systems require lower water pressure than sprinklers. Use a pressure gauge to measure the water pressure in the zones you plan to convert. Ideal pressure for drip irrigation is between 20 and 30 PSI. If the pressure is too high, add a pressure regulator to protect the drip lines. Proper pressure ensures efficient water delivery without damage.
Locate Sprinkler Heads
Find every sprinkler head within the zones you identified. Each head will either be replaced or capped off. Note the type and size of each sprinkler head for correct drip conversion parts. Mark their locations to avoid missing any during installation. This step prevents leaks and ensures complete coverage with your new drip system.
Required Tools And Materials
Converting a sprinkler system to a drip irrigation system requires specific tools and materials. These parts ensure your drip system works efficiently and saves water. Preparing the right equipment makes the installation process smooth and successful.
Drip Conversion Kits
Drip conversion kits include all essential parts to change sprinkler heads to drip emitters. Kits usually contain adapters, emitters, and connectors. These kits fit directly into existing sprinkler lines. They help create a steady, slow flow of water to plants. Using a conversion kit simplifies the switch from spray to drip irrigation.
Pressure Regulators
Pressure regulators control water pressure in drip systems. Sprinklers work at higher pressure, but drip lines need lower pressure. Regulators prevent damage to delicate drip tubing and emitters. Installing a pressure regulator keeps water flow steady and safe. This tool ensures drip irrigation performs well without leaks or bursts.
Tubing And Fittings
Tubing carries water from the main line to plants in drip irrigation. Flexible drip tubing comes in various lengths and diameters. Fittings connect tubing pieces and allow changes in direction or branching. Common fittings include tees, elbows, and couplers. Choosing quality tubing and fittings creates a reliable drip network. Proper connections prevent leaks and water waste.
Preparing The Sprinkler System
Preparing the sprinkler system is the first step to convert it into a drip system. This process helps ensure a smooth transition and prevents damage to your irrigation setup. It involves stopping the water flow, clearing the pipes, and handling existing sprinkler heads properly. These actions set a clean and ready base for your new drip lines.
Turn Off Water Supply
Start by shutting off the main water supply to your sprinkler system. This prevents water from flowing while you work on the pipes. Locate the water valve, usually near the irrigation timer or main water source, and close it completely. Double-check that no water is coming out of the sprinkler heads.
Flush The Lines
Next, flush out any dirt or debris inside the sprinkler pipes. Open the system briefly to let water flow and clean the lines. This step prevents clogs in your new drip system. After flushing, turn the water off again before removing or capping any sprinkler heads.
Remove Or Cap Sprinkler Heads
Remove the sprinkler heads in the area you want to convert to drip irrigation. Unscrew them carefully to avoid damaging the pipes. For sprinkler heads you don’t remove, place caps on the fittings to seal them. Use Teflon tape on the threads for a tight seal and to avoid leaks.
Installing Drip Components
Installing drip components is the key step in converting a sprinkler system. This process changes your irrigation from spray to drip, saving water and targeting plants better. Proper installation ensures your drip system works efficiently and lasts longer. Follow clear steps to attach adapters, lay tubing, and install emitters.
Attach Adapters To Existing Pipes
Start by turning off the water supply. Remove the sprinkler heads from the pipes. Attach the correct adapters to the existing pipes. These adapters connect the drip tubing to the old sprinkler lines. Use Teflon tape on the threads for a tight seal. Check that adapters fit snugly and do not leak.
Lay Drip Tubing
Unroll the drip tubing along the garden beds or plant rows. Cut the tubing to fit the area you want to water. Place the tubing close to the plant roots for best results. Use stakes to secure the tubing in place. Avoid sharp bends or kinks to keep water flowing freely.
Install Emitters And Connectors
Poke small holes in the tubing where plants need water. Insert emitters into these holes to release water slowly. Add connectors to link different tubing sections if needed. Check that emitters and connectors are tight and secure. Test the system by turning on water and adjusting emitters for even flow.
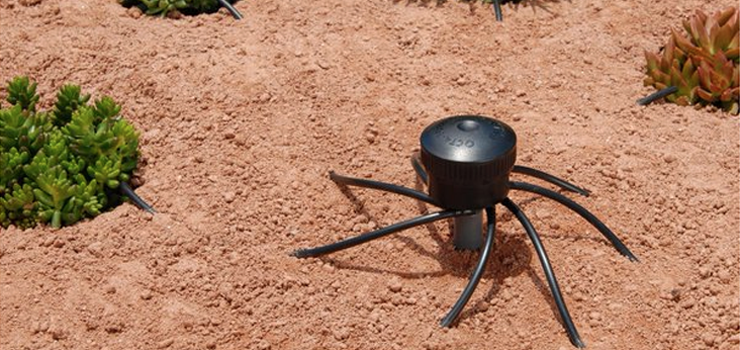
Credit: help.dripdepot.com
Adjusting Water Pressure
Adjusting water pressure is a crucial step when converting a sprinkler system to a drip system. Drip irrigation requires lower water pressure to work efficiently. Too much pressure can damage the drip emitters or cause uneven watering. Proper pressure adjustment ensures each plant gets the right amount of water without waste.
Use Pressure Regulators
Pressure regulators help control water flow to the drip system. They lower the pressure from the main line to a safe level for drip emitters. Install a pressure regulator at the start of your drip line. Choose one that matches your system’s recommended pressure range, usually between 20 and 30 PSI. This prevents damage and helps the system run smoothly.
Test Flow Rate
Testing the flow rate shows how much water the drip system delivers. Open the water and check how fast water flows from each emitter. Use a small container to catch water for 30 seconds, then measure the amount. This helps verify if your pressure is correct. Adjust the regulator or valves until the flow matches your plants’ needs.
Prevent Overwatering
Overwatering wastes water and harms plants. Adjusting pressure correctly helps avoid this problem. If the pressure is too high, emitters deliver too much water fast. Keep pressure steady and low for slow, steady watering. Use timers and check soil moisture regularly to ensure plants get just enough water.
Testing And Troubleshooting
Testing and troubleshooting are vital steps after converting your sprinkler system to a drip system. These steps ensure the system works efficiently and your plants receive the right amount of water. Carefully checking the system helps avoid water waste and plant stress. Follow these simple steps to spot problems early and fix them quickly.
Check For Leaks
Start by turning on the water and watching the entire drip system. Look closely at all connections, fittings, and tubing for any water escaping. Even small leaks can reduce water pressure and cause uneven watering. Tighten any loose parts and replace damaged tubing to stop leaks. Use your hand or a dry cloth to feel for wet spots along the lines.
Ensure Even Water Distribution
Observe how water flows from each emitter or drip line. Water should flow steadily and evenly from all points. Uneven flow means some plants get too much or too little water. Check for clogs or blockages in emitters and flush the system if needed. Adjust emitter placement to cover all plants well. A balanced system helps plants grow healthy and strong.
Fix Common Issues
Common problems include low water pressure, clogged emitters, and broken tubing. Low pressure may need a pressure regulator adjustment or cleaning of filters. Clear clogged emitters by soaking them in vinegar or replacing them. Repair damaged tubing using connectors or replace sections as necessary. Regular maintenance keeps your drip system working smoothly and saves water.
Maintenance Tips
Maintaining a drip irrigation system after converting from a sprinkler is crucial. Regular upkeep ensures water flows evenly and plants stay healthy. Simple steps help avoid clogs and system failures. Follow these maintenance tips to keep your drip system working well year-round.
Regular Cleaning
Clean filters and emitters often. Dirt and debris can block water flow. Remove filters and rinse them with clean water. Soak clogged emitters in vinegar to dissolve mineral buildup. Clear tubing by flushing water through it regularly. This prevents blockages and keeps water pressure steady.
Seasonal Adjustments
Adjust watering schedules with the seasons. Plants need less water in cooler months. Reduce watering time or frequency in fall and winter. Increase watering during hot, dry months. Check for leaks or damaged parts after winter. Replace worn components to prepare for the growing season.
Monitor System Performance
Watch your plants and soil moisture closely. Uneven watering shows system problems. Check each emitter to ensure water flows well. Look for dry spots or puddles. Fix or replace faulty parts immediately. Keep an eye on water pressure for consistent delivery. Regular checks help spot issues early and save water.
Cost And Time Considerations
Switching from a sprinkler system to a drip irrigation system saves water and targets plants directly. Understanding the cost and time factors helps plan the project effectively. Knowing what materials you need and how long the installation takes prevents surprises. Deciding between doing it yourself or hiring a pro impacts both budget and time.
Budgeting For Materials
Materials for drip systems include tubing, emitters, filters, and connectors. Prices vary based on garden size and system complexity. Simple kits cost less, while custom setups raise expenses. Quality parts last longer and reduce maintenance costs. Plan for extra pieces to replace or extend the system later.
Diy Vs Professional Help
Doing the installation yourself saves money on labor. Basic conversions need only simple tools and some time. Professionals provide faster, precise setups and fix problems quickly. Hiring experts costs more but guarantees proper function. Consider your skill level and schedule when choosing.
Estimated Installation Time
Small systems take a few hours to install. Medium-sized gardens may require a full day. Large or complex zones can take several days. Time depends on removing sprinklers, laying drip lines, and testing the system. Allow extra time for learning or troubleshooting during the process.

Credit: www.youtube.com
Frequently Asked Questions
Can I Convert A Sprinkler Head To A Drip Line?
Yes, you can convert a sprinkler head to a drip line using a drip conversion kit. Remove the sprinkler head, install a pressure regulator, and attach the drip line. Cap unused heads and flush the system before installation for optimal performance.
Can I Turn A Sprinkler Head Into A Dripper Zone?
Yes, you can turn a sprinkler head into a dripper zone by removing the sprinkler head and installing a drip conversion kit. Use a pressure regulator and cap unused heads for efficient drip irrigation. Flush the line before installation to clear debris.
Can You Add A Drip Line To An Existing Sprinkler System?
Yes, you can add a drip line to an existing sprinkler system by capping some heads and installing drip adapters on others. Flush the line first, then attach pressure regulators for efficient drip irrigation.
How To Change Pop-up Sprinkler To Drip?
Turn off water and flush the line. Remove sprinkler heads and cap unused ones. Install a pressure regulator and drip conversion kit. Connect drip lines to existing pipes. Test for leaks and adjust flow for efficient watering.
Conclusion
Converting your sprinkler system to a drip system saves water and time. Drip irrigation delivers water directly to plant roots. It reduces evaporation and runoff. Follow the steps carefully for a smooth change. Use proper parts like pressure regulators for best results.
Regular maintenance keeps your drip system working well. Enjoy healthier plants with efficient watering. This simple upgrade benefits your garden and the environment. Start your conversion today and see the difference.