Restoring Beauty: How To Restain Outdoor Wood Furniture
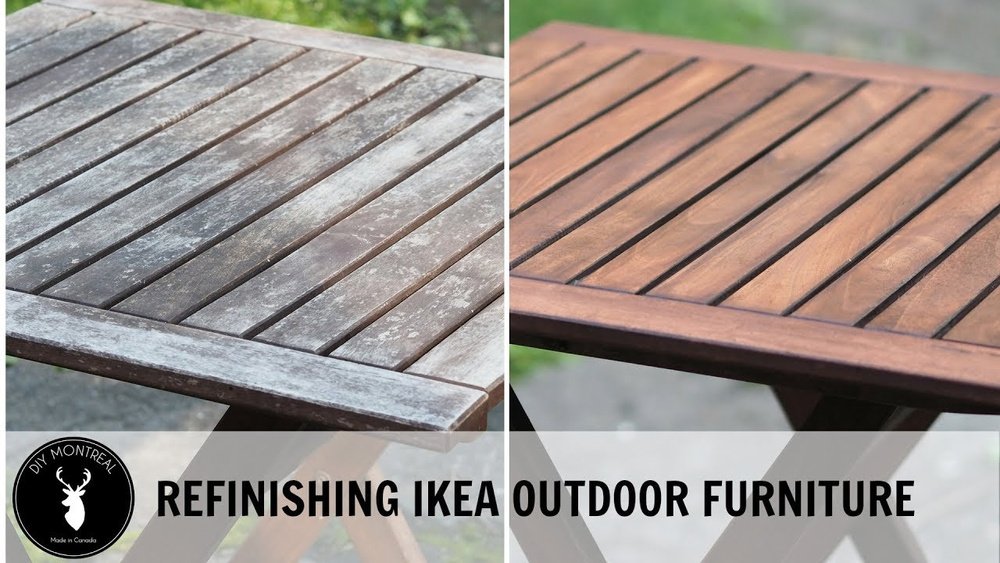
Outdoor wood furniture adds charm and comfort to gardens, patios, and decks. But sun, rain, humidity, and daily use slowly fade the color and damage the surface. After a few years, the wood can look dull or even gray, and stains may peel or crack.
Restaining is one of the most effective ways to bring back the natural beauty and protect your furniture for years. Whether you want to refresh a favorite bench or restore a weathered table, this guide will help you do it right.
You do not need to be a professional to restain outdoor wood furniture. With patience, careful steps, and the right materials, almost anyone can achieve results that look impressive and last. This article will walk you through each stage, from choosing the best stain to applying it properly.
Along the way, you’ll find practical tips, data, and real-life examples to ensure your project succeeds.
Why Restaining Matters
Outdoor wood furniture faces harsh weather every day. Sunlight breaks down the wood fibers and fades color. Moisture causes swelling, cracks, and rot. If you ignore these problems, the furniture will soon look old, and may even become unsafe to use.
Restaining does more than make furniture look good. It protects the wood from UV rays, moisture, and mold. A fresh stain acts as a shield, blocking water and preventing color loss. According to the Forest Products Laboratory, outdoor wood that is regularly stained can last up to twice as long as untreated wood.
Key benefits:
- Extends the life of your furniture
- Prevents splinters, cracks, and decay
- Restores color and wood grain
- Makes cleaning easier
Many homeowners underestimate the value of routine maintenance. Regular restaining is a small investment compared to replacing damaged furniture.
Choosing The Right Stain For Outdoor Wood
Selecting the right stain is essential. Outdoor wood needs a stain that can handle sun, rain, and changing temperatures. There are three main types:
| Stain Type | Protection Level | Appearance | Best Use |
|---|---|---|---|
| Transparent | Low | Shows natural wood | New, high-quality wood |
| Semi-transparent | Moderate | Shows grain, adds color | Weathered, lightly damaged wood |
| Solid | High | Hides grain, strong color | Old, damaged wood |
Transparent stains let the wood’s natural beauty shine, but provide less protection. Semi-transparent stains are a balanced choice, highlighting the grain while guarding against weather. Solid stains cover imperfections and offer maximum defense.
Oil-based Vs Water-based Stains
Oil-based stains penetrate deeper into wood, offering stronger moisture protection and longer-lasting color. Water-based stains dry faster, emit fewer fumes, and are easier to clean up. Both have pros and cons:
| Type | Dry Time | Durability | Cleanup |
|---|---|---|---|
| Oil-Based | 24–48 hours | 3–5 years | Solvent needed |
| Water-Based | 4–6 hours | 2–3 years | Soap & water |
For humid climates, oil-based stains are often preferred. If you have children or pets, water-based options are safer and quicker.
Non-obvious Insight
Many people focus only on color. But UV protection is crucial for outdoor furniture. Look for stains with UV blockers—these help prevent fading and keep your furniture looking new longer.
Preparing Outdoor Wood Furniture For Restaining
Preparation is the foundation of a successful restaining job. Skipping these steps leads to poor results, even if you use the best stain. You’ll need to clean, repair, and sand the wood.
Cleaning The Furniture
Outdoor furniture collects dirt, mold, and old stain. Start by brushing off loose debris. Next, wash the wood with a mixture of water and mild detergent. For stubborn stains or mildew, use a wood cleaner or a diluted bleach solution (1 cup bleach to 1 gallon water).
- Rinse thoroughly with a garden hose.
- Let the furniture dry for at least 24 hours.
Practical Tip: If the wood is heavily stained or painted, consider using a chemical stripper. Always follow safety instructions and wear gloves.
Repairing Damage
Inspect your furniture for cracks, loose screws, or rotten spots. Replace broken parts and tighten hardware. Fill small cracks with wood filler that is suitable for outdoor use. Let the filler dry completely.
Non-Obvious Insight: Pay attention to the bottom of legs and joints—these areas often rot first. Elevate furniture during cleaning and restaining to access these spots.
Sanding The Surface
Sanding removes old stain and smooths the wood. Use medium-grit sandpaper (80–120 grit) for rough areas, then finish with fine-grit (150–180 grit). Sand in the direction of the grain.
- Wipe away dust with a damp cloth.
- Let the wood dry before staining.
If your furniture has detailed carvings or tight corners, use a sanding sponge or small tool.
Essential Tools And Materials
Before you start, gather everything you need. The right tools make the process easier and safer.
You’ll need:
- Stain (oil-based or water-based)
- Paintbrushes (synthetic for water-based, natural for oil-based)
- Rags or foam applicators
- Sandpaper (80–180 grit)
- Wood cleaner or mild detergent
- Drop cloths or plastic sheeting
- Gloves and eye protection
- Stir stick (for mixing stain)
- Wood filler (for repairs)
- Screwdriver or hammer (for hardware)
- Mask (if sanding or using chemical strippers)
Budget Tip: You don’t need expensive tools. Quality sandpaper and a good brush are most important.
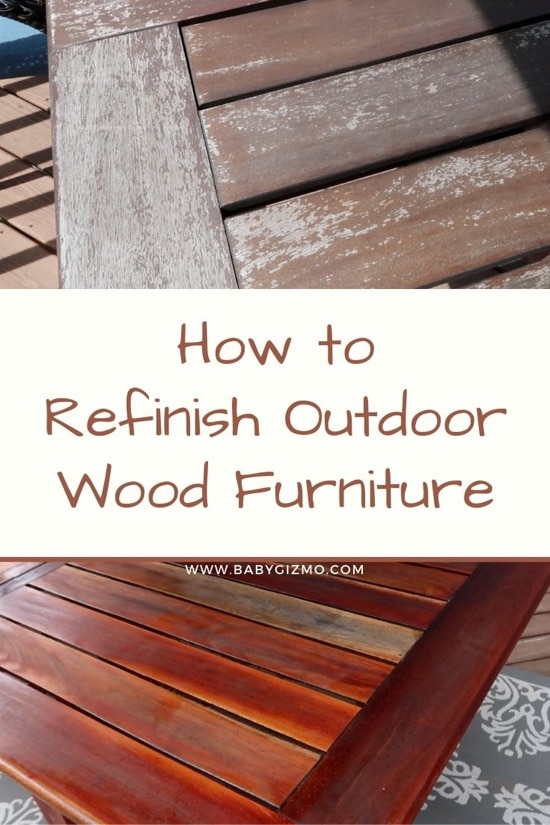
Credit: babygizmo.com
Step-by-step Guide: How To Restain Outdoor Wood Furniture
With your materials ready and wood prepared, you can begin the staining process. Follow these steps for the best results.
1. Set Up Your Workspace
Choose a dry, well-ventilated area. Avoid staining on windy days—dust can stick to wet stain. Lay drop cloths under the furniture to protect surfaces.
Safety Tip: If working indoors, open windows and wear a mask.
2. Apply The Stain
Stir the stain thoroughly. Dip your brush or applicator in the stain and wipe off excess. Apply a thin, even coat in the direction of the wood grain.
- Start with less stain—add more if needed.
- Work in small sections.
Non-Obvious Insight: Don’t rush. Applying the stain slowly helps avoid streaks and blotches.
3. Remove Excess Stain
Wait 5–15 minutes, depending on the product instructions. Wipe off excess stain with a clean rag. This step prevents sticky surfaces and uneven color.
If you want a deeper color, wait for the first coat to dry (usually 4–6 hours for water-based, 24 hours for oil-based), then apply a second coat.
4. Let The Stain Dry
Place the furniture in a dust-free area. Drying times vary:
- Water-based: 4–6 hours between coats, fully dry in 24 hours
- Oil-based: 24 hours between coats, fully dry in 48 hours
Avoid touching the wood or placing objects on it until fully dry.
5. Apply A Protective Finish (optional)
Some stains include sealers. If not, consider adding a clear outdoor polyurethane or spar varnish. This adds extra protection against sun and rain.
- Apply with a brush, following the grain.
- Let dry for 24–48 hours.
Practical Tip: For furniture exposed to extreme weather, reapply the finish every year.
Common Mistakes To Avoid
Even experienced DIYers can make mistakes. Here are some to watch for:
- Skipping cleaning or sanding: Stain won’t stick to dirty or rough surfaces.
- Using indoor stains outdoors: These fade quickly and don’t protect against moisture.
- Applying thick coats: Thick layers dry poorly and may peel.
- Ignoring drying time: Touching wet stain leaves fingerprints and ruins the finish.
- Not removing old hardware: Metal parts can trap moisture and rust.
Non-Obvious Insight: Many people forget to check the weather. Staining in high humidity or rain can ruin the finish. Always stain on dry, mild days.
How Often Should You Restain?
How often you need to restain depends on climate, wood type, and exposure. Most outdoor furniture should be restained every 2–3 years. In harsh climates (lots of sun or rain), yearly maintenance may be needed.
Signs it’s time to restain:
- Faded or uneven color
- Water no longer beads on the surface
- Visible cracks or peeling
- Rough texture
Regular inspection saves time and money. If you spot damage early, repairs are easier.
Data: Outdoor Wood Furniture Longevity
To show the impact of restaining, here’s a comparison:
| Maintenance | Average Lifespan | Appearance |
|---|---|---|
| No treatment | 3–5 years | Gray, cracked |
| Stained every 3 years | 8–12 years | Rich color, smooth |
| Stained yearly + sealed | 15+ years | Like new |
Proper care can more than triple the lifespan of your furniture. This is especially important for expensive or heirloom pieces.
Practical Tips For Better Results
Some extra tips can help you get the most out of your work:
- Test stain on a hidden area before applying to all surfaces. This shows how the color looks on your wood.
- If staining in direct sunlight, the stain may dry too fast. Try to work in shade or move furniture indoors.
- Use a small brush for joints and corners. Foam brushes are good for flat surfaces.
- Wear old clothes and gloves—the stain is hard to remove from skin.
- Keep pets and kids away until the stain is dry.
Non-Obvious Insight: For teak or cedar furniture, avoid stains with high pigment. These woods have natural oils and colors, so lighter stains or oil treatments work best.
Eco-friendly Staining Choices
Staining can be eco-friendly. Water-based stains release fewer chemicals and clean up easily. Some brands use renewable materials or recycled packaging. Look for stains with low VOC (volatile organic compounds) labels.
Disposing of leftover stain and rags is important. Never pour stain down the drain. Let rags dry completely before throwing away—they can catch fire if left wet.
Real-life Example: Restaining A Patio Bench
Let’s walk through a real-life example. Jane had a cedar patio bench that turned gray after five years outside. She followed these steps:
- Cleaned with water and detergent, scrubbed off mildew.
- Fixed a loose leg and filled small cracks.
- Sanded the surface with 120-grit, then 180-grit sandpaper.
- Tested semi-transparent stain on the underside.
- Applied the stain with a brush, wiped off excess.
- Let dry for 24 hours.
- Added a clear polyurethane finish.
The bench looked almost new, with a warm color and smooth surface. Jane’s project cost under $40, compared to $300 for a new bench.
Comparing Popular Stain Brands
Choosing a stain can be confusing. Here’s a comparison of three leading brands:
| Brand | Type | Durability | Price per Quart | Eco-Friendly |
|---|---|---|---|---|
| Minwax | Oil-Based | 3–5 years | $12 | No |
| Behr | Water-Based | 2–3 years | $15 | Yes |
| Cabot | Semi-Transparent | 4–6 years | $18 | Some options |
Tip: Always check reviews and test on your wood before buying large quantities.

Credit: www.artsychicksrule.com
Addressing Challenges With Older Furniture
Older furniture often has extra challenges. Wood may be soft, cracked, or warped. In these cases:
- Use a solid stain to cover imperfections.
- Sand gently to avoid removing too much wood.
- Repair joints with outdoor wood glue.
If the wood is badly damaged, consider replacing parts or consulting a professional. Sometimes, restoring is not possible, but staining can still improve appearance and extend life.
Protecting Furniture After Restaining
After staining, keep your furniture looking good:
- Cover furniture during heavy rain or snow.
- Clean spills quickly—food and drink can damage the stain.
- Reapply protective finish every 1–2 years.
- Store smaller pieces indoors during winter.
A small amount of maintenance each season prevents big repairs later.

Credit: www.thriftydecorchick.com
Costs And Time Estimates
Restaining is affordable and can fit most budgets. Here are typical costs:
- Stain: $12–$20 per quart (covers 120–150 sq. Ft.)
- Sandpaper: $4–$8
- Brushes: $5–$10
- Cleaner: $6–$12
Total: $27–$50 for one bench or chair.
Time estimate:
- Cleaning: 1 hour
- Repairs: 1 hour
- Sanding: 1–2 hours
- Staining: 1 hour
- Drying: 24–48 hours (not active work)
Plan for a weekend project. Staining larger sets takes more time, but the steps are the same.
When To Call A Professional
If your furniture is antique, very large, or has severe damage, consider hiring a professional. Experts can:
- Match original colors and finishes
- Repair complex joints
- Apply industrial-grade stains
Professionals charge $75–$200 per piece. For high-value items, this is a smart investment.
External Resource
For more in-depth advice on outdoor wood care and stain types, see the Bob Vila Guide.
Frequently Asked Questions
What’s The Difference Between Indoor And Outdoor Wood Stains?
Indoor stains are made for dry conditions and do not protect against sun or rain. Outdoor stains contain UV blockers and water-resistant chemicals. Using indoor stain outside leads to fading and damage.
How Long Should I Wait Before Using Furniture After Staining?
Wait at least 24–48 hours after the final coat is dry. For oil-based stains, longer is better. Using furniture too soon can leave marks or damage the finish.
Can I Stain Over Old Stain?
You can if the old stain is not peeling or damaged. Clean and sand the surface, then test the new stain on a small area. If the old stain is thick or cracked, remove it first.
Is Sanding Always Necessary?
Sanding ensures the surface is smooth and ready to absorb stain. You may skip sanding if the wood is already in good shape, but rough or dirty surfaces must be sanded.
What If My Furniture Has Mold Or Mildew?
Clean with a mild bleach solution and let dry completely. Moldy wood needs extra care—remove all visible mold before staining. If mold returns, check for leaks or poor drainage.
Restaining outdoor wood furniture is a rewarding project that restores beauty and protects your investment. With careful preparation, the right stain, and regular maintenance, your furniture can look great and last for many years.