
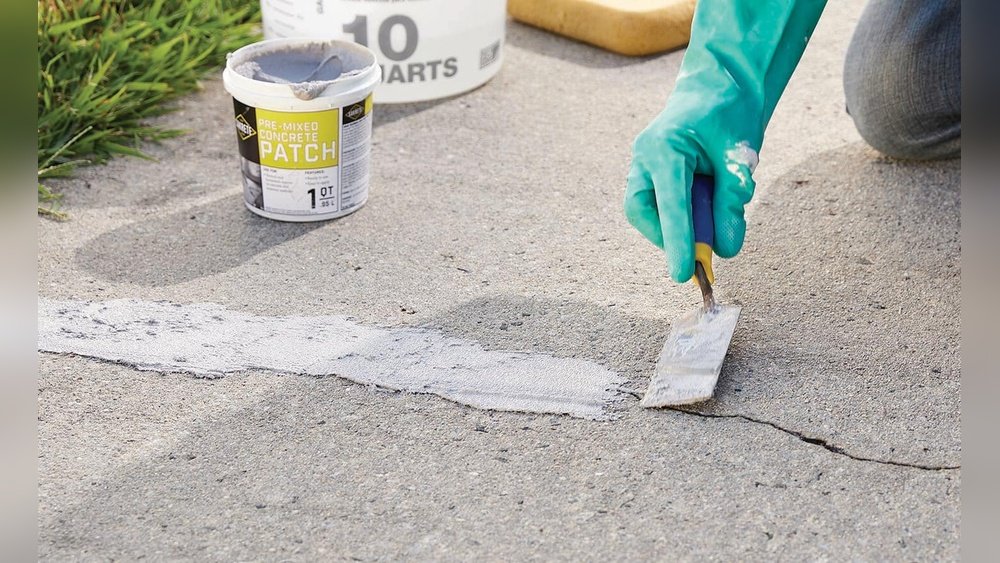
Cracks in a concrete patio can be more than just an eyesore. Over time, these splits can get worse, letting water in, weakening the surface, or even causing safety hazards. Many homeowners see a crack and feel frustrated, but the good news is most cracks can be repaired without professional help—and your patio can look almost as good as new. If you understand what causes these cracks and know the right steps, you can fix them efficiently and even prevent future problems.
This guide will walk you through everything you need to know to repair cracks in your concrete patio. From understanding why cracks form, to selecting the best materials, to step-by-step repair techniques, you’ll find practical tips and real-world advice. Even if you’re not a DIY expert, you’ll learn how to tackle cracks with confidence, and when it’s better to call in a professional.
Let’s turn that cracked patio into a safe, sturdy, and good-looking space once again.
Why Do Concrete Patios Crack?
Before you fix cracks, it helps to know what causes them. Concrete is strong, but it’s not flexible. When the ground moves, temperatures change, or water seeps in, the surface can break apart. Here are the main reasons cracks appear in patios:
- Shrinkage – As fresh concrete dries, it shrinks. If it dries too quickly or unevenly, cracks can form.
- Ground Movement – Soil under the patio can settle or shift, especially after heavy rain or drought, leading to cracks.
- Freeze-Thaw Cycles – In cold climates, water seeps into small gaps, freezes, and expands, pushing concrete apart.
- Heavy Loads – Furniture, vehicles, or even tree roots can stress the slab and cause splits.
- Poor Installation – If concrete is not mixed, poured, or cured properly, it’s more likely to crack.
- Lack of Control Joints – Control joints are lines cut into concrete to help control where cracks happen. Without them, cracks can appear randomly.
Understanding these causes is important. If you only patch cracks without fixing the underlying problem, new ones will likely appear.
Types Of Cracks: How To Identify And Prioritize
Not all cracks are the same. Some are harmless, while others need quick attention. Knowing the difference will help you plan your repair.
Common Crack Types
- Hairline Cracks: Very thin, less than 1/16 inch wide. Often caused by shrinkage. Usually cosmetic, but can get worse if ignored.
- Wide Cracks: Larger than 1/8 inch. May signal ground movement or heavy load issues.
- Deep Cracks: Go through most of the slab. More serious, may require structural repair.
- Spider Web or Crazing: Thin, surface-level cracks forming a network. Usually from drying too fast, mostly cosmetic.
- Edge Cracks: Along the edges, can be a sign of weak support or erosion underneath.
When To Repair
- Repair immediately if cracks are wider than 1/8 inch, growing, or letting in water.
- Monitor hairline cracks, but fix them if they collect dirt or water, or if you want to improve appearance.
- Consult a professional if you see uneven surfaces, wide/deep cracks with vertical displacement, or cracks linked to foundation problems.
Tools And Materials: What You’ll Need
Having the right supplies makes the job easier and ensures a lasting repair. Here’s what you’ll likely need for most concrete patio crack repairs:
Basic Tools
- Wire brush: For cleaning out cracks.
- Chisel and hammer: To widen and shape cracks if needed.
- Shop vacuum or blower: Removes dust and debris.
- Putty knife or trowel: For applying patch material.
- Caulking gun: If using tube sealants.
Materials
- Concrete patch or resurfacer: For filling cracks and smoothing surfaces.
- Concrete caulk or sealant: For flexible, waterproof sealing.
- Epoxy or polyurethane injection kit: For deep or structural cracks.
- Backer rod: Foam rod for filling deep cracks before sealing.
- Waterproofing sealer: To protect the surface after repair.
Safety Gear
- Gloves
- Safety glasses
- Dust mask
Choosing the right material depends on crack size, depth, and whether you want a flexible or rigid repair.
Table: Crack Types Vs. Recommended Repair Materials
Here’s a quick reference for which repair method works best for each type of crack:
| Crack Type | Width/Depth | Recommended Repair Material | Notes |
|---|---|---|---|
| Hairline Crack | <1/16 inch | Concrete patch/caulk | Mostly cosmetic; seal to prevent water entry |
| Wide Crack | >1/8 inch | Epoxy/polyurethane or patch | May need backer rod for depth |
| Deep Crack | Full-depth | Epoxy injection kit | Consider structural assessment |
| Spider Web/Crazing | Surface only | Resurfacer | Improves appearance |
| Edge Crack | Varies | Patch or caulk | Check for erosion or weak support |
Step-by-step Repair: Fixing Small And Hairline Cracks
Repairing small cracks is something most homeowners can do in a day with simple tools. Here’s how to get the best results:
1. Clean The Crack
Dirt, debris, and loose concrete prevent repairs from sticking. Use a wire brush to scrub inside the crack, then a vacuum or blower to remove dust. For outdoor patios, a hose can help, but let the area dry completely before moving on.
2. Widen And Deepen (if Needed)
For better adhesion, widen hairline cracks slightly with a chisel and hammer. Aim for a “V” shape—wider at the top, narrower at the bottom. This shape holds patch material better.
3. Apply Concrete Patch Or Caulk
For cracks less than 1/4 inch wide, use concrete caulk. Squeeze a bead into the crack, smoothing with a putty knife.
For cracks up to 1/2 inch wide, a premixed concrete patch works well. Push it deep into the crack, then level with a trowel.
4. Smooth And Blend
Wipe away excess with a damp sponge. Try to match the texture of the surrounding patio. Some products dry quickly, so work in small sections.
5. Allow To Cure
Let the patch cure as instructed (often 24 hours). Keep pets and foot traffic away. Cover with plastic if rain is expected.
6. Seal The Surface
Once fully dry, use a concrete sealer to protect the repair from water and stains.
Non-obvious Tip
Don’t ignore tiny cracks—even hairline splits let water in. Sealing them early prevents bigger problems later.
Fixing Wide Or Deep Cracks: Advanced Techniques
Wider or deeper cracks need extra care. If you skip steps, the repair won’t last. Here’s how to tackle these tougher jobs:
1. Assess The Crack
Measure width and depth. For cracks deeper than 1/2 inch, use a backer rod before patching. This saves material and gives a flexible base.
2. Prepare The Crack
Clean thoroughly. Remove any crumbling concrete with a chisel. If the crack moves, check for underlying soil issues first.
3. Install Backer Rod (if Needed)
Push a foam backer rod into the crack, about 1/4 inch below the surface. This creates a base for the patch or sealant.
4. Choose Your Repair Material
- Epoxy or polyurethane injection: Best for deep, structural cracks. These flow into the crack and harden, bonding the slab.
- Polymer-modified concrete patch: Good for wide but not deep cracks.
5. Apply The Repair
Follow product directions exactly. Epoxy kits often come with special applicators. For wide cracks, work in layers, letting each cure.
6. Finish And Seal
Smooth the surface and let it cure. Always seal after repair to block water and chemicals.
Non-obvious Tip
If cracks reappear quickly, it could mean bigger problems under the slab. Address drainage or soil issues before repeating repairs.
Table: Pros And Cons Of Diy Vs. Professional Repair
Some repairs can be done yourself, while others are better left to experts. Here’s a side-by-side look:
| Option | Pros | Cons | Best For |
|---|---|---|---|
| DIY Repair | Cost-effective Immediate results Satisfying for small jobs |
May miss underlying issues Shorter-lasting for deep cracks |
Hairline, small surface cracks |
| Professional Repair | Long-lasting Expert diagnosis Handles deep/structural cracks |
Higher cost May require scheduling |
Wide, deep, or recurring cracks |
Resurfacing: When Cracks Are Widespread
If your patio has many small cracks, it may be easier and better-looking to resurface the whole area. Resurfacing covers old concrete with a thin, new layer.
Steps To Resurface
- Clean and Repair: Clean the patio and fix large cracks as described above.
- Mix Resurfacer: Use a bagged concrete resurfacer and mix with water.
- Apply: Pour on the surface and spread with a squeegee or trowel.
- Texture: Use a broom or brush for a slip-resistant finish.
- Cure: Let dry as directed, usually a day or two.
Resurfacing makes old patios look new and can hide spider web cracks or minor pitting.
Example
A homeowner in Ohio had a 20-year-old patio with dozens of tiny cracks. After patching the worst spots and resurfacing, the patio looked brand new—and was ready for outdoor entertaining.
:max_bytes(150000):strip_icc()/Concretepatio-GettyImages-530405037-2212685ea29747389c74ed034a4a6e04.jpg)
Credit: www.thespruce.com
Preventing Future Cracks
Fixing cracks is important, but preventing new ones saves time and money. Here are practical ways to protect your patio:
- Control Water: Make sure water drains away from your patio. Add gutters or French drains if needed.
- Seal Regularly: Apply a concrete sealer every 2–3 years to block water and stains.
- Avoid Heavy Loads: Don’t park vehicles or place hot tubs on patios not designed for heavy weight.
- Add Control Joints: If resurfacing, have joints cut or marked to control where cracks form.
- Fix Soil Issues: Stabilize soft or loose soil before pouring or repairing concrete.
- Remove Tree Roots: Roots can lift and break concrete. Consider root barriers or removing problem trees.
Non-obvious Tip
Don’t use de-icing salts on your patio in winter. They can force water into cracks and make them worse.
Common Mistakes To Avoid
Even with good intentions, some errors can ruin a repair. Here’s what to watch for:
- Skipping cleaning: Dirt prevents patch material from bonding.
- Filling cracks when wet: Moisture weakens most repairs.
- Using the wrong material: Not all products are for outdoor or large cracks.
- Ignoring movement: If the ground keeps moving, cracks will return.
- Not sealing after repair: Unsealed repairs let in water and chemicals, reducing lifespan.
Learning from others’ mistakes can save you from repeating them.

Credit: www.youtube.com
Real-world Example: Step-by-step Hairline Crack Repair
Let’s walk through a real example. Suppose you notice several thin cracks on your patio after winter. Here’s how to fix them:
- Gather Materials: Wire brush, vacuum, concrete caulk, putty knife, gloves.
- Clean Cracks: Scrub with wire brush, vacuum out dust.
- Widen Slightly: Use a screwdriver to gently open the crack if very narrow.
- Apply Caulk: Squeeze concrete caulk into the crack, filling completely.
- Smooth Surface: Run putty knife over caulk, wipe extra with damp cloth.
- Let Dry: Keep dry for at least 24 hours.
- Seal Area: After curing, apply concrete sealer to the whole patio.
This simple process can make your patio look better and last longer.
How Weather Affects Concrete Cracks
Concrete reacts to temperature and weather. Extreme heat, cold, or moisture can stress the surface. Here’s how to work with the weather:
- Best time to repair: Mild temperatures (50–80°F) are ideal. Too hot or cold affects curing.
- Avoid rain: Moisture during repair weakens the bond.
- Sun protection: Shade large areas when resurfacing to prevent cracking as it dries.
Table: Weather Effects On Concrete Repairs
| Weather Condition | Effect on Repair | Precaution |
|---|---|---|
| Rain | Prevents bonding, washes out repair | Wait for dry weather, cover repairs |
| High Heat (>90°F) | Dries too fast, cracks may form | Work in morning/evening, shade repair |
| Cold (<40°F) | Slow curing, weak repair | Use cold-weather products, wait for warmth |
| Humidity | Affects drying time | Adjust curing time as needed |
Choosing The Right Repair Product
There are many concrete repair products at hardware stores. Here’s how to pick the best one for your patio:
- Outdoor use: Make sure the product is for exterior concrete.
- Flexible vs. rigid: Caulks and sealants are flexible, good for moving cracks. Rigid patches are better for static cracks.
- Fast-setting vs. slow-setting: If you need a quick fix, choose fast-setting. For durability, slow-setting often lasts longer.
- Color match: Some patches can be tinted. Others dry gray or white. Test on a small spot if appearance matters.
Reading reviews or asking at the hardware store can help you avoid low-quality products. The Home Depot website has a helpful guide comparing common repair materials.

Credit: www.brickform.com
Safety Tips For Diy Concrete Repair
Working with concrete isn’t dangerous, but you should still protect yourself.
- Wear gloves: Concrete can irritate skin.
- Use eye protection: Chips or dust can fly up when chiseling.
- Wear a mask: Dust is common when cleaning or mixing.
- Ventilate: If using strong sealers, work outside or keep air moving.
Following these tips will help you stay safe and comfortable.
When To Call A Professional
DIY repairs are fine for small cracks, but you should call a pro if:
- Cracks are wider than 1/2 inch or deep through the slab.
- The patio has sunken, shifted, or become uneven.
- Cracks keep returning after repair.
- There’s water pooling or drainage problems.
Professionals can assess the soil, install piers, or even re-level the slab if needed. While this costs more, it prevents bigger issues later.
Frequently Asked Questions
What Causes Cracks To Keep Coming Back After Repair?
Most recurring cracks are due to ongoing movement beneath the patio—such as settling soil or expanding tree roots. If you only patch the surface but don’t address these issues, cracks will return. Ensuring good drainage and stable soil is key to lasting repairs.
How Long Do Concrete Crack Repairs Last?
A proper repair can last 5–10 years or more if you use quality materials, clean well, and seal the surface. High-traffic patios or those with ongoing movement may need touch-ups more often.
Can I Paint Over Repaired Cracks?
Yes, you can paint or stain your patio after repairs, but wait until all patch materials and sealers are fully cured. Use paint made for exterior concrete for best results.
Is It Safe To Walk On The Patio After Repair?
Wait at least 24 hours before walking on a repaired crack, and longer before placing heavy furniture. Always follow the product’s drying recommendations.
Should I Repair Cracks Myself Or Hire A Professional?
Fixing small cracks is usually a simple DIY job. For deep, wide, or structural cracks—or if you’re unsure of the cause—consult a professional. They can ensure the repair is both attractive and long-lasting.
Fixing cracks in your concrete patio might seem challenging, but with the right knowledge and materials, most homeowners can handle the job themselves. By understanding why cracks happen, choosing the right repair method, and taking steps to prevent future damage, you can keep your patio safe, strong, and looking great for years to come. If you ever feel unsure, don’t hesitate to get expert advice—it’s better to fix the root problem than to patch cracks again and again. Your patio is an important part of your home; a little care goes a long way.