Building a pergola attached to your house is a project that can transform your outdoor space. A well-built pergola adds beauty, shade, and function, creating an inviting spot for relaxation or entertainment. It also increases your home’s value and can make your backyard feel like an extension of your living room.
Many homeowners dream of a cozy area for family gatherings, summer barbecues, or simply a quiet place to enjoy a cup of coffee. An attached pergola is a practical way to achieve that dream, blending seamlessly with your home’s architecture.
But building a pergola isn’t just about screwing a few beams together. You need to consider design, materials, safety, and building codes. Even small mistakes can lead to structural problems, water leaks, or costly repairs. The good news? With the right planning and some careful work, most people with basic DIY skills can successfully build a pergola attached to their house.
This guide will walk you through every step, from the first sketch to the final coat of stain—while sharing practical tips and common pitfalls that many beginners miss.
Planning Your Attached Pergola
Before you buy any wood or pick up a hammer, planning is essential. Good planning prevents expensive mistakes and ensures your pergola fits your needs and home style.
Choosing The Right Location
The location of your pergola affects everything—shade, comfort, privacy, and even safety. Ask yourself:
- Where does the sun hit your house in the morning and afternoon?
- Do you want shade at certain times of day?
- Is there enough clearance from doors, windows, or utility lines?
- How will water drain off your roof and away from the pergola?
A north or east-facing wall offers soft morning sun, while west-facing walls get the hottest afternoon rays. If your backyard has overhead wires or underground pipes, always check their location first.
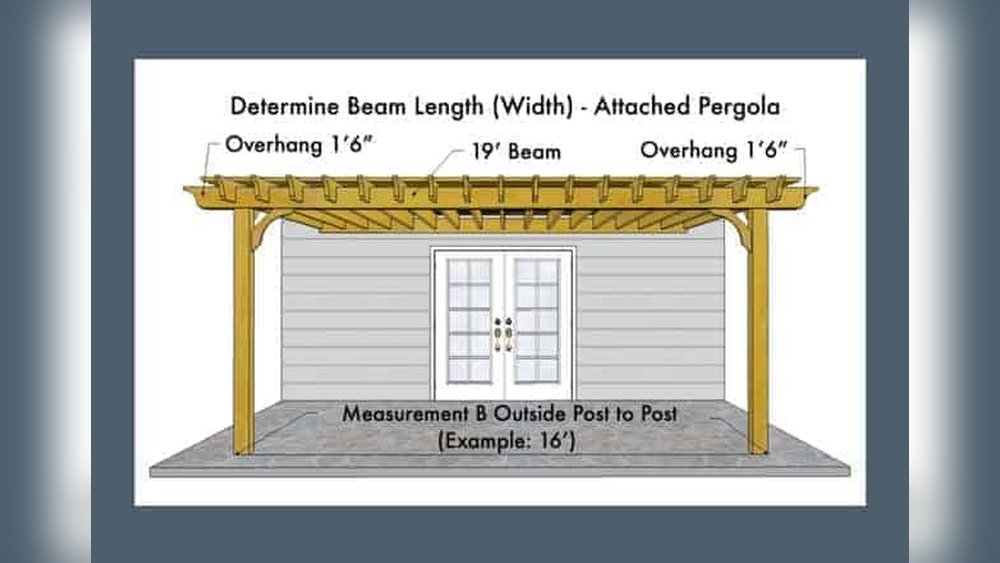
Defining Size And Shape
Standard pergolas are often 8×12, 10×12, or 12×16 feet, but your space may require a custom size. Measure carefully from your house outward. Leave enough space for walking around furniture or grills.
Height is just as important. Most pergolas are 8–10 feet tall. Check that doors can open fully and that the pergola roof won’t block windows or vents.
Style And Integration
Match your pergola style to your home. For example, a modern house looks best with clean lines and minimal trim, while a traditional home might suit decorative ends and lattice sides. Some homeowners add climbing plants, lights, or fabric panels for extra comfort and style.
Budgeting And Timeline
Costs can range from $1,500 for a small, basic wood pergola to over $6,000 for larger, custom designs with premium materials. Be realistic about your budget. Factor in:
- Lumber or metal costs
- Fasteners and hardware
- Concrete for footings
- Stain, sealer, or paint
- Tools rental or purchase
- Permit fees
A typical DIY build takes 2–4 weekends, depending on complexity and your experience.
Permits And Codes
Before you start, check local building codes and HOA rules. Most towns require a permit for attached pergolas because they’re connected to the house. You may need to submit plans or get inspections. Ignoring permits can lead to fines or forced removal.
Selecting Materials
Your choice of materials affects the pergola’s look, strength, maintenance, and lifespan. Think about your climate, budget, and how much time you want to spend on upkeep.
Wood Options
Pressure-treated pine is affordable and resists rot, but may warp or crack over time. Cedar and redwood are naturally resistant to decay and insects, with a warm color and pleasant scent. These cost more but last longer and need less chemical treatment. For a high-end look, ipe or other tropical hardwoods are extremely durable but expensive and hard to work with.
Metal Pergolas
Aluminum and steel pergolas are strong, modern-looking, and require less maintenance than wood. Aluminum is rustproof, while steel needs a protective coating. Metal kits are often easier to assemble but may not match traditional home styles.
Fasteners And Connectors
Always use galvanized or stainless steel hardware for outdoor projects. Regular nails and screws can rust, stain the wood, and weaken joints. Some pergola kits come with specialty brackets that make installation faster and more secure.
Roofing Materials
By default, pergolas have open rafters, but you can add a polycarbonate cover or retractable fabric for more shade and rain protection. Make sure any cover is rated for outdoor use and won’t trap heat or moisture against the house.
Comparison Of Popular Pergola Materials
| Material | Cost (per sq. ft.) | Maintenance | Lifespan | Appearance |
|---|---|---|---|---|
| Pressure-Treated Pine | $3-5 | High | 10-15 years | Rustic, can stain or paint |
| Cedar | $7-10 | Medium | 15-25 years | Natural, warm color |
| Redwood | $10-15 | Low | 20-30 years | Rich color, smooth grain |
| Aluminum | $8-12 | Low | 20+ years | Modern, sleek |
| Steel | $10-18 | Medium | 20+ years | Industrial, strong |
Tools And Materials Checklist
A successful pergola build starts with the right tools and materials. Gather everything before starting to avoid project delays.
Essential Tools
- Circular saw or miter saw
- Cordless drill and drill bits
- Tape measure and pencil
- Carpenter’s square
- Level (4-foot recommended)
- Ladder or scaffolding
- Post hole digger or auger
- Shovel
- Socket set or wrenches
- Hammer or mallet
- Safety glasses and gloves
Materials List (for A Typical 10×12 Ft Pergola)
- 2–4 pressure-treated 6×6 posts (support columns)
- Ledger board (2×8 or 2×10, length matches pergola width)
- 2×8 or 2×10 beams (for front and sides)
- 2×6 rafters (spacing 16–24 inches apart)
- Concrete mix (for footings)
- Galvanized post anchors or brackets
- Lag bolts and wood screws (galvanized or stainless)
- Joist hangers or specialty pergola brackets
- Stain, sealer, or paint
Tip: Buy 10–15% extra wood to allow for cutting mistakes, knots, or warping.
Measuring And Marking The Site
Accurate measuring and marking make construction smoother and the finished pergola look professional.
- Mark the Ledger Line: Using a level, mark a straight line on your house wall where the top of the pergola’s ledger board will attach. This should be at least 8 feet above the ground, or higher if you want more headroom.
- Layout Footing Holes: Measure out from the house to mark the location of your front support posts. Use stakes and string to create a rectangle that matches your pergola’s footprint. Double-check for square corners using the 3-4-5 triangle rule or a carpenter’s square.
- Check Spacing: Posts are usually set 8–12 feet apart for strength. Wider spans may require larger beams or extra support.
Non-obvious insight: Many beginners forget to check for underground utilities before digging post holes. Always call your local utility marking service first—hitting a gas or water line is dangerous and expensive.
Installing The Ledger Board
The ledger board anchors the pergola to your house. It must be strong and properly flashed to prevent leaks.
- Position the Ledger: Hold the ledger board on your marked line. Make sure it’s level.
- Pre-Drill Holes: Drill holes every 16–24 inches along the ledger, avoiding wall studs, wires, or pipes.
- Attach with Lag Bolts: Use lag bolts long enough to reach solid framing inside your wall (not just siding or brick veneer). Tighten securely.
- Add Flashing: Install metal or vinyl flashing above the ledger to direct rainwater away and prevent rot behind the board.
- Seal Gaps: Use exterior-grade caulk to seal any gaps between the ledger and house.
Common mistake: Attaching the ledger only to siding or brick veneer. Always bolt into solid framing, or the pergola could pull away from the house over time.
Digging Footings And Setting Posts
Support posts carry most of your pergola’s weight. Proper footings prevent sagging and movement.
- Dig Post Holes: Use a post hole digger or auger to dig holes at least 24–36 inches deep (or below your local frost line).
- Add Gravel Base: Pour 4–6 inches of gravel in each hole for drainage.
- Set Posts: Place the 6×6 posts in the holes, temporarily bracing them plumb (vertical) with stakes and scrap wood.
- Pour Concrete: Fill holes with concrete mix, sloping the top away from the post to shed water. Let cure at least 24–48 hours.
- Check Level and Alignment: Re-check that all posts are straight and at the correct height before the concrete sets.
Tip: For extra durability, use metal post anchors set in concrete, then attach posts above ground. This prevents rot and termite damage.
Attaching Beams And Rafters
With your posts secure, it’s time to build the pergola’s frame.
Installing Beams
- Mark Beam Height: Measure up from the ground and mark the desired height on each post.
- Cut Beams to Length: Use a circular saw to cut beams for the front and sides.
- Attach Beams: Set beams on top of the posts, checking for level. Secure with galvanized bolts or specialty brackets.
- Double Beams: For extra strength, use doubled 2x8s or 2x10s (two boards side by side), especially for spans over 10 feet.
Adding Rafters
- Rafter Spacing: Mark rafter positions on both the ledger and front beam (usually 16–24 inches apart).
- Notch Rafters: If needed, cut notches so rafters sit flush on the ledger and beam.
- Attach Rafters: Secure each rafter with joist hangers, screws, or brackets.
- Decorative Ends: Cut rafter ends in a curve, angle, or other pattern for a custom look.
Non-obvious insight: Stagger rafter joints so they don’t all line up—this distributes weight more evenly and looks more natural.
Example: Beam And Rafter Layout
| Component | Typical Size | Spacing | Fastener |
|---|---|---|---|
| Ledger Board | 2×8 or 2×10 | n/a | Lag bolts |
| Support Posts | 6×6 | 8–12 ft apart | Concrete/anchors |
| Beams | 2×8 or 2×10 | n/a | Bolt/bracket |
| Rafters | 2×6 | 16–24 in. on center | Joist hangers/screws |
Securing Lateral Bracing And Cross Members
A strong pergola needs more than just posts and beams. Bracing and cross members prevent swaying and help the pergola handle wind and weight.
- Diagonal Bracing: Install short diagonal boards between posts and beams at each corner.
- Cross Members: Add 2×2 or 2×4 cross pieces above the rafters for more shade and a finished look.
- Hardware: Use strong brackets or hurricane ties for extra security in storm-prone areas.
Tip: Even if your area isn’t windy, bracing makes the pergola feel solid and extends its life.
Credit: www.homedepot.com
Roofing And Shade Options
While traditional pergolas are open, many people want more protection from sun or rain.
Polycarbonate Panels
Clear or tinted polycarbonate lets in light but blocks UV and rain. It’s lightweight, easy to install, and lasts for years. Just be sure to slope panels away from the house for drainage.
Retractable Canopies
Fabric canopies offer flexible shade—pull them out for sun, retract them for stargazing. Choose weather-resistant fabric and strong rails or cables.
Climbing Plants
Vines like wisteria, grape, or clematis add natural shade and beauty. But beware—some vines can get heavy or damage wood over time.
Roofing Options Comparison
| Option | Pros | Cons |
|---|---|---|
| Open Rafters | Natural light, classic look | No rain protection |
| Polycarbonate Panels | Rain proof, UV protection | May trap heat, costlier |
| Fabric Canopy | Adjustable shade, stylish | Needs cleaning, can wear out |
| Climbing Plants | Green, cools air, beautiful | Takes time to grow, maintenance |
Finishing Touches
A few finishing steps can make your pergola look polished and last for years.
Sanding And Sealing
Sand all exposed wood, especially edges and ends, to remove splinters. Apply a high-quality outdoor stain or sealer to protect against water, sun, and insects. Reapply every 2–3 years for best results.
Decorative Additions
- String lights or lanterns for evening use
- Curtains or roll-down shades for privacy
- Outdoor speakers for music
- Hanging planters or shelves
Safety Check
Go over every bolt, bracket, and joint. Tighten anything loose. Make sure there are no sharp edges or exposed screws.
Pro tip: If you plan to grill under your pergola, keep at least 3 feet clearance above and around the grill to prevent fire hazards.
Maintenance And Longevity
A well-built pergola can last decades with simple maintenance:
- Inspect for loose bolts or rot each spring and fall.
- Clean debris from the roof or rafters.
- Re-stain or seal wood as needed.
- Trim plants to prevent them from pulling on the structure.
Neglecting maintenance is a top reason pergolas fail early.
Common Mistakes To Avoid
Many pergola projects go wrong due to the same few errors. Here’s what to watch out for:
- Skipping Permits: Can lead to fines or forced removal.
- Attaching Ledger to Weak Siding: Always bolt into framing.
- Shallow Footings: Posts must sit below frost line to avoid heaving.
- Wrong Fasteners: Use only galvanized or stainless steel outdoors.
- No Flashing: Missing flashing above the ledger can cause serious leaks.
- Poor Measurements: Double-check all dimensions before cutting.
- Ignoring Wind Load: Bracing is needed for stability.
- Overloading with Heavy Plants: Some vines can add hundreds of pounds.
- Not Slope Roofing: Flat covers hold water and can leak into your house.
- Lack of Ongoing Maintenance: Leads to rot, rust, and failure.
Learning from others’ mistakes can save you time, money, and headaches.

Credit: backyardoas.com
Real-world Example: A Step-by-step Build
Let’s walk through a real scenario. Imagine you want a 10×12 foot cedar pergola attached to the back of your house.
- Design: You sketch a simple rectangle, 10 feet wide, 12 feet deep, 9 feet high.
- Permits: You check with your city and submit your plans. Permit approved in 2 weeks.
- Materials: You choose cedar for low maintenance and beauty.
- Preparation: Mark the ledger line 9 feet above the patio. Mark post holes 12 feet out, 10 feet apart.
- Ledger: You find solid wall framing, drill pilot holes, and attach a 2×10 cedar ledger with lag bolts. Flashing installed above.
- Posts: Dig two holes, each 36 inches deep. Add gravel, set posts, and pour concrete. Posts are braced for 2 days.
- Beams: Cut and bolt two 2×10 beams to the top of the posts, flush with the ledger height.
- Rafters: Cut six 2×6 rafters, notched to sit on both the ledger and front beam. Secure with joist hangers.
- Bracing: Add diagonal 2×4 bracing at each post.
- Cross Members: Add 2×2 cross pieces above rafters for more shade.
- Stain: Apply two coats of oil-based outdoor stain.
- Decor: Hang string lights and add a weather-resistant outdoor curtain.
The total cost is about $2,800, including permit, wood, hardware, and stain. The build takes three weekends, working with a friend.
Sustainability Considerations
If you care about the environment, there are eco-friendly choices:
- Use FSC-certified wood to ensure responsible forestry.
- Choose water-based stains and sealers.
- Recycle construction waste.
- Consider solar-powered lights for your pergola.
When To Hire A Professional
Not every project is a good fit for DIY. Hire a professional if:
- Your house wall is masonry, brick, or stucco (needs special anchors).
- You have a sloped or uneven yard.
- You want a complex design (curves, multiple levels).
- You’re not comfortable with power tools or ladders.
- Local codes require professional installation.
A good contractor can save time and ensure a safe, code-compliant build. Always check references and insurance before hiring.
Frequently Asked Questions
How Much Does It Cost To Build A Pergola Attached To A House?
Costs vary widely. A basic 10×12 ft wood pergola might cost $1,500–$3,000 in materials if you build it yourself. Hiring a contractor could raise the total to $4,000–$8,000. Premium materials or complex designs will cost more.
Do I Need A Permit To Build An Attached Pergola?
In most areas, yes. Because an attached pergola connects to your house and may affect drainage or structure, a permit is usually required. Check with your local building department before starting.
Can I Attach A Pergola To Vinyl Siding Or Brick?
Yes, but you must secure the ledger to the house’s structural framing, not just the siding or brick veneer. Use long lag bolts and proper flashing to prevent leaks. For brick walls, special masonry anchors are needed.
What Is The Best Wood For A Pergola?
Cedar and redwood are top choices because they resist rot and insects naturally. Pressure-treated pine is cheaper but needs more maintenance. For a modern look, some use metal or composite materials.
How Can I Make My Pergola More Weatherproof?
Add a polycarbonate cover or retractable fabric canopy for rain protection. Make sure the cover is sloped to drain water away from your house. Regularly seal all wood surfaces and check for leaks at the ledger.
Building a pergola attached to your house is a rewarding project that can change how you use your outdoor space. It takes careful planning, accurate building, and a bit of patience, but the result is a beautiful, lasting addition to your home. For more detailed building codes and best practices, you can review the Family Handyman Pergola Guide. With the right approach, your new pergola will offer shade, style, and a reason to spend more time outdoors for years to come.

Credit: www.youtube.com