If you have a string trimmer and want sharper, cleaner lawn edges, you don’t need to buy a separate edger. With the right know-how, you can convert your trimmer to an edger and get professional-looking results. Many homeowners are surprised to learn this process is simple, cost-effective, and can improve the look of your yard dramatically. This guide explains everything you need to know—from step-by-step instructions to tips, mistakes to avoid, and even extra advice for tricky corners or tough soil. Whether you have a gas or electric trimmer, you’ll find clear answers here.
Why Convert A Trimmer To An Edger?
Many people ask why you should convert a trimmer to an edger instead of buying a dedicated tool. The main reasons are:
- Save money: No need to buy another device.
- Space-saving: One tool does two jobs.
- Easy maintenance: Fewer tools to care for.
- Versatility: Switch between trimming and edging in seconds.
Most modern trimmers are designed for both tasks, but learning how to use your tool for edging can create cleaner lines, improve curb appeal, and make your lawn look professionally maintained. Many people are surprised at the difference a crisp edge makes—it’s often the small details that set a well-cared-for yard apart from the rest.
A sharp edge can make walkways pop and garden beds look tidy. It’s a simple change that boosts your home’s first impression.
If you live in a neighborhood where lawns are a point of pride, clean edges can even increase property value. Realtors often talk about “curb appeal”—that first impression buyers get from the sidewalk. A neat edge is an easy, low-cost way to improve that.
Even if you’re not selling, you’ll enjoy coming home to a yard that looks finished and cared for.
Understanding Trimmers And Edgers
Before you convert, it’s important to know the differences between trimmers and edgers. Understanding each tool’s strengths helps you get the best results.
How Trimmers Work
String trimmers use a rotating nylon string to cut grass and weeds. They’re best for:
- Cutting around trees, fences, and flower beds
- Cleaning up long grass in tight spaces
Trimmers are flexible because the string bends and rebounds off hard surfaces. This lets you get close to objects without damaging them. They’re especially useful for uneven terrain or places a mower can’t reach. However, trimmers cut horizontally by default, so the result is a flat top rather than a crisp edge.
How Edgers Work
Edgers cut a clean, vertical line along sidewalks, driveways, and garden beds. They use a blade or string to create a sharp edge. The result is a clear boundary between grass and pavement.
Edgers are designed for one thing: creating a noticeable boundary. The vertical motion slices through soil and grass for a defined look. This not only makes your lawn look neat, but also slows grass from creeping over pavement or into garden beds. Some edgers use a spinning metal blade, while others use a heavy-duty string.
Trimmer Vs Edger: Key Differences
Here’s a quick comparison for clarity:
| Feature | Trimmer | Edger |
|---|---|---|
| Cutting Angle | Horizontal | Vertical |
| Main Use | Grass & weeds | Clean edges |
| Tool Shape | Curved/Straight Shaft | Usually straight shaft |
| Cutting Tool | Nylon string | Blade or string |
While you can trim with an edger in a pinch, it’s less effective. The opposite is true—trimmers can edge, but only with the right technique and setup. The main difference is the direction of the cut and the type of finish you get.
Tools And Materials Needed
To convert your trimmer to an edger, you need:
- String trimmer (electric, battery, or gas)
- Safety goggles
- Gloves
- Ear protection (for loud gas models)
- Extra trimmer line
- Edger attachment (optional for some models)
- Wheel kit (optional, improves control)
- Flathead screwdriver (for attachment changes)
- Measuring tape (for marking edges)
Some advanced models, like those from brands such as Ryobi, Black+Decker, or Stihl, have quick-release attachments for easy conversion.
It’s also helpful to keep a small brush or rag nearby for cleaning debris off your trimmer, especially after working in damp or muddy areas. If you have a long driveway or many flower beds, a wheel kit can keep your lines straighter with less effort.
For curved beds, a flexible guide (like a garden hose or rope) helps you stay on track.
Many people overlook ear protection, but even electric trimmers can be loud enough to cause hearing fatigue after a few minutes. Gloves also help prevent blisters, especially if you have a long edging job.
Step-by-step Guide: Converting Trimmer To Edger
Follow these steps for the best results:
1. Check Your Trimmer Type
First, identify your trimmer:
- Straight shaft: Easier for edging.
- Curved shaft: Can work, but harder to control.
Some trimmers have a built-in edging function. Look for a button or lever that rotates the head.
If you’re unsure, check your manual or look up your model online. Some brands label the edging function clearly, while others tuck it away in the instructions. Don’t force the head to rotate—if it feels stuck, there may be a locking pin or button you missed.
2. Adjust The Trimmer Head
Most trimmers allow you to rotate the head to change the cutting angle. For edging, you want the string to cut vertically.
- Locate the adjustment mechanism (usually a button, lever, or knob).
- Rotate the head so the string is perpendicular to the ground.
- Make sure the string is long enough for a clean cut.
Some older or basic models may not have a rotating head. In this case, you can still edge by tilting the entire trimmer so that the string is vertical. This takes more practice but works well with patience.
3. Add Edger Attachments (optional)
Some trimmers accept edger attachments or a wheel kit.
- Attach the edger blade or wheel kit using a screwdriver.
- Tighten all screws and ensure stability.
This makes edging easier and more precise, especially along sidewalks or driveways.
If your trimmer supports attachments, consider investing in a wheel kit for long, straight edges. Wheels keep your cut at a consistent height, which is especially useful if you have uneven pavement or bumpy ground. Guide bars or fences can also help if you’re after perfection.
4. Mark Your Edging Line
Use measuring tape or a garden hose to mark a straight line where you want your edge.
- For sidewalks: Place the hose along the pavement.
- For flower beds: Mark a gentle curve.
Clear away debris and stones before edging.
It’s easy to overlook small pebbles or sticks, but hitting one at high speed can break your trimmer string or even chip concrete. Taking a few extra minutes to clear the path will save you time and money.
5. Start Edging
- Hold the trimmer at a 90-degree angle to the ground.
- Walk slowly along your marked line.
- Keep the string just above the soil to avoid scalping grass.
- Use a steady pace for even edges.
For best results, edge when the soil is dry. Wet soil can clog the trimmer head.
If you’re new to edging, use short, careful movements at first. It’s better to go over an area twice than to rush and cut too deep. Keep your arms relaxed—tension leads to uneven lines.
6. Clean Up
- Remove any loose grass or soil.
- Use a broom or leaf blower to clear the area.
- Check the edge for any missed spots.
Don’t skip this step—cleaning up makes your work stand out and lets you check for rough spots that need a second pass.
7. Switch Back To Trimming
After edging, rotate the head back to its original position for regular trimming. Always check the trimmer line and replace if needed.
If you used attachments or changed the string, now’s a good time to wipe down the trimmer and check for loose screws. This helps your tool last longer and work better next time.
Top Tips For Perfect Edges
Here are expert tips to help you get the cleanest, straightest edges:
- Start slow: Practice in a less visible area first.
- Keep the string fresh: Old or short string gives uneven cuts.
- Wear protection: Safety goggles and gloves are essential.
- Edge regularly: Weekly edging keeps lines sharp.
- Use a wheel kit: Wheels make it easier to follow straight lines.
- Avoid wet soil: Wet dirt sticks to the trimmer and can cause clumping.
- Trim first, edge second: Trimming before edging reduces mess.
- Sharpen your edge: Make two passes if needed for tough areas.
- Angle matters: Keep the trimmer perfectly vertical for best results.
- Use a guide: Mark your line with string or hose before starting.
Experienced homeowners also recommend checking the trimmer line regularly during use. If you notice the line getting shorter or frayed, stop and replace it. A fresh line cuts more cleanly and makes the job easier. Some people overlook their walking speed—moving too fast can make the edge wavy, while a slow, steady pace gives the best results.
If you have a garden bed with mulch or loose soil, edge first, then add mulch. This way, you avoid scattering mulch everywhere.
Common Mistakes And How To Avoid Them
Many beginners make mistakes when converting their trimmer. Here are the most frequent errors and how to fix them:
- Wrong angle: Cutting at the wrong angle creates jagged edges. Hold the trimmer upright.
- Too fast: Moving too quickly leads to uneven lines. Slow, steady motion is best.
- Skipping safety gear: Always wear goggles and gloves to prevent injuries.
- Ignoring attachments: Wheels and guides make a big difference.
- Letting string get too short: Replace the string often for smooth cuts.
- Edging in wet conditions: Wait for dry weather.
A non-obvious insight: Many people don’t realize that soil hardness affects edging. If your soil is dry and compacted, water it lightly before edging for easier cuts.
Another overlooked issue is not checking for underground obstacles. Sprinkler heads, low wires, or hidden roots can damage your trimmer or ruin your edge. Walk the line before you start and watch for anything unusual. If you hear a new sound or feel resistance, stop and check before continuing.
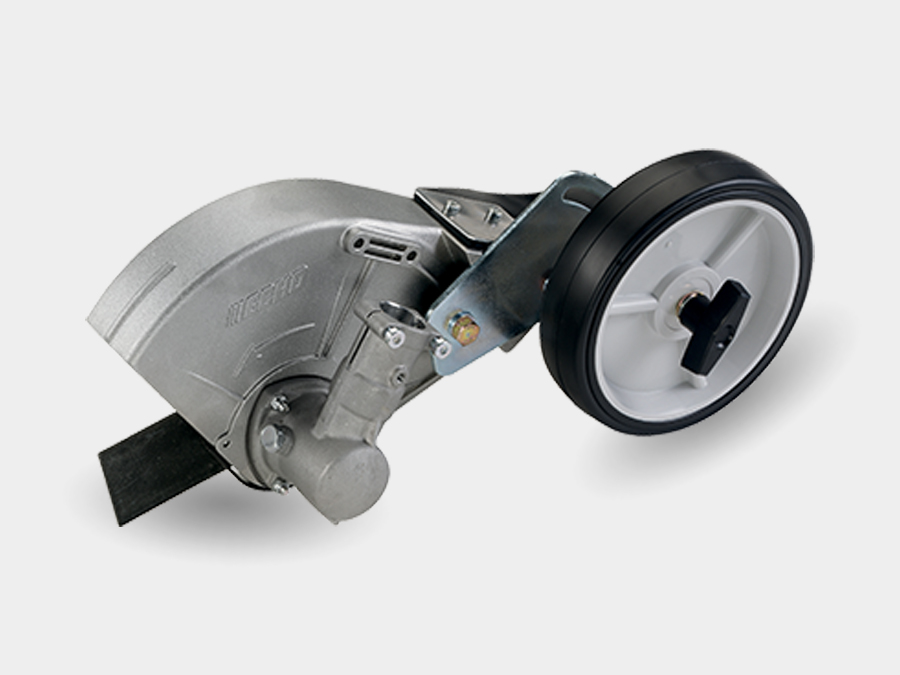
Credit: www.echo-usa.com
Advanced Edging Techniques
If you want edges that truly stand out, try these advanced techniques:
Double Pass
Make one pass with the trimmer, then repeat in the opposite direction. This removes extra debris and creates a sharper edge.
Depth Control
Use your trimmer’s guide or wheel attachment to keep the depth consistent. This prevents accidental damage to roots or pavement.
A good trick is to set a depth limit with a small stick or marker on the shaft, so you don’t go too deep and damage the lawn’s root system.
Curved Edges
For flower beds or walkways with curves, move the trimmer slowly and use a flexible guide like a garden hose. Practice helps!
Don’t be afraid to stop and reposition yourself on tight curves. It’s better to take your time than to risk uneven lines.
Dealing With Tough Soil
If your soil is rocky or hard, consider using an edger blade attachment. Watering the area before edging can soften the ground.
For extremely tough spots, use short, gentle bursts instead of forcing the trimmer. If you hit a rock or root, stop and clear it by hand.
Edging Around Obstacles
For trees, posts, or stones, use short bursts and move the trimmer carefully. Don’t force the string, as it can break.
In tight spots, lower the speed if your trimmer allows it, and use the tip of the string for more control. For objects with delicate bark or paint, use a physical barrier like cardboard to protect them as you edge.
Edger Attachments: Are They Worth It?
Many Trimmer Brands Offer Edger Attachments. Are These Worth Buying?
| Attachment | Pros | Cons |
|---|---|---|
| Edger Blade | Sharp edges, long-lasting | Requires installation, more expensive |
| Wheel Kit | Easy control, straight lines | May not fit all models |
| Guide Bar | Helps keep depth steady | Can limit flexibility |
If you edge often, attachments make the process faster and easier. But most basic trimmers can do the job without extras.
A good rule: start without attachments your first few times. If you find it hard to get straight lines or consistent depth, then invest in a wheel kit or guide bar.
Trimmer Types: Which Are Best For Edging?
Not all trimmers are equal. Here’s how popular types compare:
| Trimmer Type | Edging Ability | Ease of Use | Cost |
|---|---|---|---|
| Gas | Very strong, good for large yards | Heavier, more noise | $$$ |
| Electric | Reliable, less vibration | Lightweight, easy to switch | $$ |
| Battery | Portable, easy conversion | Very light, best for small yards | $ |
For most homeowners, electric or battery-powered trimmers are easiest for edging. Gas models are powerful but heavier.
If you have a large yard or thick, wild grass, gas trimmers can save time—but they need more maintenance. Battery trimmers are quiet, light, and easy to store, but check the run time if you have a big job. Electric trimmers are a good middle ground, but you need to manage the cord.
Safety Tips When Converting Trimmer To Edger
Safety is critical. Follow these rules every time:
- Wear eye protection: Flying debris can cause injury.
- Use gloves: Protect your hands from sharp grass and stones.
- Check the area: Remove sticks, stones, or toys before edging.
- Keep children and pets away: Safe work area is important.
- Turn off the trimmer: Before changing attachments or adjusting the head.
A non-obvious insight: If you’re edging near electrical wires or water pipes, be extra careful. Always check for underground hazards before deep edging.
Even if your edge is shallow, it’s possible to nick shallow pipes or wiring. If you’re unsure, call your utility company for a map of buried lines.
Maintenance After Edging
After you convert your trimmer and finish edging:
- Clean the head: Remove grass and soil.
- Check the string: Replace if frayed or short.
- Inspect attachments: Tighten screws and check for wear.
- Store safely: Keep in a dry place to prevent rust.
Regular maintenance extends the life of your trimmer and keeps edges sharp.
Don’t forget to check the shaft and handle for cracks, especially after edging along hard surfaces. Wipe down all metal parts to avoid rust, and store attachments in a labeled bag or box so you don’t lose small parts.
Environmental Considerations
Converting your trimmer to an edger can be eco-friendly:
- Reduce tools: Fewer devices means less manufacturing waste.
- Electric trimmers: Use less energy and create less pollution.
- Proper disposal: Recycle old strings and attachments.
If possible, use battery or electric trimmers. Gas models create more emissions.
Another green tip: use biodegradable trimmer line if available. Some brands offer lines made from recycled materials or plant-based plastics. Also, sweep up all clippings and compost them instead of leaving them on sidewalks or driveways.
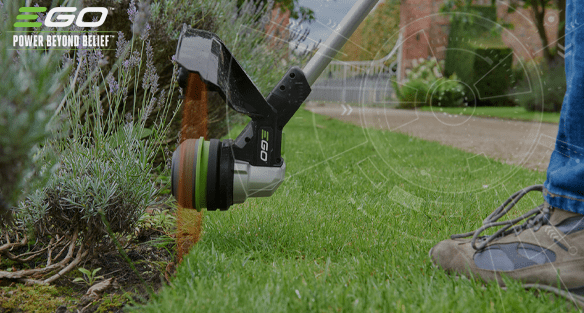
Credit: egopowerplus.co.uk
Geo-targeted Tips: Edging In Different Regions
Lawn care varies depending on your region and climate.
Warm Climates
- Grass grows fast. Edge every week.
- Soil stays loose, making edging easier.
Look out for fire ants or other insects when edging in the South or other warm areas.
Cold Climates
- Grass grows slower. Edge every 2-3 weeks.
- Watch for frozen soil—wait for thaw.
If you edge when the ground is frozen, you risk damaging both your trimmer and your lawn.
Urban Areas
- Often more pavement, so edges are more visible.
- Use wheel kits for precise lines.
Noise can be an issue, so edge during reasonable hours to avoid disturbing neighbors.
Rural Areas
- Edges may be longer and less defined.
- Use guide bars and mark lines carefully.
Wild grasses can be tougher, so keep extra trimmer line handy.
Seo And Voice Search: Making Your Trimmer Edger Conversion Findable
If you’re searching online or using voice assistants, use phrases like:
- “How to convert trimmer to edger”
- “Tips for edging with string trimmer”
- “Best edging attachments for trimmers”
- “DIY trimmer edger conversion guide”
- “How to edge lawn with trimmer”
These terms help you find expert advice and video tutorials. If you want detailed product comparisons, visit sites like Consumer Reports for unbiased reviews.
Voice search is growing, so asking your smart speaker for “ways to edge a lawn with a string trimmer” can lead you to more resources.

Credit: www.lowes.com
Answers To Common Problems
Here are solutions to frequent conversion issues:
- Trimmer won’t rotate head: Check for a locking pin or stuck mechanism. Lubricate if necessary.
- String breaks easily: Use thicker or high-quality line.
- Uneven edges: Practice holding the trimmer steady and vertical.
- Trimmer overheats: Clean after each use and avoid edging for too long without breaks.
- Attachment won’t fit: Check compatibility before purchasing.
If you find your trimmer vibrates more than usual, check that attachments are seated tightly and the string is even on both sides. For stubborn grass or weeds, let the trimmer spin up to full speed before starting the cut.
Real-life Example: Homeowner Success Story
Sarah, a homeowner in Texas, converted her battery-powered trimmer with a wheel kit. She marked her driveway edge with a garden hose, rotated the trimmer head, and edged along the line. Within 30 minutes, her lawn had sharp, professional edges. She now repeats the process every week and spends less time on maintenance.
Sarah says the biggest surprise was how much easier cleanup was after regular edging. “The first time, I had to go over the same spot twice,” she explains, “but after a few weeks, the edge stayed neat and I only needed a quick pass.
” She also noticed less grass growing into her flower beds, saving her weeding time.
Edging Frequency: How Often Should You Edge?
Experts recommend:
- Weekly: For fast-growing grass in warm climates.
- Bi-weekly: For slower growth or cooler climates.
- After mowing: Always edge after mowing for best results.
Regular edging prevents grass from spilling over sidewalks and keeps your yard neat.
If you notice your edges getting fuzzy or grass creeping over the line, it’s time for a touch-up. Consistency is key—a little each week is easier than fixing overgrown edges once a month.
Extra Tips For Beginners
If you’re new to edging, remember:
- Practice in a hidden spot first.
- Watch video tutorials for visual guidance.
- Ask a neighbor or professional for advice.
- Use short bursts, not long sweeps.
- Don’t worry about perfection—edges improve with practice.
A trick for straight lines: focus your eyes 2–3 feet ahead, not directly where the string is cutting. This helps you stay on track. Also, don’t feel discouraged if your first edge isn’t perfect. With each mow and edge, you’ll get better.
Frequently Asked Questions
How Do I Convert My Trimmer To An Edger?
Most trimmers can be converted by rotating the head to a vertical position. Some models have a built-in edging function, while others require manual adjustment. Attachments like wheel kits or edger blades can help. Always follow your trimmer’s manual for specific instructions.
Can I Use Any String Trimmer As An Edger?
You can use most trimmers, but straight shaft models work best. Curved shaft trimmers are harder to control for edging. Check if your trimmer allows head rotation or accepts attachments for easier conversion.
What Are The Best Attachments For Edging?
The top attachments are edger blades, wheel kits, and guide bars. Edger blades create sharp lines, wheel kits help you follow straight paths, and guide bars keep depth steady. Check compatibility before buying.
Is Edging Safe For Children Or Pets?
No. Always keep children and pets away while edging. Debris can fly, and the spinning string is dangerous. Wear protection and clear the area before starting.
How Often Should I Edge My Lawn?
Edging frequency depends on grass growth and region. In warm areas, edge weekly. In cooler climates, every 2-3 weeks is enough. Edge after mowing for best results.
Converting your trimmer to an edger is a smart way to get cleaner lawn lines without spending extra money. With the right tools, careful technique, and regular maintenance, you can achieve results that rival professional landscapers. Remember, practice makes perfect—and your yard will thank you for the effort.