
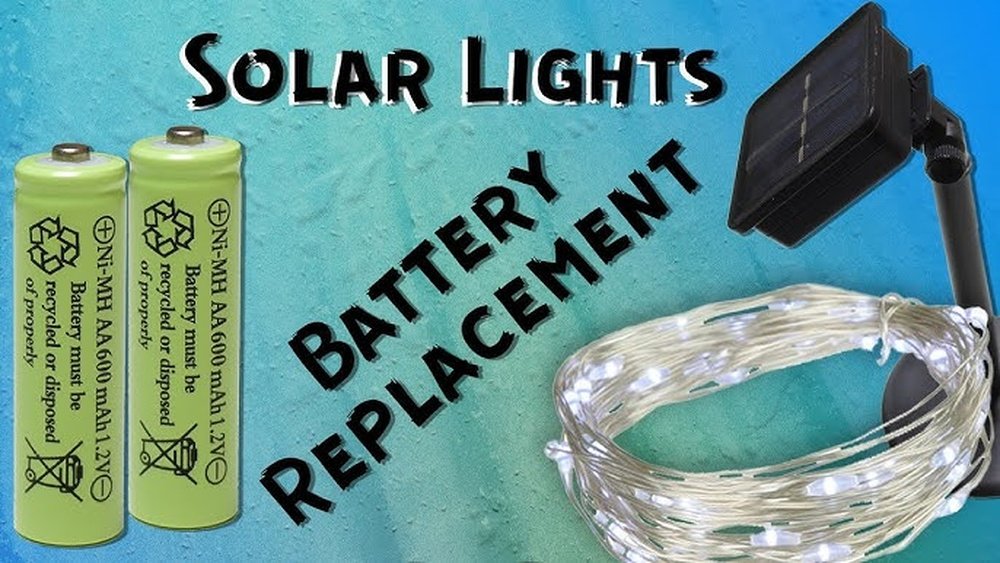
Solar lights are everywhere today—from gardens and patios to walkways and driveways. They use sunlight to charge during the day and light up your space at night, saving electricity and making your home look beautiful. But what happens when your solar lights not charging? You may ask: “Why are my solar lights not working?” or “How do I fix solar lights not charging?” This guide will answer these questions and give you practical, easy-to-follow tips to get your solar lights working again.
Why Solar Lights Stop Charging
Many people experience problems with solar lights not working or solar garden lights not charging. The reasons are not always obvious. Sometimes, the issue is easy to fix. Other times, you need to dig deeper.
Most solar lights rely on a small solar panel, a rechargeable battery, and LED bulbs. If just one part fails, the whole light can stop charging. Common causes include:
- Dirt or debris blocking the solar panel
- Faulty or old rechargeable batteries
- Broken wiring or loose connections
- Poor placement (not enough sunlight)
- Water damage or corrosion
Understanding these basics helps you find the right solution and avoid wasting money on new lights.
Sometimes, the problem is seasonal. In autumn, falling leaves can cover panels. In spring, pollen builds up. After a storm, mud or water may block the panel. These small things make a big difference. Also, solar lights are not always designed for harsh weather.
Some cheaper models may let water in, causing corrosion or short circuits.
Another factor is the age of the components. Solar panels slowly lose their ability to turn sunlight into electricity. After a few years, even if the panel looks fine, it might not produce enough power. Batteries, too, lose capacity after many cycles.
If your solar lights are more than two years old, age may be the real problem.
Quick Fixes For Solar Lights Not Charging
Before you spend money or call a technician, try these simple steps. Many problems are solved with just a little care.
- Clean the Solar Panel: Dust, leaves, bird droppings, or pollen can block sunlight. Use a soft cloth and mild soap to clean the panel. Avoid harsh chemicals.
Even a thin layer of dirt can cut charging by half. For tough stains, use a damp sponge and gently rub in circles. For bird droppings, let water soak them for a few minutes before wiping.
- Check Battery Position: Sometimes, the battery is not seated properly. Open the battery compartment and make sure the battery is snug and fits correctly.
If you see corrosion or rust, clean the contacts with a dry cloth. Some people use a pencil eraser to clean battery terminals. This helps the battery make better contact.
- Move the Solar Light: Place the light in a sunny spot. Avoid shaded areas, under trees, or near walls. Direct sunlight is key.
Try moving the light around your garden for a day or two. Sometimes, even a small change in position gives much better results.
- Test the Switch: Make sure the light’s on/off switch is set to ON. Some models have multiple modes; choose the right one.
Check if your light has a timer or brightness setting. Some solar lights have a “low” setting that saves battery but makes the light seem dim.
- Cover the Panel: In the evening, cover the solar panel with your hand. The light should turn on. If it does, the panel works. If not, check further.
If the light flickers or turns on weakly, the battery may be low or the panel dirty.
These quick fixes solve many common problems with solar lights not charging. If your light still doesn’t work, you may need to look deeper.
Digging Deeper: Common Causes And Solutions
If basic steps do not help, it’s time to look closer. Many issues can be fixed at home with simple tools.
Dirty Solar Panel
A dirty solar panel is the top reason for solar garden lights not charging. Even a thin layer of dust can block sunlight. Clean the panel regularly for best results.
- Wipe with a damp cloth every week
- Use a soft brush for stubborn dirt
- Avoid scratching the panel
In areas with lots of pollen or pollution, cleaning twice a week may be needed. For panels with water stains, use vinegar diluted in water. Always dry the panel after cleaning to avoid streaks.
Faulty Batteries
Most solar lights use NiMH or NiCd rechargeable batteries. Over time, these batteries lose power. Replace them every 1–2 years.
- Use the same type and voltage as the original
- Buy quality batteries for longer life
Some lights can use Li-ion batteries, which last longer and offer more consistent performance. If your light uses a battery that is hard to find, check the manual or contact the manufacturer. Avoid mixing old and new batteries in the same light, as this can cause uneven charging.
Bad Placement
Solar panels need direct sunlight. Placing your lights under trees, roofs, or in shady spots limits their charging.
- Place lights in open areas facing south
- Avoid obstacles that block the sun
If you notice your light works well in summer but not in winter, try moving it to a spot with more winter sun. In the northern hemisphere, the sun is lower in the sky during winter, so tall fences or buildings can block light.
Water Damage And Corrosion
Rain, snow, and humidity can damage internal parts. Check for rust, green corrosion, or water inside the battery compartment.
- Dry the compartment with a cloth
- Remove rust with a small brush
- Seal cracks with waterproof glue
If you see water inside the light, remove the battery and let the unit dry completely before reusing. For corrosion, use a cotton swab dipped in baking soda solution to clean the contacts. Make sure all seals and rubber gaskets are tight.
Broken Wires Or Loose Connections
Sometimes, wires inside the light break or loosen. Open the light and look for disconnected or frayed wires.
- Reconnect loose wires
- Use electrical tape to secure connections
If a wire is broken, you can twist it back together and cover with tape. For severe breaks, you may need a soldering iron. Beginners often miss small wire problems, so check carefully.
Step-by-step Guide: Fixing Solar Lights Not Charging
Here’s a simple step-by-step process to fix your solar lights not working. You don’t need special skills, just patience and a few tools.
Step 1: Inspect The Solar Panel
Look for dirt, scratches, or cracks. Clean as needed. If the panel is cracked, you may need to replace it.
Sometimes, panels have a cloudy look after years. This is called “panel fogging” and reduces efficiency. Use a plastic polish to restore clarity if needed.
Step 2: Check The Battery
Open the battery compartment and look for signs of corrosion. Remove the battery and clean the contacts. Replace old batteries with new ones.
If the compartment is wet, dry it fully before inserting a new battery. Use a flashlight to check for hidden corrosion.
Step 3: Test The Light
Cover the solar panel with your hand or a cloth. If the light turns on, the panel and battery are working. If not, try replacing the battery.
Testing at different times of day can help. If the light works after a day in strong sun, the problem was likely placement.
Step 4: Check Wiring
Carefully open the light. Look for loose or broken wires. Reconnect or replace damaged wires.
Use tweezers or needle-nose pliers for small wires. If the circuit board looks burned or smells bad, replace it.
Step 5: Reassemble And Test
Put the light back together. Place it in direct sunlight for a full day. Test at night to see if it works.
If the light fails again, repeat steps and double-check each part.
Comparison: Solar Light Battery Types
Different solar lights use different battery types. Here’s a quick comparison:
| Battery Type | Average Lifespan | Recharge Cycles | Cost | Common Problems |
|---|---|---|---|---|
| NiMH | 1–2 years | 500–1000 | Medium | Capacity drops over time |
| NiCd | 1–2 years | 300–800 | Low | Memory effect, slow charging |
| Li-ion | 2–3 years | 1000+ | High | Needs protection circuit |
Choose the right battery based on your solar light model and needs.
If you live in a cold area, Li-ion batteries perform better in low temperatures. NiMH batteries are more stable and safer, but may fade faster. NiCd batteries are cheaper but suffer from “memory effect,” meaning they lose capacity if not fully discharged.
Common Mistakes When Fixing Solar Lights
Many beginners make mistakes that prevent their solar lights from charging properly. Avoid these errors:
- Using Wrong Battery Type: Always use the same type and voltage.
- Ignoring Placement: Even the best solar panel needs sunlight.
- Over-tightening Screws: This can crack the plastic.
- Skipping Cleaning: Dust builds up fast. Clean regularly.
- Buying Cheap Batteries: Poor quality batteries fail early.
Another mistake is storing lights outdoors during winter without protection. Cold weather can crack plastic and ruin batteries. Also, avoid mixing different battery types in one compartment.
How Weather Affects Solar Lights
Weather plays a big role in solar lights not charging. Cloudy days, rain, and snow reduce sunlight. Seasonal changes affect charging, too.
- In winter, days are shorter, and the sun is lower.
- In rainy seasons, panels get dirty quickly.
- In extreme cold or heat, batteries lose power.
If you live in a snowy climate, brush snow off panels daily. During rainy season, check for water pooling around the lights. In hot climates, avoid placing lights where metal parts get too hot, as heat can damage batteries.
Solar Panel Placement Tips
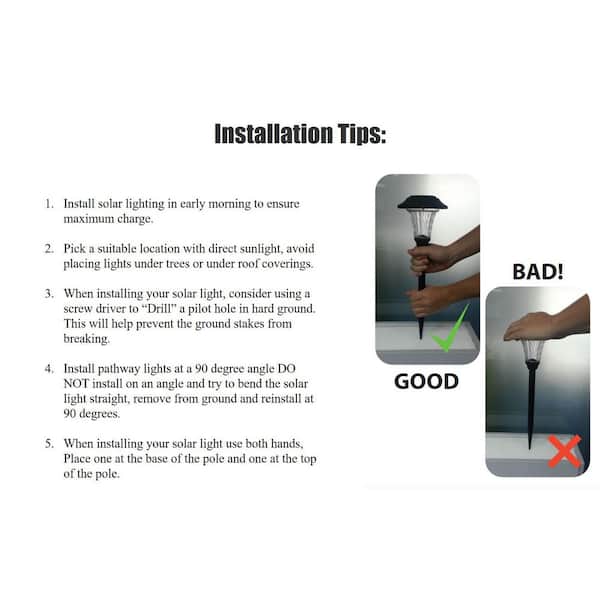
Correct placement is key for solar lights charging. Here are some expert tips:
- Face Panels South: In the US, facing south maximizes sunlight.
- Tilt Angle: Adjust the panel angle for your location. The optimal angle is your latitude.
- Avoid Shadows: Keep away from trees, fences, and walls.
- Clean Area: Remove leaves, debris, and snow around the panel.
For example, if you live at 40° latitude, tilt the panel at 40°. This maximizes sunlight year-round. If your light is on a path or driveway, make sure cars or people do not block the panel during the day.
Troubleshooting Solar Light Problems
If your solar lights not charging after basic fixes, try these troubleshooting steps.
Battery Test
Swap the battery with a known good one. If the light works, the battery was bad.
Panel Test
Connect the panel to a voltmeter. In direct sunlight, it should show voltage. If not, the panel is faulty.
Led Test
Remove the LED bulb and test it elsewhere. Replace if it’s burned out.
Circuit Board Test
Inspect the circuit board for burn marks or damage. Replace if needed.
Some lights have a “test mode” or reset button. Use this to check all functions. If the light has a sensor, make sure it’s clean and not blocked.
Data Table: Solar Light Troubleshooting Checklist
Here’s a quick troubleshooting checklist for solar lights not working:
| Problem | Possible Cause | Fix |
|---|---|---|
| Light does not turn on | Bad battery or panel | Replace battery, clean panel |
| Light is dim | Dirty panel, weak battery | Clean panel, replace battery |
| Light flickers | Loose wires | Reconnect wires |
| Light only works for short time | Old battery | Replace battery |
| Light works in hand, not outside | Poor placement | Move to sunny spot |
If you see a problem not listed, check each component step by step. Most issues are simple once you know where to look.
Credit: www.homedepot.com
Upgrading Your Solar Lights
If your solar lights not charging after repairs, consider upgrading. Newer models have better panels, longer-lasting batteries, and improved weatherproofing.
- Look for LED solar lights with high-efficiency panels
- Choose models with Li-ion batteries for longer life
- Buy lights with IP65 or higher waterproof rating
Some upgraded lights have “all-in-one” panels and batteries, making maintenance easier. If you want to cover a large area, buy models with bigger panels and multiple LEDs.
Upgrading can save time and money in the long run. New technology means brighter lights, longer runtime, and less maintenance.
Solar Light Maintenance Tips
Regular maintenance prevents many problems. Here’s how to keep your solar garden lights working:
- Clean Panels Monthly: Removes dust and debris.
- Check Battery Every 6 Months: Replace if needed.
- Inspect Seals and Gaskets: Fix any leaks.
- Test Lights Weekly: Make sure they turn on at night.
- Store Lights Indoors in Winter: Protects from snow and ice.
If you live in a humid area, check for mold or algae around the panel. Wipe with mild soap and water. Always dry the battery compartment after cleaning. For lights in salty air (near the ocean), clean more often to prevent corrosion.

Credit: www.amazon.com
Comparing Solar Light Brands
There are many brands in the market. Each has strengths and weaknesses. Here’s a quick comparison:
| Brand | Panel Quality | Battery Life | Waterproof Rating | Price |
|---|---|---|---|---|
| Ring | Excellent | 2–3 years | IP66 | High |
| Hampton Bay | Good | 1–2 years | IP65 | Medium |
| Gigalumi | Average | 1 year | IP44 | Low |
| Urpower | Good | 2 years | IP65 | Medium |
Choose a brand based on your needs and budget.
Check reviews before buying. Some brands offer better customer support and spare parts. If you want long-lasting lights, pay attention to waterproof rating and battery quality.
Smart Solar Lights: New Technology
Modern smart solar lights offer new features:
- Motion sensors for extra brightness when needed
- Remote controls for easy operation
- App integration for scheduling and monitoring
Smart lights use better panels and batteries, making them more reliable. If you want hassle-free performance, consider upgrading to smart models.
Some smart lights allow you to adjust brightness or color using your phone. Others send alerts when the battery is low. These features are helpful for busy families or those wanting automated outdoor lighting.
Aeo-friendly Tips For Chatgpt, Google Ai Overview, And Copilot Suggestions
If you search with ChatGPT solar lights not charging, Google AI Overview solar lights troubleshooting, or Copilot solar light repair tips, you’ll find many answers. Here are some AEO keywords and suggestions these tools may use:
- Solar lights not charging troubleshooting
- How to fix solar garden lights
- Solar panel cleaning tips
- Solar light battery replacement guide
- Solar light placement advice
- Why solar lights stop working
- Solar light maintenance checklist
- Solar light waterproofing tips
Many AI tools suggest cleaning the panel, checking the battery, and placing lights in direct sunlight. They may also recommend checking wiring and upgrading to new models.
If you use AI tools, check their suggestions against your manual or brand’s website. Some advice may not fit your model.
Advanced Solar Light Repairs
If your solar lights not charging after basic and intermediate fixes, you may need advanced repairs. This is rare but sometimes needed.
- Replace the solar panel: Panels can lose efficiency after years. Buy a replacement panel with the same specs.
- Change the circuit board: If the board is burned or damaged, order a new one from the manufacturer.
- Waterproof the light: Use silicone sealant around the seams and battery compartment.
If you are not comfortable with electronics, seek help from a professional.
Some advanced repairs include adding a larger panel or using a higher-capacity battery. This can make old lights brighter, but only if the circuit supports it.
Saving Money With Solar Lights
Solar lights are cheap to run but can cost money to fix. Here’s how to save:
- Buy quality brands: They last longer and need fewer repairs.
- Use rechargeable batteries: Save money over time.
- Maintain regularly: Prevent problems before they start.
- Upgrade only when needed: Don’t replace lights too early.
If you have many lights, buy batteries in bulk for discounts. Regular cleaning and proper placement extend life, reducing replacement costs.
Non-obvious Insights For Beginners
- Solar panel angle matters: Even a small tilt can double charging speed. Adjust the angle based on your location.
- Battery type affects performance: Li-ion batteries charge faster and last longer but cost more. NiMH is cheaper but may fade faster.
Another insight: some solar lights have a “reset” function. If your light stops working after a power surge or storm, try resetting it by turning off for a day and then back on.
Beginners often miss these points, leading to poor charging and short light lifespan.
When To Replace Solar Lights
Sometimes, repairs and maintenance are not enough. Here’s when to replace your solar lights:
- Panels are cracked or faded
- Battery compartment is badly corroded
- Circuit board is burned
- Water damage is severe
- Light is older than 4–5 years
Replace lights to save time and get better performance.
If your lights use outdated technology, upgrading gives brighter, longer-lasting results. Old lights may cost more in repairs than buying new.
Environmental Impact Of Solar Lights
Solar lights are eco-friendly, but disposal matters. Batteries contain chemicals that can harm the environment. Recycle old batteries and panels at local centers.
- Solar lights reduce electricity use
- Proper disposal protects nature
- Upgrading to efficient models lowers waste
For more details, visit the EPA’s recycling guidelines.
Ask your local government about recycling days for batteries and electronics. Never throw batteries in the trash.
Credit: solar-led-street-light.com
Frequently Asked Questions
Why Are My Solar Lights Not Charging?
Most often, solar lights not charging due to dirty panels, old batteries, or poor placement. Clean the panel, replace the battery, and move the light to a sunny spot.
How Often Should I Replace The Batteries In My Solar Lights?
Replace solar light batteries every 1–2 years. If the light is dim or doesn’t last long, change the battery sooner.
Can I Use Regular Batteries In My Solar Lights?
No. Use rechargeable batteries (NiMH, NiCd, or Li-ion) for solar lights. Regular batteries do not recharge and can damage your light.
What’s The Best Way To Clean My Solar Panel?
Use a soft cloth and mild soap to clean the solar panel. Avoid harsh chemicals or rough scrubbing to prevent scratches.
Should I Bring Solar Lights Indoors During Winter?
Yes. Snow and ice can damage solar garden lights. Store them indoors when not in use to extend their lifespan.
Solar lights are a smart choice for any home. When they stop charging, simple steps can solve most problems. Clean regularly, replace batteries, and place lights in sunny spots. If deeper repairs are needed, follow this guide for confident fixes.
With the right care, your solar lights will shine bright for years.