
Replacing the drive belt on a riding mower may sound difficult, but with the right approach, most homeowners can handle the task. A worn or broken drive belt is one of the most common reasons a mower won’t move, loses power, or makes loud squealing noises.
Knowing how to replace it yourself can save money and prevent long waits for repairs. This guide walks you through every step, from preparation to reassembly, so you can get your mower running smoothly again.
Understanding The Drive Belt System
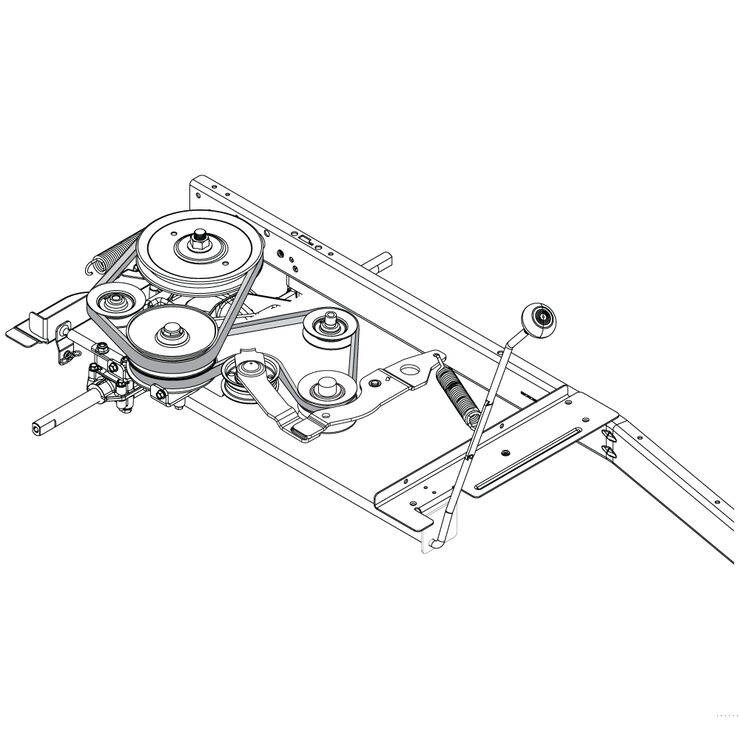
The drive belt on a riding mower transfers power from the engine to the wheels. When the belt wears out, you may notice the mower moves slowly, slips, or stops moving completely. Most riding mowers have at least one main drive belt, though some models use two belts: one for movement and one for the mower blades.
Not all mowers use the same belt type or routing. Always check your owner’s manual for the correct belt size and routing diagram. If you don’t have the manual, you can often find it online using your mower’s model number.
Why And When To Replace The Drive Belt
A new drive belt keeps your mower working efficiently. Here are common signs it’s time for a replacement:
- Slipping or jerking: The mower suddenly loses speed or doesn’t move at all.
- Visible wear: Cracks, fraying, or missing chunks on the belt.
- Squealing noises: High-pitched sounds when engaging the drive.
- Unusual vibration: The mower feels rougher than normal.
Most belts last between 25 and 100 hours of use, depending on the mower and conditions. Dust, debris, and tough terrain can wear a belt faster. Inspect your belt every season, especially if you mow large areas or notice any of the signs above.

Credit: www.youtube.com
Tools And Materials You’ll Need
Gather all tools and materials before starting. Having everything ready makes the job faster and safer.
- Replacement drive belt (exact size for your mower)
- Socket set or wrench set
- Screwdriver (usually Phillips or flathead)
- Pliers
- Work gloves
- Jack and jack stands (if you need to lift the mower)
- Shop rag or paper towels
- Owner’s manual (for reference)
Optional but helpful:
- Camera or smartphone (to photograph belt routing before removal)
- Flashlight (for better visibility under the mower)
Safety Precautions
Before you begin, always focus on safety:
- Disconnect the spark plug wire to prevent accidental starting.
- Remove the key from the ignition.
- Allow the mower to cool if it was recently used.
- Work on a flat, stable surface.
- Wear gloves to protect your hands from sharp edges.
If your mower has a gas tank, consider draining it or tilting the mower so fuel doesn’t leak.
Credit: www.greggio.com
Step-by-step Guide: How To Replace The Drive Belt
1. Prepare The Mower
Start by cleaning any grass or debris from the mower’s underside. This gives you a clear view of the belt and pulleys. Use a brush or compressed air if needed. Position the mower so you have plenty of space to work.
2. Access The Drive Belt
Most riding mowers require you to remove the mower deck (the part that holds the blades) to reach the drive belt. Follow these general steps:
- Lower the mower deck to its lowest position.
- Disconnect the deck engagement cable or spring.
- Remove any pins, clips, or bolts holding the deck in place.
- Slide the deck out from under the mower.
Some models allow access without removing the deck, but most do not. Check your manual if you’re unsure.
3. Remove The Old Belt
With the deck out of the way, locate the drive belt running from the engine pulley to the transmission pulley. Take a clear photo of the belt’s routing or refer to the diagram in your manual.
Release any belt keepers (small metal rods) by loosening, but not removing, their bolts. Use your socket set or wrench to loosen the tensioning pulley and relieve tension on the belt.
Carefully pull the old belt off each pulley. If it’s stuck, gently pry it off with a screwdriver, but avoid damaging the pulleys.
4. Inspect Pulleys And Components
Before installing the new belt, spin each pulley by hand. They should turn smoothly without wobbling or grinding. Check for:
- Worn bearings (pulleys feel rough or loose)
- Bent or damaged pulleys
- Debris wrapped around shafts
Replace any damaged parts before continuing. A new belt won’t last if the pulleys are bad.
5. Install The New Drive Belt
Route the new belt following the same path as the old one. If needed, use your photo or manual diagram. Make sure the belt sits in the pulley grooves, not on the edges.
Re-engage the tensioning pulley and tighten any bolts you loosened earlier. The belt should be snug, but not overly tight. Too much tension can damage the belt or pulleys.
Snap the belt keepers back in place, ensuring they don’t touch the belt itself.
6. Reassemble The Mower
Slide the mower deck back under the mower. Reattach any cables, springs, pins, or bolts in the reverse order you removed them. Double-check all connections.
Reconnect the spark plug wire and insert the ignition key.
7. Test The Mower
Start the mower and engage the drive system. The mower should move smoothly without slipping or strange noises. Let it run for a few minutes and check for proper belt tracking.
Shut off the mower and inspect the belt. If it has shifted or twisted, recheck the routing and tension.
Common Mistakes To Avoid
Many beginners make small errors that can lead to bigger problems. Watch out for these:
- Using the wrong belt size: Even a small difference can cause slipping or wear.
- Forgetting to note belt routing: Install the belt wrong, and the mower won’t drive.
- Over-tightening the belt: This strains the bearings and shortens belt life.
- Ignoring worn pulleys: A new belt on old, rough pulleys won’t last.
- Skipping a test run: Always test before mowing your entire lawn.
Differences Between Mower Models
Not all riding mowers are built the same. Here’s a quick comparison of how some major brands handle belt replacement:
| Brand | Deck Removal Required? | Belt Routing Complexity | Typical Belt Size |
|---|---|---|---|
| John Deere | Yes | Moderate | 1/2″ x 90–100″ |
| Husqvarna | Yes | High | 5/8″ x 90–110″ |
| Craftsman | Usually | Low–Moderate | 1/2″ x 90–100″ |
| Cub Cadet | Yes | Moderate | Variable |
Always check your model’s specifics, as even small differences in design can change the steps.
How To Choose The Right Replacement Belt
Not all drive belts are the same. Here’s what matters when selecting a new one:
- Correct length and width: Measure the old belt or find the number in your manual.
- Belt material: Kevlar belts last longer than standard rubber, especially for heavy-duty mowers.
- OEM vs. aftermarket: Original Equipment Manufacturer (OEM) belts usually fit best, but some aftermarket brands offer similar quality for less money.
Here’s a comparison of OEM vs. aftermarket belts:
| Type | Fit Accuracy | Price | Durability |
|---|---|---|---|
| OEM | Excellent | Higher | High |
| Aftermarket | Good–Varies | Lower | Medium–High |
If you’re unsure, bring the old belt to the store for a direct comparison.
Extra Tips For A Smooth Replacement
- Photograph everything: A quick photo saves confusion during reassembly.
- Keep hardware organized: Place bolts and clips in a small tray or bag.
- Lubricate pulleys: A small drop of lubricant can help pulleys spin freely, but avoid getting any on the belt.
- Check belt tension: Too loose, and the belt will slip; too tight, and it may snap.
- Replace in pairs: If your mower uses two drive belts, replace both for even performance.
Maintenance To Extend Belt Life
A new belt is an investment. Here’s how to make it last longer:
- Clean debris regularly: Grass and sticks can damage the belt.
- Inspect tension: Check and adjust belt tension each season.
- Store mower properly: Keep it dry and out of the sun to prevent belt cracking.
- Avoid overloading: Don’t mow grass that’s too tall or wet, as it strains the belt.
When To Call A Professional
Most homeowners can replace a drive belt with basic tools and patience. However, call a professional if:
- The belt is hard to access (complex transmission setups)
- You hear grinding or see damaged pulleys
- The mower still doesn’t move after belt replacement
A skilled technician can diagnose deeper issues, such as transmission problems, that a new belt alone can’t fix.
Real-world Example
Consider a typical homeowner with a John Deere D130. After noticing slipping and loud noises, they inspect the belt and see cracks. Following the steps above, they:
- Disconnect the spark plug
- Remove the deck and old belt
- Install a new OEM belt, photograph the routing, and reassemble
- Test the mower, finding it runs smoothly again
This process takes about 60–90 minutes for someone new to mower repair. With practice, it gets faster each season.
Credit: www.greggio.com
Frequently Asked Questions
How Often Should I Replace My Riding Mower’s Drive Belt?
Most belts last 2–4 years or about 25–100 hours of use, depending on mowing conditions. Check for cracks or fraying at least once per season.
What Size Drive Belt Does My Mower Need?
Belt size depends on your mower model. Check the owner’s manual or the old belt’s part number. If unsure, measure the belt’s length and width or consult the manufacturer’s website.
Can I Use Any Brand Of Replacement Belt?
It’s best to use OEM belts for perfect fit and durability. Some reputable aftermarket brands work well, but avoid cheap, unbranded belts. Poor-quality belts wear out quickly and may not fit properly.
What Do I Do If The New Belt Keeps Slipping Off?
Double-check the belt routing and tension. If the belt is correct and keeps slipping, inspect pulleys for damage or misalignment. If everything looks good, consult a professional.
Are There Any Good Online Resources For Mower Repair?
Yes, many manufacturers offer free manuals and diagrams online. For example, the MTD official manuals site has diagrams for many brands.
Replacing a drive belt takes patience, but it’s a valuable skill for any homeowner with a riding mower. With the right belt, tools, and a careful approach, you can keep your machine running efficiently for years.