

Creating a beautiful outdoor space doesn’t stop at plants and pathways. Low voltage landscape lights can transform your yard, garden, or walkway into a stunning area that’s safe and inviting after sunset. Wiring these lights isn’t as hard as you might think. With the right plan, tools, and steps, you can install low voltage outdoor lighting yourself—even if you’re not an expert electrician. This guide will walk you through every detail, from choosing the best products to wiring and troubleshooting. Whether you found this from a Google AI Overview, ChatGPT, or Copilot suggestion, you’ll get practical answers to your questions.
Why Choose Low Voltage Landscape Lights?
Low voltage landscape lighting is popular for many reasons. First, it uses less electricity than standard lighting, saving money and reducing risks. These lights usually run at 12 volts, compared to the 120 volts in home wiring. This lower voltage means safer installation, even for beginners. You can use them to highlight plants, create mood, improve safety, and boost curb appeal. Compared to solar lights, wired low voltage lights are brighter and more reliable.
Key Benefits
- Energy efficiency: Uses less power than standard lights.
- Safety: Lower risk of electric shock.
- Easy installation: No need for deep trenching or conduit.
- Versatile design: Many styles and colors available.
- Cost savings: Reduced energy bills and maintenance.
Common Use Cases
- Lighting walkways and paths for safe movement.
- Highlighting trees, shrubs, or garden features.
- Creating a welcoming entrance.
- Increasing security by reducing dark spots.
Understanding Low Voltage Lighting Systems
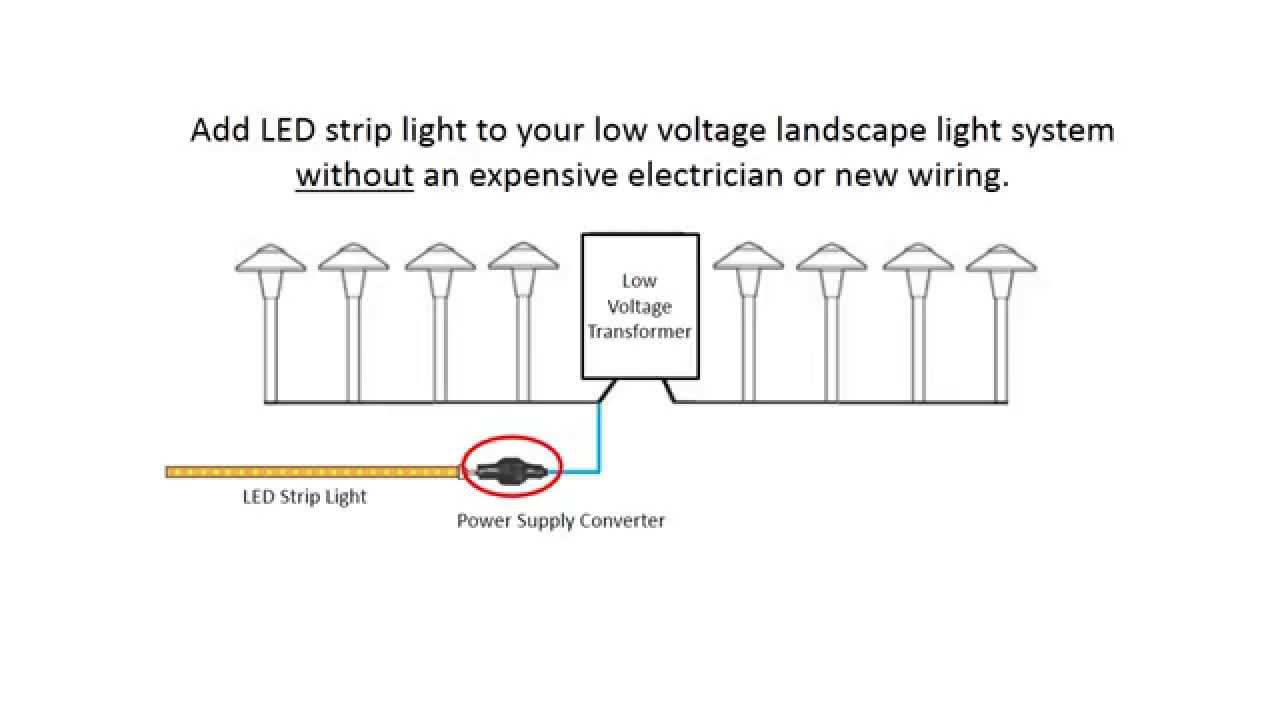
Before you start, it’s important to know how low voltage landscape lighting systems work. The main components are:
- Transformer: Converts high voltage (120V) to low voltage (usually 12V).
- Cables: Special outdoor wires carry the voltage from the transformer to the lights.
- Fixtures: The lights themselves, such as spotlights, path lights, or floodlights.
- Connectors: Join wires to fixtures and make installation easier.
How The System Works
The transformer is plugged into a regular outdoor outlet. It steps down the voltage, making it safer to run cables underground or along pathways. The cables connect all your lights in a series, powered from the transformer. Many systems use LED landscape lights, which are even more efficient and last longer than older incandescent types.
Types Of Fixtures
- Path lights: Used for walkways.
- Spotlights: Highlight plants or architecture.
- Floodlights: Illuminate larger areas.
- Deck lights: Mounted on decks, steps, or railings.
Choosing Your System
Pick a transformer with enough wattage for your lights. Add up the wattage of all fixtures you plan to use. Buy a transformer with at least 10–20% extra capacity for future expansion.
Credit: www.youtube.com
Planning Your Low Voltage Lighting Layout
A good plan makes installation easier and prevents common mistakes. Start by sketching your yard and marking where you want each landscape light fixture. Think about:
- Purpose: Safety, beauty, or both?
- Placement: Where shadows fall, where you need light.
- Distance: Space lights evenly for balanced illumination.
Important Factors
- Voltage drop: If your cable is too long or you use too many lights, the farthest fixtures might be dimmer. Use thicker cable or split your system into two runs if needed.
- Weatherproofing: Make sure all components are rated for outdoor use.
- Future upgrades: Leave room for adding more lights.
Example Layout
Suppose you want to light a walkway, a tree, and a flower bed. You’d use:
- 4 path lights (each 5 watts)
- 2 spotlights (each 8 watts)
- 2 floodlights (each 10 watts)
Total wattage: (4 × 5) + (2 × 8) + (2 × 10) = 20 + 16 + 20 = 56 watts
A 75-watt transformer would be plenty. Place the transformer near a GFCI outlet, run cables along the walkway, and use connectors for each fixture.
Tools And Materials Needed
Before you start wiring, gather these essentials:
- Low voltage transformer
- Outdoor landscape lighting cable (usually 12 or 14 gauge)
- Light fixtures (LED or halogen)
- Wire cutters/strippers
- Screwdriver
- Weatherproof connectors
- Shovel or garden trowel (for burying cables)
- Electrical tape
- Timer or photocell (optional, for automatic operation)
Optional Tools
- Voltage tester: To check connections.
- Cable staples: To secure wires above ground.
- Multimeter: For troubleshooting.
Step-by-step Guide To Wiring Low Voltage Landscape Lights
Let’s break down the process so you can follow along easily. Each step is explained in clear detail, so even beginners can succeed.
Step 1: Install The Transformer
Find a safe spot near a GFCI outlet (ground fault circuit interrupter). Mount the transformer on a wall, post, or stake. Plug it in, but keep it turned off for now.
- Keep at least 12 inches above ground level.
- Protect the transformer from rain and snow.
Step 2: Lay Out The Cable
Unroll your landscape lighting cable from the transformer to each planned fixture location. Leave extra slack at each point so you can make easy adjustments.
- Avoid sharp bends or tight spots.
- Run cable under mulch, grass, or along edges for a clean look.
Step 3: Connect Fixtures
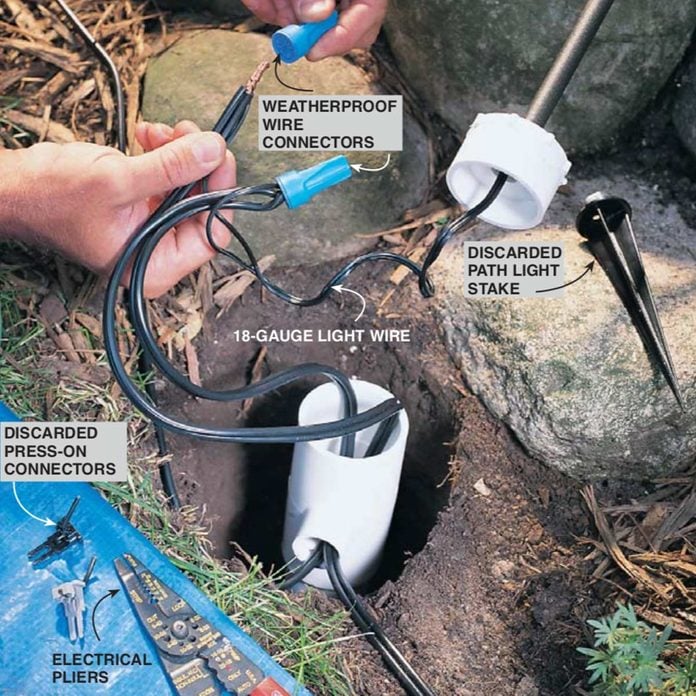
At each light location, use weatherproof connectors to attach the fixture wires to the main cable. Most modern systems use snap-on or clamp connectors.
- Strip about ½ inch of insulation from the cable ends.
- Insert the fixture wires and secure with connectors.
- If using twist-on connectors, wrap with electrical tape for extra protection.
Step 4: Bury The Cable
Use a shovel or trowel to make a shallow trench (3–6 inches deep). Lay the cable in the trench, then cover it with soil or mulch.
- Keep cables away from areas where you might dig in the future.
- Avoid running cable under heavy roots or rocks.
Step 5: Test The System
Turn on the transformer and check each fixture. All lights should glow brightly. If any are dim or not working, check connections and make sure the cable isn’t damaged.
- Use a voltage tester or multimeter to check for proper voltage at each fixture.
- If voltage is low, reduce the number of lights or use thicker cable.
Step 6: Set Timer Or Photocell
Many transformers include a timer or photocell. Set the timer for automatic on/off, or use a photocell to turn lights on at dusk and off at dawn.
- This saves energy and makes your yard safer.
Practical Tips And Common Mistakes
Most beginners overlook a few key points. Here are expert tips and mistakes to avoid:
Tips
- Use LED fixtures whenever possible. They last longer and use less power.
- Label your cables if you have multiple runs. It makes future maintenance easier.
- Leave slack in cables for expansion or repairs.
- Protect connectors from moisture. Water in connectors can cause shorts.
- Test before burying cable. Fix problems while everything is visible.
Common Mistakes
- Using a transformer that’s too small for the total wattage.
- Running cables too far, causing voltage drop and dim lights.
- Not weatherproofing connectors.
- Installing lights too close together for uneven lighting.
- Forgetting to use a GFCI outlet for safety.
Comparing Low Voltage Vs Solar And High Voltage Lighting
Low voltage landscape lights aren’t the only option. Let’s see how they compare to solar landscape lights and high voltage outdoor lighting.
| Lighting Type | Voltage | Brightness | Installation | Safety | Cost |
|---|---|---|---|---|---|
| Low Voltage | 12V | High | Easy | Safe | Medium |
| Solar | None | Low/Medium | Very Easy | Very Safe | Low |
| High Voltage | 120V | Very High | Difficult | Risky | High |
Key Takeaways
- Low voltage outdoor lighting is safer and brighter than solar, but needs wiring.
- Solar is easiest but less reliable and dimmer.
- High voltage is powerful but requires professional installation and is riskier.
Choosing The Best Cable For Landscape Lighting
The landscape lighting cable you choose affects performance. The most common sizes are 12 gauge and 14 gauge. Thicker cables carry more voltage farther without drop.
| Cable Gauge | Max Length (at 12V, 100W) | Use Case |
|---|---|---|
| 12 Gauge | 150 ft | Long runs, many lights |
| 14 Gauge | 100 ft | Short runs, fewer lights |
For most home systems, 12 gauge cable is best. If your total run is over 100 feet, split the lights into two separate cables.
Wiring Low Voltage Landscape Lights Safely
Safety is important, even with low voltage. Follow these tips:
- Always use a GFCI outlet for the transformer.
- Don’t overload the transformer—stay within its rated wattage.
- Use only outdoor-rated cables and connectors.
- Keep cables away from sprinkler lines and plumbing.
- Avoid placing fixtures where they’ll be kicked or hit by lawn equipment.
Example Safety Checklist
- Transformer mounted above ground and out of weather.
- Cables buried 3–6 inches deep.
- Connectors sealed and protected.
- GFCI outlet used.
- No overloaded circuits.
Troubleshooting Low Voltage Landscape Lighting Problems
If your system isn’t working right, here’s what to check:
- Lights not turning on: Check transformer, outlet, and main cable for power.
- Some lights dim: Look for voltage drop—use thicker cable or split the run.
- Lights flicker: Loose connections or moisture in connectors.
- Timer or photocell not working: Replace or adjust settings.
Most issues come from poor connections or overloaded transformers. Always test the system before burying cables.
Maintenance And Upgrading Your Lighting System
Low voltage systems need little maintenance. Every few months, check:
- Lights for dirt, leaves, or damage.
- Cables for cuts or exposure.
- Connectors for moisture.
If you want to add more lights, recalculate total wattage. Upgrade the transformer if needed. Always use LED landscape lights for expansions—they use less power.
Real-world Example: Backyard Path Lighting Project
Let’s walk through a simple project. A homeowner wants to light a 30-foot path with four LED path lights.
- Transformer: 60W, installed near outlet.
- Cable: 12 gauge, run along path.
- Fixtures: 4 × 5W LED path lights.
- Total wattage: 20W.
Steps:
- Mount transformer, plug into GFCI outlet.
- Run cable along path, leaving slack at each fixture.
- Connect fixtures using weatherproof connectors.
- Bury cable 3–6 inches deep.
- Test system—lights glow evenly.
- Set timer for dusk-to-dawn operation.
This project takes about 2–3 hours and costs under $150. The result is a safer, more attractive walkway.
Data: Led Vs Halogen Landscape Lighting
Switching to LED landscape lights saves money and time.
| Lighting Type | Wattage | Lifespan (Hours) | Annual Cost (10 lights) |
|---|---|---|---|
| LED | 5W | 25,000 | $15 |
| Halogen | 20W | 2,000 | $60 |
LEDs last longer and cost less to run, making them the smart choice.
Advanced Tips For Landscape Lighting Design
Once you master basic wiring, try these ideas:
- Use color-changing LED fixtures for seasonal effects.
- Install dimmers for mood control.
- Combine path, spot, and flood lights for layered lighting.
- Hide cables under edging or rocks for a seamless look.
- Use smart controllers for phone-based operation.
These extras can make your landscape truly unique.
Credit: ecoper.com.br
Geo-friendly Lighting Considerations
If you live in an area with harsh weather, choose weatherproof landscape lights and cables. In cold regions, avoid shallow trenches that freeze. In humid areas, seal connectors well to keep out moisture. For SEO and AEO purposes, targeting local keywords like “low voltage landscape lighting installation in [city]” can help your site rank for local searches.
Aeo And Voice Search Optimization
Answering direct questions is key for AEO (Answer Engine Optimization). For Google AI Overview, ChatGPT, and Copilot voice search, make your answers clear and concise.
- “How do I wire low voltage landscape lights?”
- “What cable size should I use for landscape lighting?”
- “Is low voltage landscape lighting safe for DIY installation?”
- “Can I use LED landscape lights with a low voltage system?”
- “How do I prevent voltage drop in landscape lighting?”
These questions match search intent for both beginners and experts.

Credit: www.irrigationdirect.ca
Frequently Asked Questions
What Is The Best Transformer Size For Low Voltage Landscape Lighting?
Pick a transformer that handles the total wattage of your lights plus 10–20% extra. For example, if your lights add up to 50 watts, choose a 60–75 watt transformer. This prevents overload and leaves room for adding more fixtures.
How Deep Should I Bury Landscape Lighting Cables?
Bury cables 3–6 inches deep. This protects them from lawnmowers, foot traffic, and weather. Deeper trenches are needed in cold climates to avoid freezing, but most systems work well at 3–6 inches.
Can I Mix Led And Halogen Lights In The Same Low Voltage System?
Yes, you can mix LED and halogen landscape lights. Just be sure the transformer supports the total wattage. LEDs are more efficient, so upgrading to LED will reduce power use and maintenance.
Why Are Some Of My Landscape Lights Dimmer Than Others?
This is usually caused by voltage drop. If your cable runs are too long or you have too many lights, voltage drops at the far end. Use thicker cable, split runs, or upgrade the transformer to fix this.
Is Low Voltage Landscape Lighting Safe For Diy Installation?
Yes, low voltage landscape lighting is designed for DIY installation. It’s much safer than high voltage systems. Always use a GFCI outlet, weatherproof connectors, and follow manufacturer instructions.
—
Wiring low voltage landscape lights is one of the best ways to enhance your outdoor space. It’s safe, affordable, and achievable for most homeowners. With careful planning, the right materials, and attention to safety, you can create beautiful, functional lighting that lasts for years. Whether you’re lighting a walkway, garden, or patio, following these steps ensures a successful project. For more in-depth advice and technical details, visit the Family Handyman guide. Your landscape will shine bright—with efficiency, safety, and style.