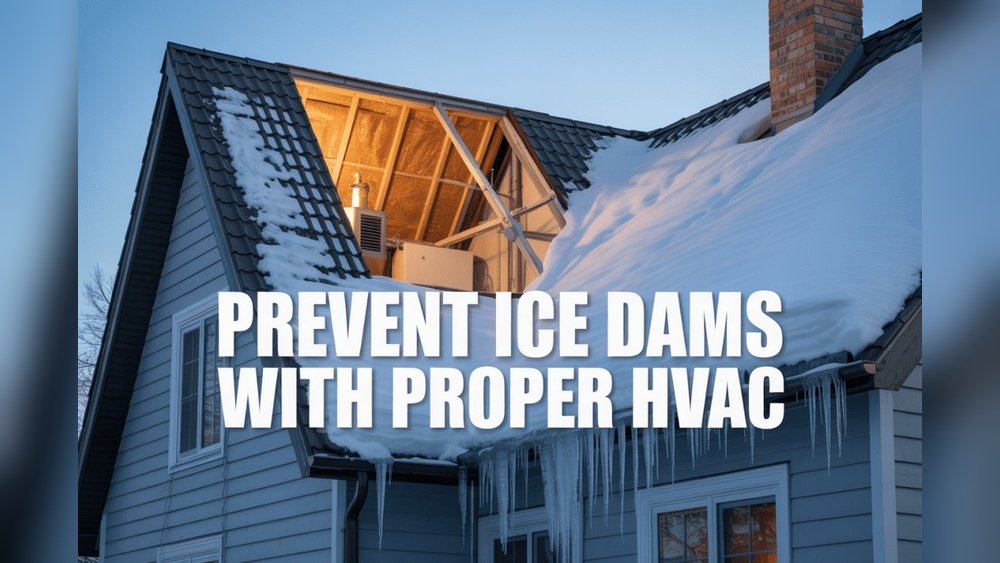
Winter brings stunning snowy landscapes, but it can also create hidden dangers for your home—one of the most common is the ice dam. These ridges of ice along the edge of your roof can cause water leaks, damage your attic, and even ruin your walls. But with the right knowledge and preparation, you can stop ice dams before they start. If you live in a colder climate, preventing ice dams should be a top priority to protect your home and your wallet.
This guide will cover the causes of ice dams, practical prevention strategies, and the best products and methods to keep your roof safe. You’ll also learn about warning signs, common mistakes, and expert advice for long-term solutions. Whether you’re a first-time homeowner or have faced ice dams before, these tips will help you enjoy a stress-free winter.
What Are Ice Dams And Why Are They A Problem?
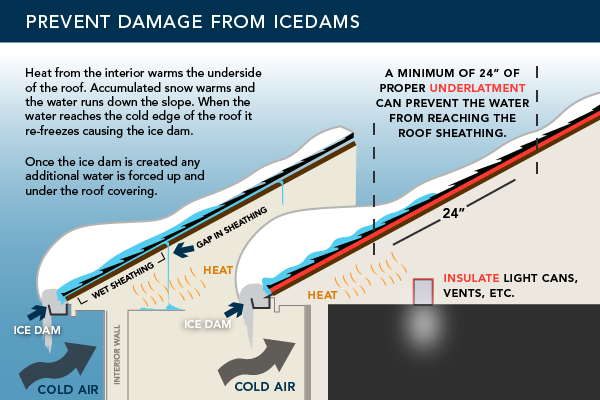
An ice dam forms when snow on your roof melts, flows down, and then refreezes near the roof edge. This creates a thick band of ice that prevents melting snow from draining properly. Water backs up behind the dam, often seeping under shingles and into your attic or walls.
Why are ice dams dangerous?
- Water leaks: Water can cause stains, peeling paint, and mold growth inside your home.
- Structural damage: Persistent leaks can weaken beams and rot wood.
- Gutter damage: The weight of ice can tear gutters away from your house.
- Expensive repairs: Fixing water damage is far more costly than preventing ice dams.
Knowing what causes these icy problems is the first step toward stopping them.
How Do Ice Dams Form? The Science Behind The Problem
Ice dams happen when there’s a temperature difference between your roof’s upper surface and the eaves (the part overhanging your walls). Warm air from your attic melts snow on the higher part of your roof, but the lower edge stays colder.
Melted water runs down and refreezes before it can drain away.
Here’s what usually creates these conditions:
- Poor attic insulation: Heat escapes from your home into the attic, warming the roof.
- Inadequate ventilation: Without enough airflow, the attic stays warm, melting snow on the roof.
- Clogged gutters: Leaves and debris block water flow, causing it to freeze along the edge.
- Weather cycles: Fluctuating temperatures (warm days, cold nights) make melting and freezing more common.
Non-obvious insight: Many homeowners believe only heavy snow causes ice dams, but even a few inches can be enough if your attic is warm and your roof edge is cold.
Signs You Might Have An Ice Dam
Catching ice dams early can save you money and headaches. Here are some warning signals:
- Icicles forming on the edge of your roof
- Water stains on ceilings or walls
- Peeling paint near the roofline
- Moisture in the attic
- Gutters filled with ice
If you see any of these, act quickly to avoid bigger problems.
15 Expert Tips To Prevent Ice Dams On Your Roof
1. Upgrade Your Attic Insulation
The most effective way to prevent ice dams is to keep your attic cold. Proper insulation slows heat loss from your home, so snow on the roof doesn’t melt prematurely.
- Target at least R-38 insulation in cold regions (about 12–14 inches of fiberglass or cellulose).
- Seal gaps around chimneys, wiring, and pipes to stop warm air leaks.
- Insulation must be evenly distributed, especially near the eaves.
Practical tip: Many homes have uneven insulation. Use a thermal camera or hire an energy auditor to spot problem areas.
2. Improve Attic Ventilation
A well-ventilated attic lets cold air flow from the eaves to the ridge, keeping the roof surface cool.
- Install soffit vents (at the roof’s edge) and ridge vents (at the top).
- Clear insulation from blocking vents.
- Aim for 1 square foot of vent area for every 150 square feet of attic space.
Non-obvious insight: Good ventilation helps in summer too—it lowers cooling costs and extends shingle life.
3. Seal Air Leaks
Even the best insulation won’t work if warm air escapes into the attic. Seal leaks around:
- Attic hatches and doors
- Recessed lighting
- Plumbing and exhaust vents
- Chimneys
Use caulk, spray foam, or weatherstripping as needed.
4. Keep Gutters Clean
Remove leaves, twigs, and debris before winter starts. Clean gutters let water flow away from your house instead of freezing in place.
- Use a gutter scoop or hose to flush out blockages.
- Consider installing gutter guards to keep out debris.
Expert tip: Check downspouts for blockages too. Water can back up from the ground.
5. Install Ice And Water Shield Membranes
A waterproof barrier under your shingles (especially along the eaves) can stop leaks even if an ice dam forms.
- Ask a roofing contractor to install at least 3–6 feet of ice and water shield along the lower roof edge, valleys, and around chimneys.
- This is most effective when done during roof replacement, but some products can be added later.
6. Use Roof Heating Cables
Heat cables (also called heat tape) run along the roof’s edge to melt ice and snow. These are electric wires you attach with clips or adhesive.
- Plug them in before heavy snow.
- Only install on problem areas (e.g., north side, valleys).
- Make sure they’re UL-listed for safety.
Warning: Don’t use heat cables as a substitute for insulation and ventilation. They’re a backup, not a solution.
7. Remove Snow With A Roof Rake
After a heavy snowfall, use a roof rake (with a long telescoping handle) to pull snow off the roof’s lower 3–4 feet.
- Start from the edge and work upward.
- Stand on the ground—never on a ladder or the roof itself.
- Remove snow evenly to avoid damaging shingles.
Pro tip: Lightweight aluminum or plastic rakes are easier to handle and less likely to damage shingles.
8. Upgrade To An Ice-resistant Roof Design
Some roofs handle snow and ice better than others. If you’re building or replacing your roof:
- Choose a steeper pitch (sloped roof) so snow slides off more easily.
- Use metal roofing—snow and ice don’t stick as easily as on shingles.
- Add snow guards to control how snow falls off.
9. Insulate And Vent Exhaust Ducts
Bathroom and kitchen exhaust fans often dump warm, moist air into the attic, raising its temperature.
- Make sure all ducts vent outside, not into the attic.
- Wrap ducts with insulation to prevent heat loss.
- Seal joints with metal tape.
10. Check And Maintain Attic Bypasses
Bypasses are hidden pathways where warm air escapes from your living space into the attic, often around:
- Light fixtures
- Chimney framing
- Plumbing stacks
Seal these with foam board or caulk.
11. Install Drip Edge Flashing
A drip edge is a metal strip installed along the roof edge. It directs water into the gutters and away from the fascia and eaves.
- Have a roofer add drip edge during roof installation or replacement.
- This also helps prevent wind-driven rain from seeping under shingles.
12. Add Radiant Barriers
A radiant barrier is a reflective material installed under the roof deck. It helps keep attic temperatures lower in both summer and winter.
- Works best when combined with proper insulation and ventilation.
- Can be installed during roof replacement or as a retrofit in some cases.
13. Use Proper Roof Shingle Placement
Shingles should overhang the roof edge by about 1/2 to 3/4 inch. Too much overhang can trap water and ice.
- Ask your roofer to follow manufacturer guidelines.
- Inspect for missing or loose shingles before winter.
14. Direct Downspout Discharge Away From The House
Melted snow and ice should drain at least 6–10 feet from your foundation.
- Use downspout extensions or splash blocks.
- Make sure water doesn’t pool near the house, which can refreeze and create ice dams at ground level.
15. Schedule Annual Roof Inspections
A professional can spot early signs of trouble you might miss.
- Check for missing shingles, damaged flashing, clogged gutters, and poor attic insulation.
- Address small issues before they become costly repairs.
Non-obvious insight: Some local utility companies offer free or discounted energy audits that include attic inspections.
Comparing Ice Dam Prevention Methods
It helps to see how different strategies stack up in terms of cost, effectiveness, and ease of installation. Here’s a comparison:
| Method | Effectiveness | Cost | DIY Friendly? |
|---|---|---|---|
| Attic Insulation | Very High | $$ | Medium |
| Attic Ventilation | High | $$ | Medium |
| Heat Cables | Medium | $$$ | Easy |
| Roof Raking | Medium | $ | Easy |
| Ice & Water Shield | Very High | $$$ | No |
Key takeaway: Attic insulation and ventilation offer the best long-term value, while heat cables and roof raking are good for emergencies.
Common Mistakes In Ice Dam Prevention
Ignoring Small Leaks
Small stains or drips might seem minor, but they often signal bigger problems. Fix them right away to prevent mold and rot.
Using Salt Or Chemicals
Never put rock salt or chemical ice melt on your roof. These products can damage shingles, gutters, and plants below.
Over-reliance On Heat Cables
Some homeowners install heat cables but skip the basics—good insulation and ventilation. Heat cables are a backup, not a primary defense.
Blocking Roof Vents
Insulation should not cover soffit or ridge vents. Blocked vents trap heat, making ice dams more likely.
Diy Roof Repairs Without Experience
Working on a roof in winter is dangerous. Hire a professional for repairs, especially if the roof is steep or high.
Non-obvious insight: It’s common to overlook the insulation around attic access points (like pull-down stairs or hatches). These often leak heat and need weatherstripping or insulation board.
Credit: www.hanover.com
When To Call A Professional
Some problems are too risky or complex for DIY fixes. Call a licensed roofing contractor or insulation expert if:
- You see large, persistent ice dams every year
- Water leaks inside, especially in multiple places
- Your attic insulation is uneven or missing in spots
- You need to install an ice and water shield or replace shingles
Professionals have the right tools, safety gear, and expertise. They can also check for other issues like poor roof design or hidden air leaks.
Geographic Factors: Why Location Matters
Ice dams are most common in areas with cold winters and frequent snow, such as the northern United States, Canada, and mountainous regions. But even milder climates can experience them during cold snaps.
Key geographic factors:
- Snowfall levels: More snow means higher risk.
- Temperature swings: Daytime melting and nighttime freezing make dams more likely.
- Roof orientation: North-facing roofs get less sun and stay colder.
- Building codes: Some regions require ice dam barriers or specific insulation levels.
If you live in a high-risk area, take extra precautions and consider local building codes when upgrading your roof.

Credit: stonebrookexterior.com
Top Products For Ice Dam Prevention
There are many products to help stop ice dams. Here’s a side-by-side look at popular options:
| Product | Purpose | Approx. Cost | Key Benefit |
|---|---|---|---|
| Blown-In Insulation | Increase R-value | $1.50–$2.00/sq. ft. | Seals gaps, covers irregular spaces |
| Heat Cables | Melt ice at eaves | $80–$120 per 100 ft. | Good for problem spots |
| Ice & Water Shield | Waterproof barrier | $50–$100 per roll | Stops leaks from ice dams |
| Gutter Guards | Keep gutters clear | $3–$8/linear ft. | Reduces clogs and ice buildup |
| Roof Rake | Remove snow safely | $35–$100 | Easy DIY snow removal |
Pro tip: Always compare product warranties and installation requirements. Some items work best together (e.g., insulation plus heat cables).
Diy Vs. Professional Ice Dam Prevention
Many prevention steps, like roof raking and gutter cleaning, are easy DIY tasks. But adding insulation, installing heat cables, or replacing roofing materials often require experience.
Diy Tasks
- Cleaning gutters
- Using a roof rake
- Sealing small air leaks
Professional Tasks
- Installing attic insulation or ventilation
- Adding ice and water shield
- Major roof repairs
Safety note: Never climb on an icy roof. If you’re unsure, call a pro.
Step-by-step: How To Safely Rake Snow Off Your Roof
- Choose the right roof rake—look for a lightweight model with a telescoping handle and non-scratch blade.
- Start from the edge and gently pull snow downward. Never push snow upward, as it can loosen shingles.
- Clear 3–4 feet from the edge to reduce risk of ice damming.
- Work in small sections to avoid overexertion.
- Stay on the ground. If you can’t reach, don’t use a ladder—call a professional.
Extra tip: Do this after each heavy snowfall to prevent buildup.
Emergency Actions If You Already Have An Ice Dam
If water is leaking inside, act fast:
- Use a box fan in the attic to blow cold air on the leak area.
- Put calcium chloride ice melt in a nylon stocking and lay it across the ice dam (do not use rock salt).
- Catch water with buckets or pans inside.
- Contact a roofer for safe ice removal.
Never chip at ice with a hammer or shovel. You could damage the roof and hurt yourself.
How To Tell If Your Roof Is At Risk
Some homes are more likely to get ice dams. Look for:
- Older homes (often have less insulation)
- Low-pitched roofs
- Complex roof shapes (multiple valleys or dormers)
- History of ice dams or leaks
If your home fits these, take extra steps before winter.
Energy Efficiency And Ice Dams
Improving attic insulation and sealing air leaks not only stops ice dams, but also lowers your energy bills. The U.S. Department of Energy says adding insulation can cut heating costs by up to 20%. You’ll feel warmer, use less energy, and protect your roof at the same time.

Credit: www.plymouthrock.com
Regional Building Codes And Ice Dam Prevention
Some states and cities require specific protection against ice dams, such as:
- Minimum R-values for attic insulation
- Ice and water shield underlayment on new roofs
- Proper attic ventilation
Check your local building codes before making upgrades. This ensures your home meets safety standards and may help with insurance claims if there’s damage.
For more technical details, you can check resources like the U.S. Department of Energy.
Case Study: How One Homeowner Stopped Ice Dams For Good
Jane, a homeowner in Minnesota, faced ice dams every winter. She spent hundreds on roof repairs and heat cables, but the problem kept coming back. Finally, she hired an energy auditor who found major air leaks around her attic hatch and recessed lights.
Jane sealed these leaks, added 12 inches of blown-in insulation, and upgraded her attic ventilation. The next winter, she had zero ice dams—and her heating bill dropped by 15%.
Key lesson: Permanent solutions require finding and fixing the root cause, not just treating the symptoms.
Frequently Asked Questions
How Do I Know If My Home Is At Risk For Ice Dams?
Homes in cold climates with poor attic insulation or ventilation are most at risk. Signs like icicles, water stains, or past ice dams mean you should take action before winter.
Can I Use Salt To Melt Ice Dams On My Roof?
No. Rock salt and chemical ice melt can damage shingles, corrode gutters, and kill plants below. Use calcium chloride in a stocking or contact a professional for safe removal.
What Is The Best Long-term Solution To Prevent Ice Dams?
The best solution is a combination of proper attic insulation, good ventilation, and sealing air leaks. These address the root cause—heat escaping into the attic.
Are Heat Cables Effective For Ice Dam Prevention?
Heat cables can help in problem spots, but they’re not a substitute for insulation and ventilation. Use them as a backup, not your primary defense.
When Should I Call A Professional For Ice Dam Issues?
Call a professional if you have persistent ice dams, water leaks inside, or need new insulation or roofing materials. Professionals have the tools and experience to fix complex problems safely.
—
Ice dams can cause big headaches, but with smart preparation, you can keep your home dry and safe all winter. Focus on insulation, ventilation, and regular maintenance for the best protection. Don’t wait for leaks to act—prevention is always cheaper and easier than repairs.
Stay proactive, and enjoy the winter season with peace of mind.