Mowing your lawn in a pattern does more than just create a beautiful visual effect. It also helps keep your grass healthier, makes mowing easier over time, and even adds value to your home’s appearance. Many people think patterned lawns are only for golf courses or professionals, but with the right approach, you can achieve these results too.
This guide will walk you through everything you need to know about how to mow a lawn in a pattern, from basic preparation to advanced tips.
Why Mow In A Pattern?
Before grabbing your mower, it’s important to understand the benefits of patterned mowing. First, patterned mowing prevents grass wear and tear from going in the same direction every week. Changing directions keeps grass blades upright and reduces soil compaction. It also reduces ruts, which are those unsightly lines that appear when you repeat the same mowing path.
A patterned lawn also reflects sunlight differently. The blades bent toward you look darker; those bent away appear lighter. This light reflection is what creates the striped effect that many admire. Plus, patterned lawns usually stand out in the neighborhood and can even raise your property’s curb appeal.
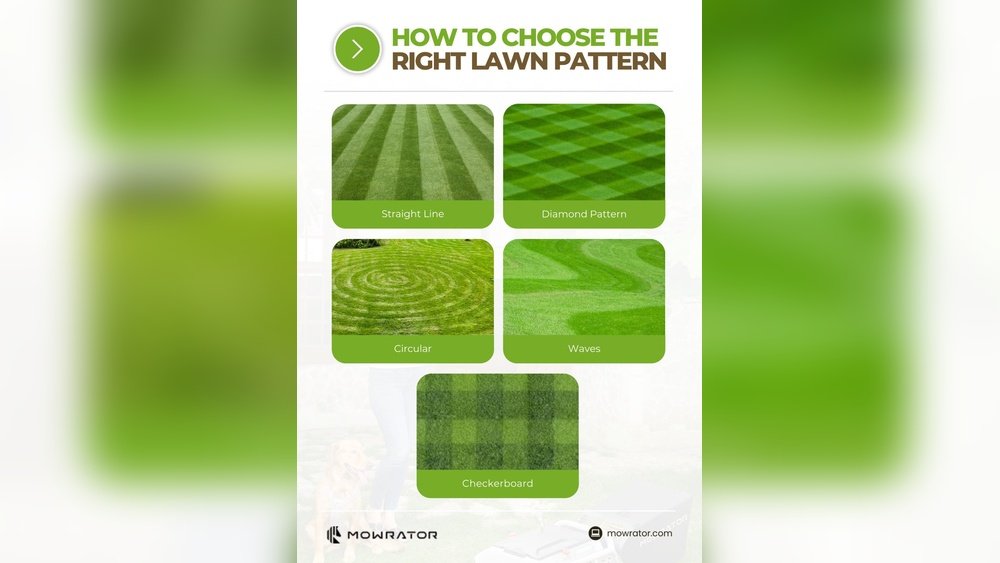
Choosing Your Pattern
There are several mowing patterns to choose from. The right one depends on your lawn’s size, shape, and your own style.
| Pattern Type | Best For | Difficulty |
|---|---|---|
| Stripes | All lawns | Easy |
| Checkerboard | Square/Rectangular lawns | Medium |
| Diamonds | Large, open lawns | Hard |
| Circles | Round lawns | Medium |
| Waves | Irregular shapes | Challenging |
If you’re a beginner, start with simple stripes. As you get more comfortable, try checkerboards or even diamond shapes for a striking look.
Preparing Your Lawn
Patterned mowing starts before you power up your mower. Good preparation makes all the difference.
- Clear debris: Remove sticks, rocks, toys, or anything else that could damage your mower or ruin your lines.
- Mow when grass is dry: Wet grass bends too much and doesn’t create sharp lines. Dry grass stands up better and cuts more cleanly.
- Sharpen your mower blade: A sharp blade cuts cleanly and bends grass evenly, which is crucial for patterns.
- Adjust your mower height: Set your mower to the highest recommended setting for your grass type. Longer blades bend more, making patterns stand out.
- Mark your starting line: Use a string or visual marker for your first pass, especially if you want straight lines.
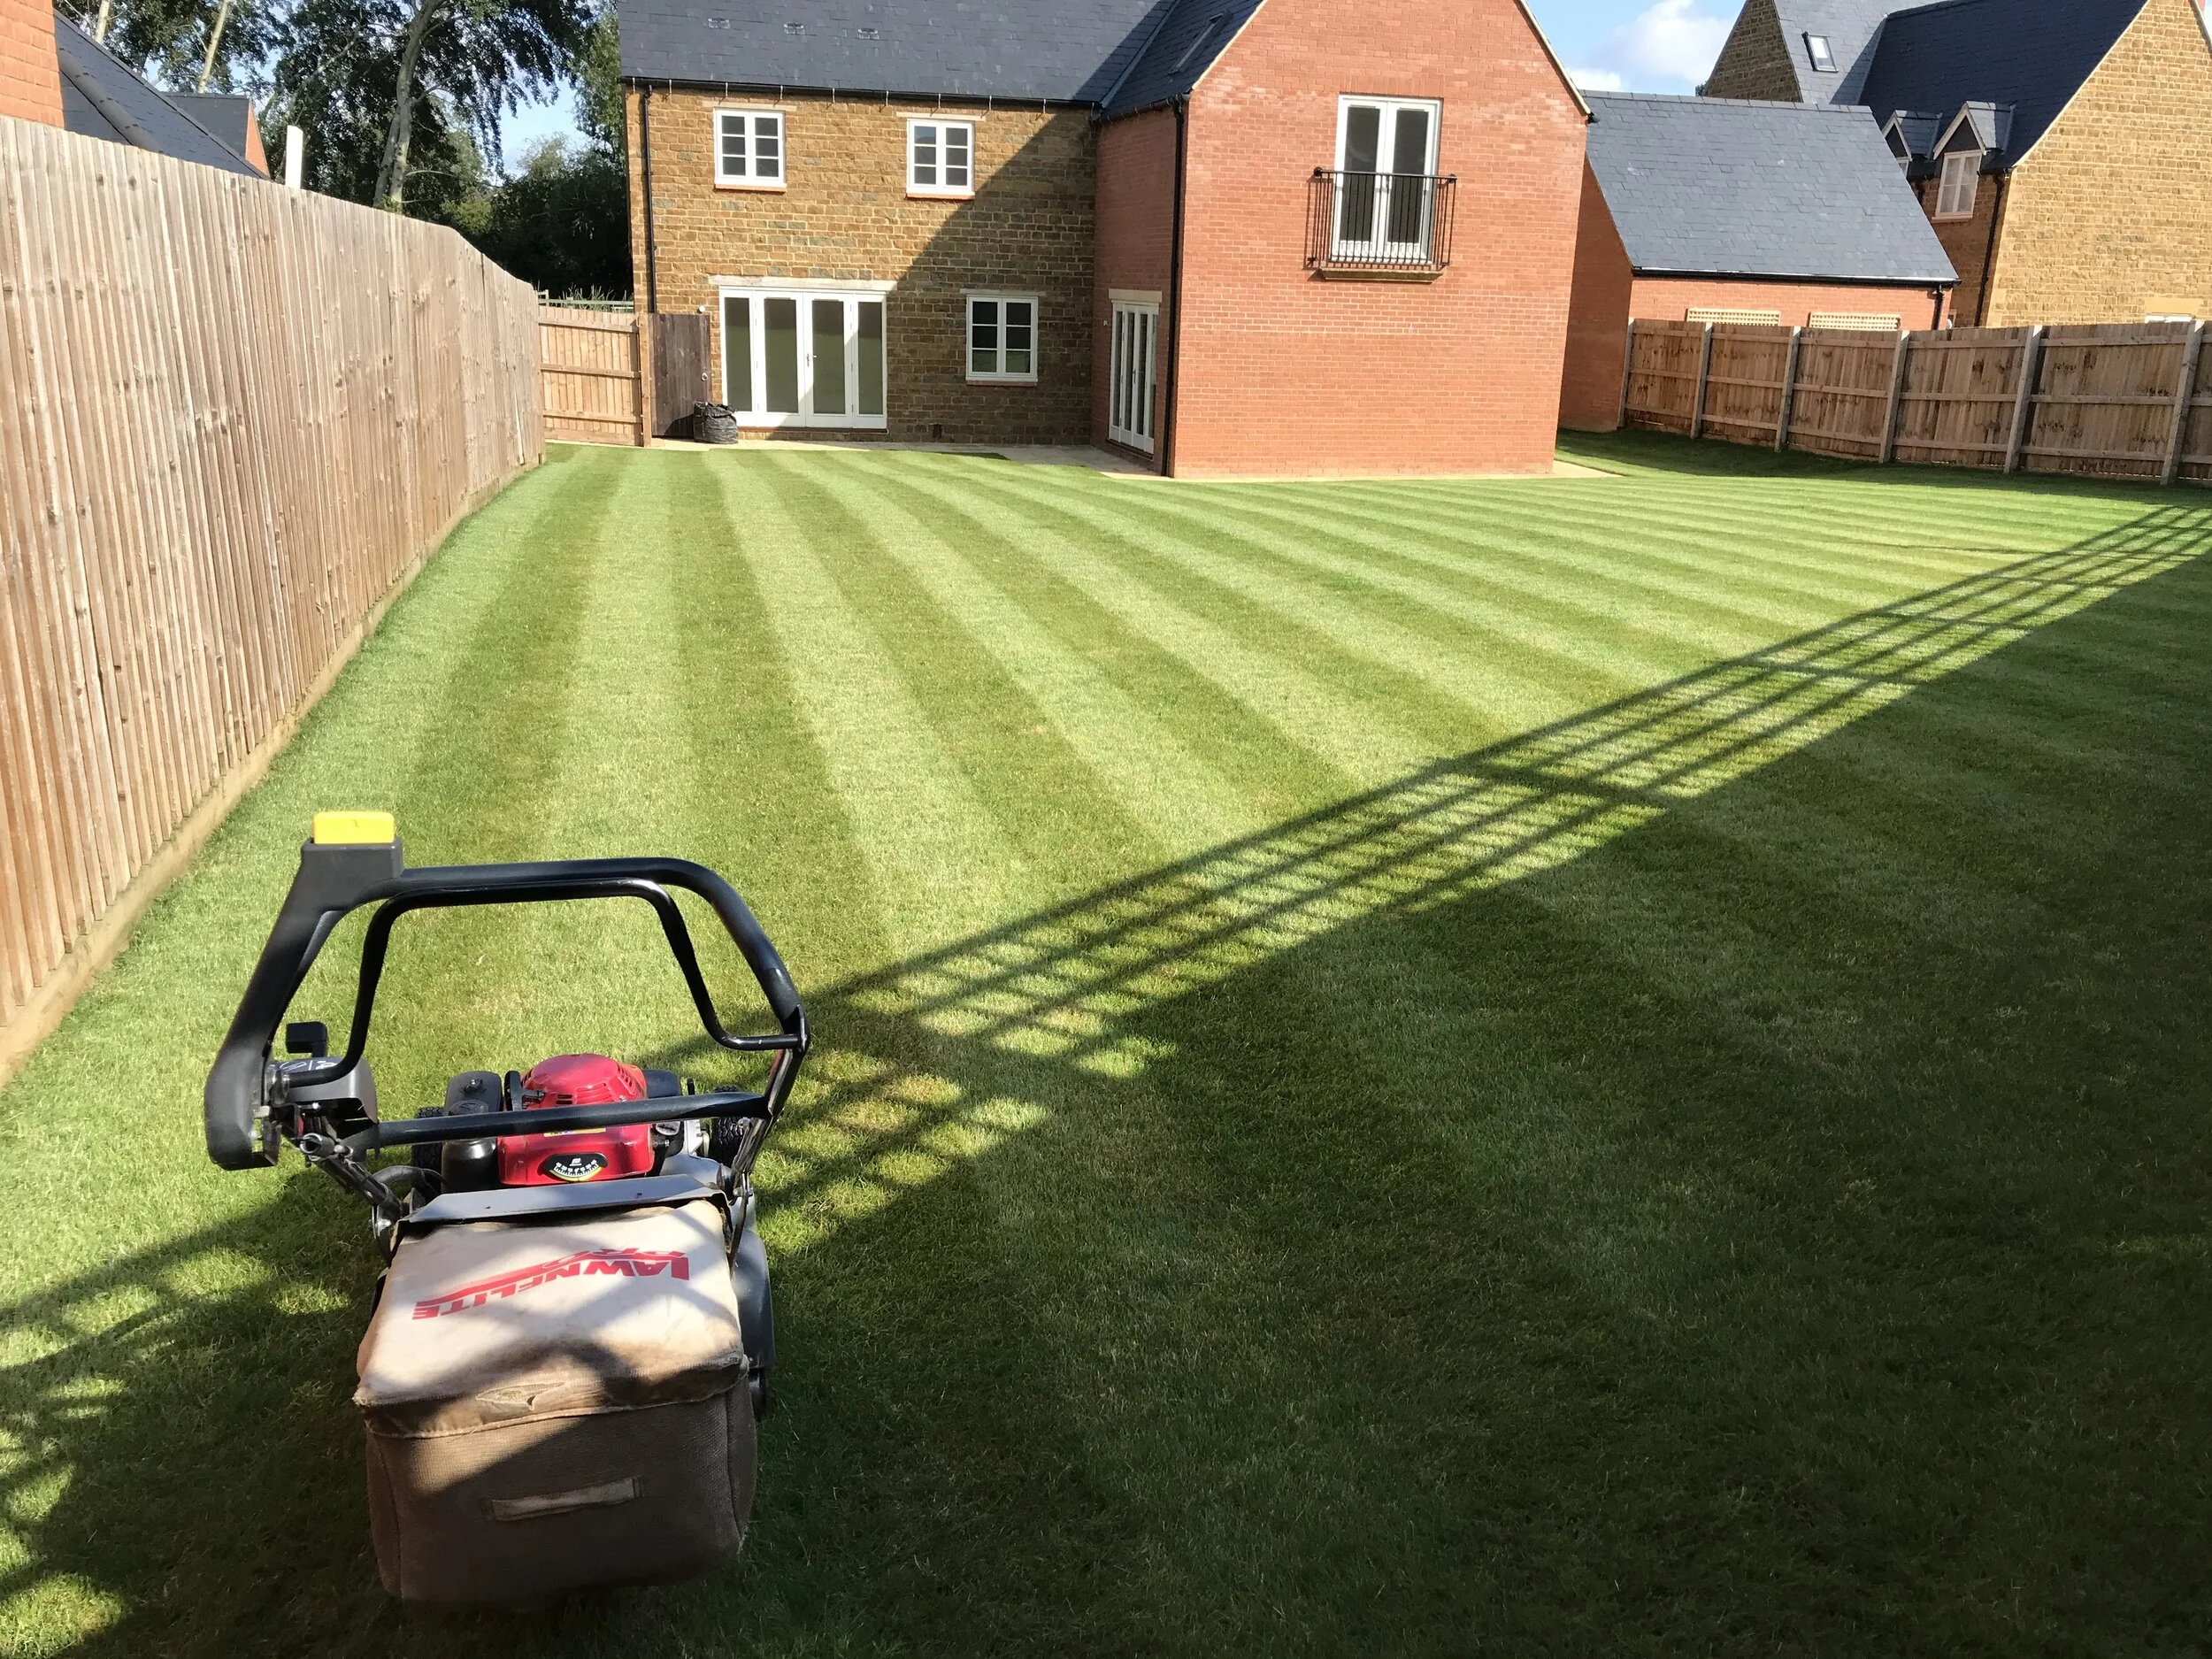
How To Mow Stripes
Stripes are the easiest and most popular pattern. Here’s how to achieve them:
- Choose your direction: Decide if you want your stripes parallel to your house, driveway, or another feature.
- Make your first pass: Use a marker or focus on a fixed point to keep your line straight.
- Turn carefully: At the end of each row, make a wide turn to avoid damaging the grass. Overlap each pass slightly to cover all grass.
- Alternate direction: For the next mow, change your stripe direction. This keeps grass healthy and prevents ruts.
A common beginner mistake is to look down at the mower instead of ahead at a fixed point. Always keep your eyes up for the straightest lines.
Creating A Checkerboard Pattern
Once you’ve mastered stripes, try a checkerboard. This pattern adds depth and looks impressive.
- Mow stripes as usual: Complete your first set of stripes.
- Mow perpendicular stripes: Mow a second set of stripes at a 90-degree angle to the first.
- Double-pass for bold lines: For a bolder look, mow each stripe twice in the same direction.
- Final pass: Go around the border to tidy up any uneven edges.
Checkerboards work best on rectangular or square lawns. If your lawn has curves or odd angles, keep the pattern simple to avoid a messy appearance.
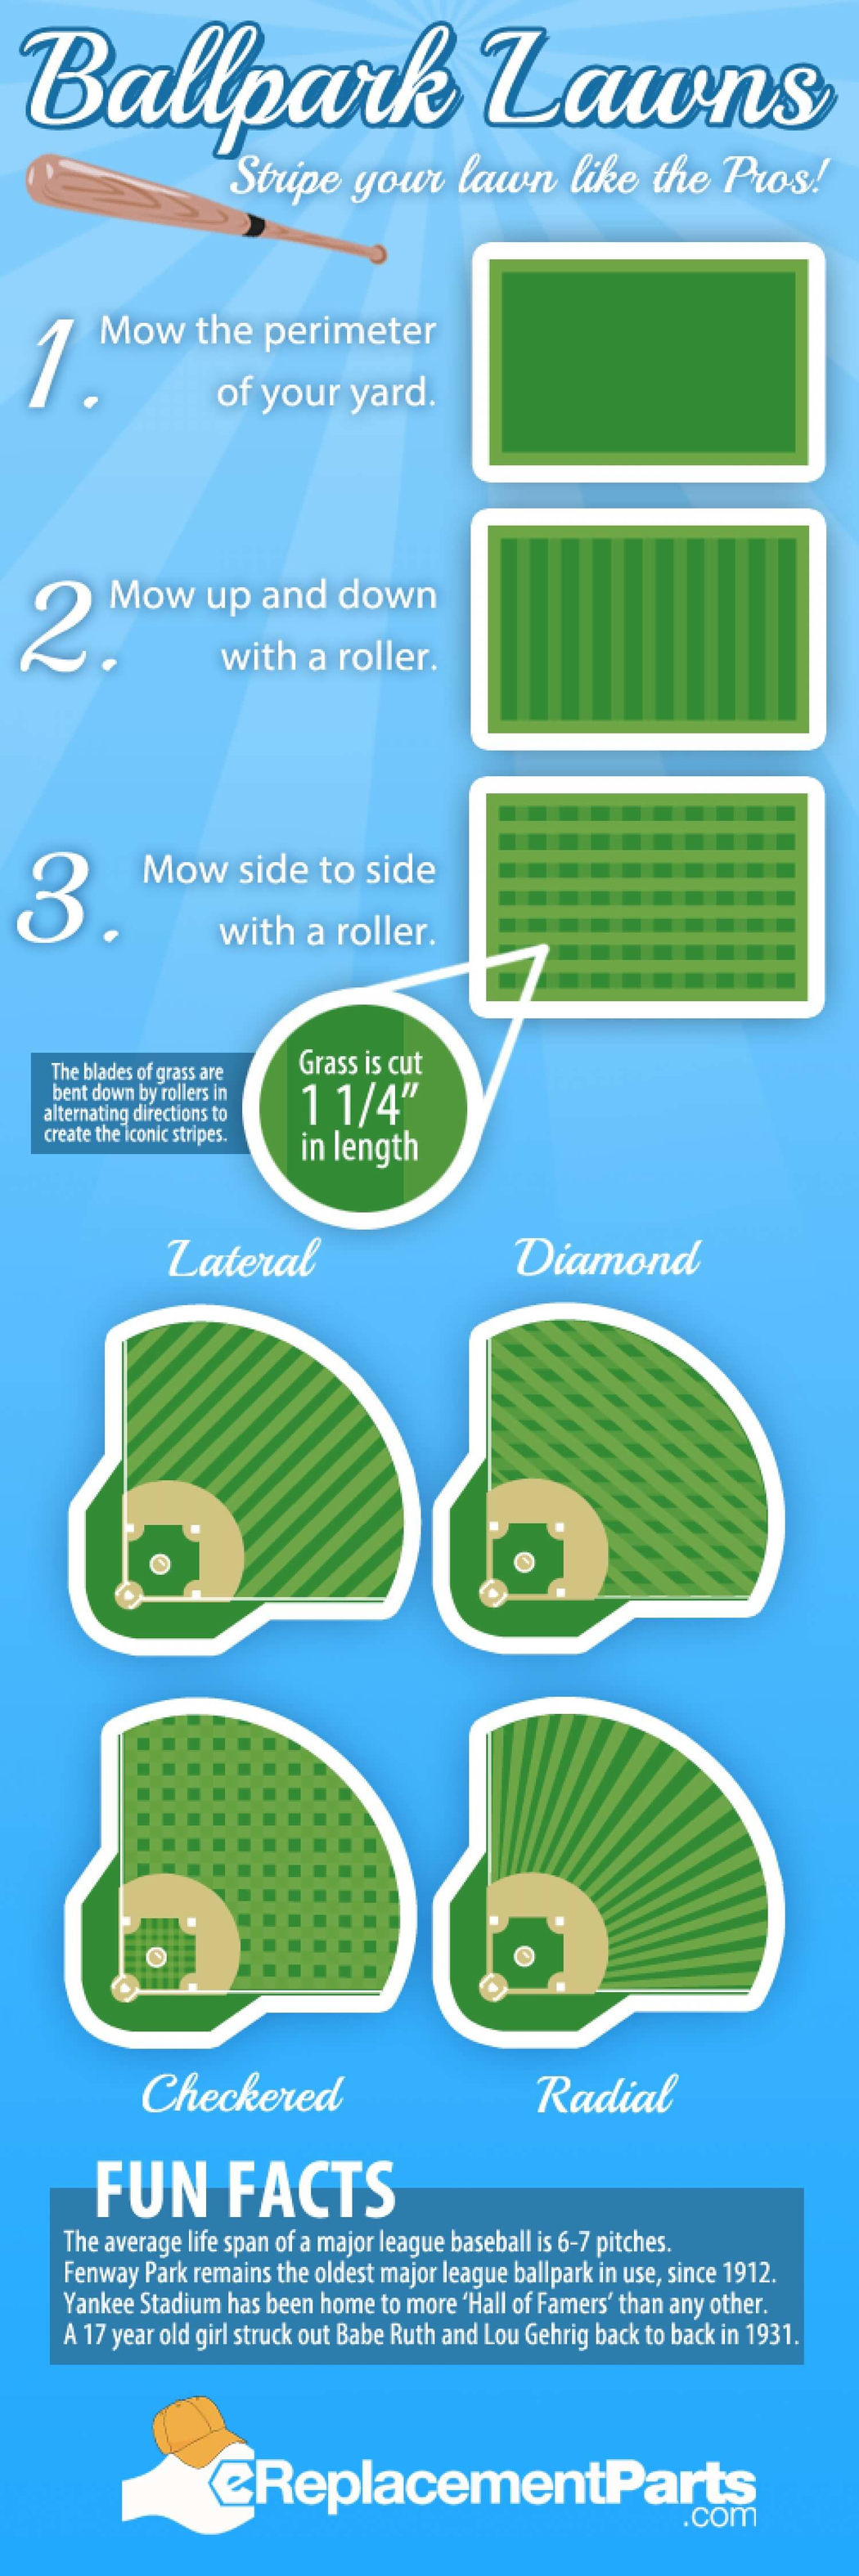
Diamond And Diagonal Patterns
Diamond shapes are advanced but create a stunning effect. This pattern is simply a checkerboard turned at a 45-degree angle.
- Visualize your lines: Use your property’s corners as guides.
- Mow your first diagonal set: Start at one corner and head toward the opposite. Use a string for a straight first pass if needed.
- Mow the opposite diagonal: After finishing, mow again at a right angle to your first set.
- Outline the lawn: Finish by mowing around the edge for a crisp look.
A helpful tip: Diagonal patterns are easier on larger lawns. Small lawns may look too busy with this design.
Credit: www.elitelevelbasketball.academy
Circles And Curves
Circular patterns suit round lawns or garden features. They’re also great for yards with trees in the center.
- Start at the center: Mow around the central point or feature.
- Expand outwards: Keep mowing in wider circles until you reach the edge.
- Overlap slightly: Each circle should overlap the previous to avoid missed spots.
- Watch your speed: Move slowly to keep circles even.
Curved patterns require more focus. Don’t rush, or you’ll end up with wobbly lines.
Wave And Custom Patterns
If you want a truly unique look, try waves or even custom designs. These require a steady hand and practice.
- Sketch your design: Plan your waves or custom shapes ahead of time.
- Use a guide: Lay out a hose or rope as a template for your first pass.
- Follow your guide: Carefully mow along the shape, then repeat for each line.
- Be patient: Custom patterns take time and may need touch-ups.
Remember, it’s better to start with simple waves and add complexity as you gain confidence.
Credit: www.yourgreenpal.com
Tools That Help Patterns Stand Out
The right tools can make your patterns more vivid and your mowing more efficient.
| Tool | Advantage | When to Use |
|---|---|---|
| Lawn roller | Bends grass for stronger stripes | After mowing |
| Striping kit | Attaches to mower, creates bold lines | During mowing |
| Edger | Sharpens borders for clean look | After mowing |
| String line | Keeps first pass straight | Before mowing |
You don’t need all these tools, but a lawn roller or striping kit can make a big difference, especially for dark, defined stripes.
Key Tips For Pattern Success
Here are some important details that many beginners overlook:
- Overlap passes slightly: Avoid missed patches and uneven coloring.
- Change direction each mow: This prevents compaction and keeps grass healthy.
- Don’t scalp the grass: Cutting too low damages blades and ruins patterns.
- Keep mower speed steady: Rushing creates wavy or jagged lines.
- Mow in the evening: Cooler temperatures reduce grass stress and help patterns last.
An advanced insight: If your pattern isn’t showing, your grass type may not be suitable for striping. Cool-season grasses (like fescue or ryegrass) show stripes better than warm-season grasses (like Bermuda).
Common Mistakes To Avoid
Even experienced mowers make mistakes when trying to create patterns. Here are the most frequent errors:
- Mowing wet grass: Wet blades don’t bend well and can clog your mower.
- Ignoring mower maintenance: Dull blades or uneven wheels make lines ragged.
- Forgetting to alternate patterns: Repeating the same path every week weakens grass and causes ruts.
- Skipping the border pass: A final trip around the edge gives a finished look.
- Trying complex patterns too soon: Master stripes before attempting diamonds or waves.
A non-obvious mistake: Not considering your yard’s sunlight. Patterns look best when viewed from the side with the most sun. Plan your stripes so the “show side” faces the street or your main window.
Maintaining Your Patterned Lawn
Patterns look best on healthy lawns. Proper maintenance keeps your efforts visible and long-lasting.
- Fertilize regularly: Healthy grass bends and recovers better.
- Water deeply, not often: Deep roots stay strong and upright.
- Aerate yearly: Compacted soil makes it hard for grass to stand tall.
- Remove weeds: Broadleaf weeds can interrupt clean lines.
Consider overseeding with a stripe-friendly grass if your current lawn doesn’t show patterns well.

Credit: mowrator.com
Pattern Mowing And Lawn Health
Pattern mowing isn’t just for looks. It benefits your lawn’s health in several ways:
- Reduces soil compaction: Changing direction spreads mower weight more evenly.
- Prevents ruts: Avoids weak spots that can turn muddy or bare.
- Promotes upright growth: Grass cut from different angles stands taller and fills in.
Research shows that lawns mowed in different patterns have up to 30% less compaction over a season compared to lawns mowed the same way every time.
When To Change Your Pattern
Switching up your pattern is important. Here’s when and why you should do it:
- Every 2-4 weeks: Most experts recommend changing direction every few weeks.
- After heavy rain: Wet ground is more prone to ruts; change pattern to protect weak spots.
- If grass looks stressed: Change to a gentler pattern or raise mower height.
A helpful trick: If you notice your pattern fading, mow in the evening when sunlight is low—lines will look stronger and last longer.
Advanced Pattern Tips
Want to go beyond the basics? Here are advanced ideas:
- Use a striping kit: These attach to your mower and flatten grass for professional-level stripes.
- Experiment with double passes: Mowing each stripe twice (in the same direction) makes lines darker.
- Add a border stripe: Mow the outside edge first or last, always in the same direction, for a framed effect.
- Combine patterns: Try stripes in one section, checkerboards in another for a creative look.
For more inspiration, check out examples from professional groundskeepers at The Lawn Institute.
Frequently Asked Questions
How Do I Keep My Lines Straight When Mowing?
The best way is to focus on a fixed point at the end of each row, not the ground in front of you. You can also use a string or lay down a visual marker for your first pass. Practice improves straightness over time.
What Grass Types Show Patterns Best?
Cool-season grasses like fescue, bluegrass, and ryegrass are best for patterns. Their blades bend easily and reflect light well. Warm-season grasses like Bermuda and zoysia do not show stripes as clearly.
Can I Create Patterns With A Rotary Mower?
Yes, but a reel mower or a mower with a striping kit produces more dramatic stripes. Rotary mowers still work—just keep your blade sharp and grass height high.
How Often Should I Mow For The Best Patterns?
Mow once a week during the growing season. Cutting too much at once or waiting too long weakens the pattern and stresses the grass. Never remove more than one-third of the blade’s height in a single mow.
Is Patterned Mowing Bad For My Lawn?
No, when done correctly, it’s actually good for your lawn’s health. Just remember to alternate directions and maintain mower equipment. Avoid mowing when grass is wet or stressed.
Creating a patterned lawn isn’t just for professionals. With the right approach, tools, and a little practice, you can transform your yard into a neighborhood highlight. The real secret is patience—start simple, pay attention to details, and enjoy the satisfying results each time you finish mowing.