If you’re growing vegetables or flowers in raised beds, you know how important consistent watering is. But hand-watering can be time-consuming, uneven, and wasteful.
That’s where drip irrigation comes in—it delivers water right to your plants’ roots, saving you effort and water. Installing a drip irrigation system for your raised beds might sound tricky, but it’s easier than you think. In this guide, you’ll discover simple steps to set up your own drip irrigation system quickly and efficiently.
By the end, you’ll have a reliable, water-smart setup that keeps your garden thriving all season long. Ready to make watering effortless and your plants happier? Let’s dive in!

Credit: www.youtube.com
Benefits Of Drip Irrigation
Drip irrigation brings many benefits to raised bed gardens. It delivers water directly to plant roots. This reduces waste and promotes healthy growth. Using drip irrigation makes gardening easier and more efficient.
Water Efficiency
Drip irrigation uses less water than traditional watering methods. Water flows slowly and directly to the soil. This prevents runoff and evaporation. It helps conserve water in dry areas. Saving water also lowers your utility bills.
Healthier Plants
Water reaches the roots without wetting leaves or stems. This reduces plant diseases caused by moisture. Plants get consistent moisture levels, which helps them grow strong. Better water delivery means better nutrient absorption. Your raised beds will produce healthier vegetables and flowers.
Time Savings
Drip irrigation reduces the time spent watering plants. You can automate the system with timers. This means less manual work and more free time. It also ensures plants get water even when you are busy or away. Maintaining your garden becomes simpler and faster.
Planning Your Setup
Planning your drip irrigation setup for raised beds is key for success. Careful preparation saves time and water. It also helps your plants grow healthy and strong. Start by understanding your garden’s size and water needs. This guide breaks down the planning into simple steps.
Measuring Raised Beds
Measure the length and width of each raised bed. Use a tape measure for accuracy. Write down the dimensions to plan tubing length. Check if beds are all the same size or different. Accurate measurements help avoid buying too much or too little tubing.
Determining Water Source
Identify where your water will come from. Common sources include outdoor faucets or rainwater tanks. Make sure the water pressure is steady and strong enough. Low pressure can reduce drip system efficiency. Consider adding a pressure regulator if needed. Know the distance from the water source to the beds.
Choosing Tubing And Emitters
Select tubing that fits your garden layout. Poly tubing is flexible and easy to install. Choose tubing diameter based on water flow needs. Pick emitters that suit your plants’ water requirements. Emitters come in different flow rates, such as 0.5 or 1 gallon per hour. Space emitters evenly for consistent watering.
Essential Tools And Materials
Installing a drip irrigation system for raised beds needs specific tools and materials. These essentials ensure easy setup and efficient watering. Preparing all items before starting saves time and effort. Each part plays a vital role in delivering water directly to your plants’ roots. Proper tools help cut, connect, and secure the tubing. Quality materials prevent leaks and ensure durability. Here are the must-have tools and materials for your project.
Tubing And Fittings
Flexible tubing carries water from the main supply to plants. Choose tubing designed for drip irrigation to resist sunlight and pressure. Fittings connect tubing pieces and create branches for multiple plants. Use connectors, tees, and elbows to fit your bed layout. Durable fittings stop leaks and keep water flowing. Select the right size tubing and fittings for your raised bed dimensions.
Hole Punch And Cutter
A hole punch creates holes in the tubing for drip emitters or smaller tubes. This tool ensures clean, precise holes without damaging the tubing. A tubing cutter or sharp scissors cut tubing to the needed lengths. Using the right cutter prevents crushed or uneven edges. Clean cuts and holes help avoid leaks and maintain water pressure. These tools make installation neat and efficient.
Stakes And End Caps
Stakes hold tubing in place along your raised bed. They keep the tubing near plant roots and prevent shifting. Use stakes designed for drip systems to avoid damaging tubing. End caps close the tubing ends and stop water from escaping. Secure end caps tightly to maintain system pressure. Both stakes and end caps increase irrigation efficiency and system longevity.
Preparing The Site
Preparing the site is the first step to a successful drip irrigation setup for raised beds. Proper preparation ensures the system works efficiently and lasts longer. This stage involves clearing the bed, warming the tubing, and marking the layout carefully.
Clearing The Bed
Remove weeds, rocks, and debris from the raised bed. Clear soil surface to make it smooth and even. This helps the tubing sit flat and prevents damage. Also, check for sharp objects that could puncture the drip lines.
Warming The Tubing
Place the drip irrigation tubing under the sun for 30 minutes. Warm tubing becomes soft and flexible. This makes it easier to unroll and shape around the bed. Cold tubing might crack or kink during installation.
Layout Marking
Plan the tubing path before installation. Use garden stakes or string to mark where the lines will run. Mark drip emitter spots near plant roots. Clear markings save time and avoid mistakes during setup.
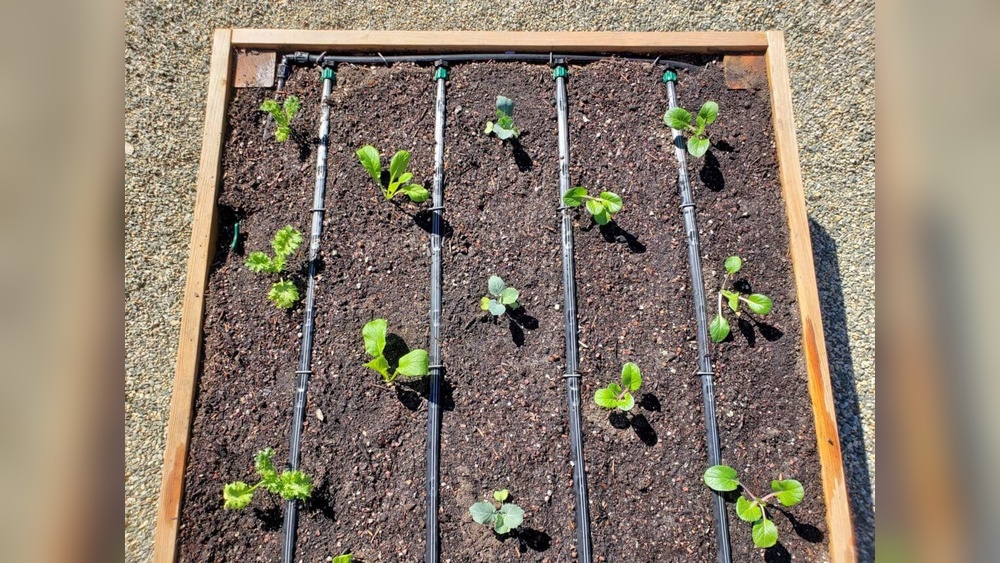
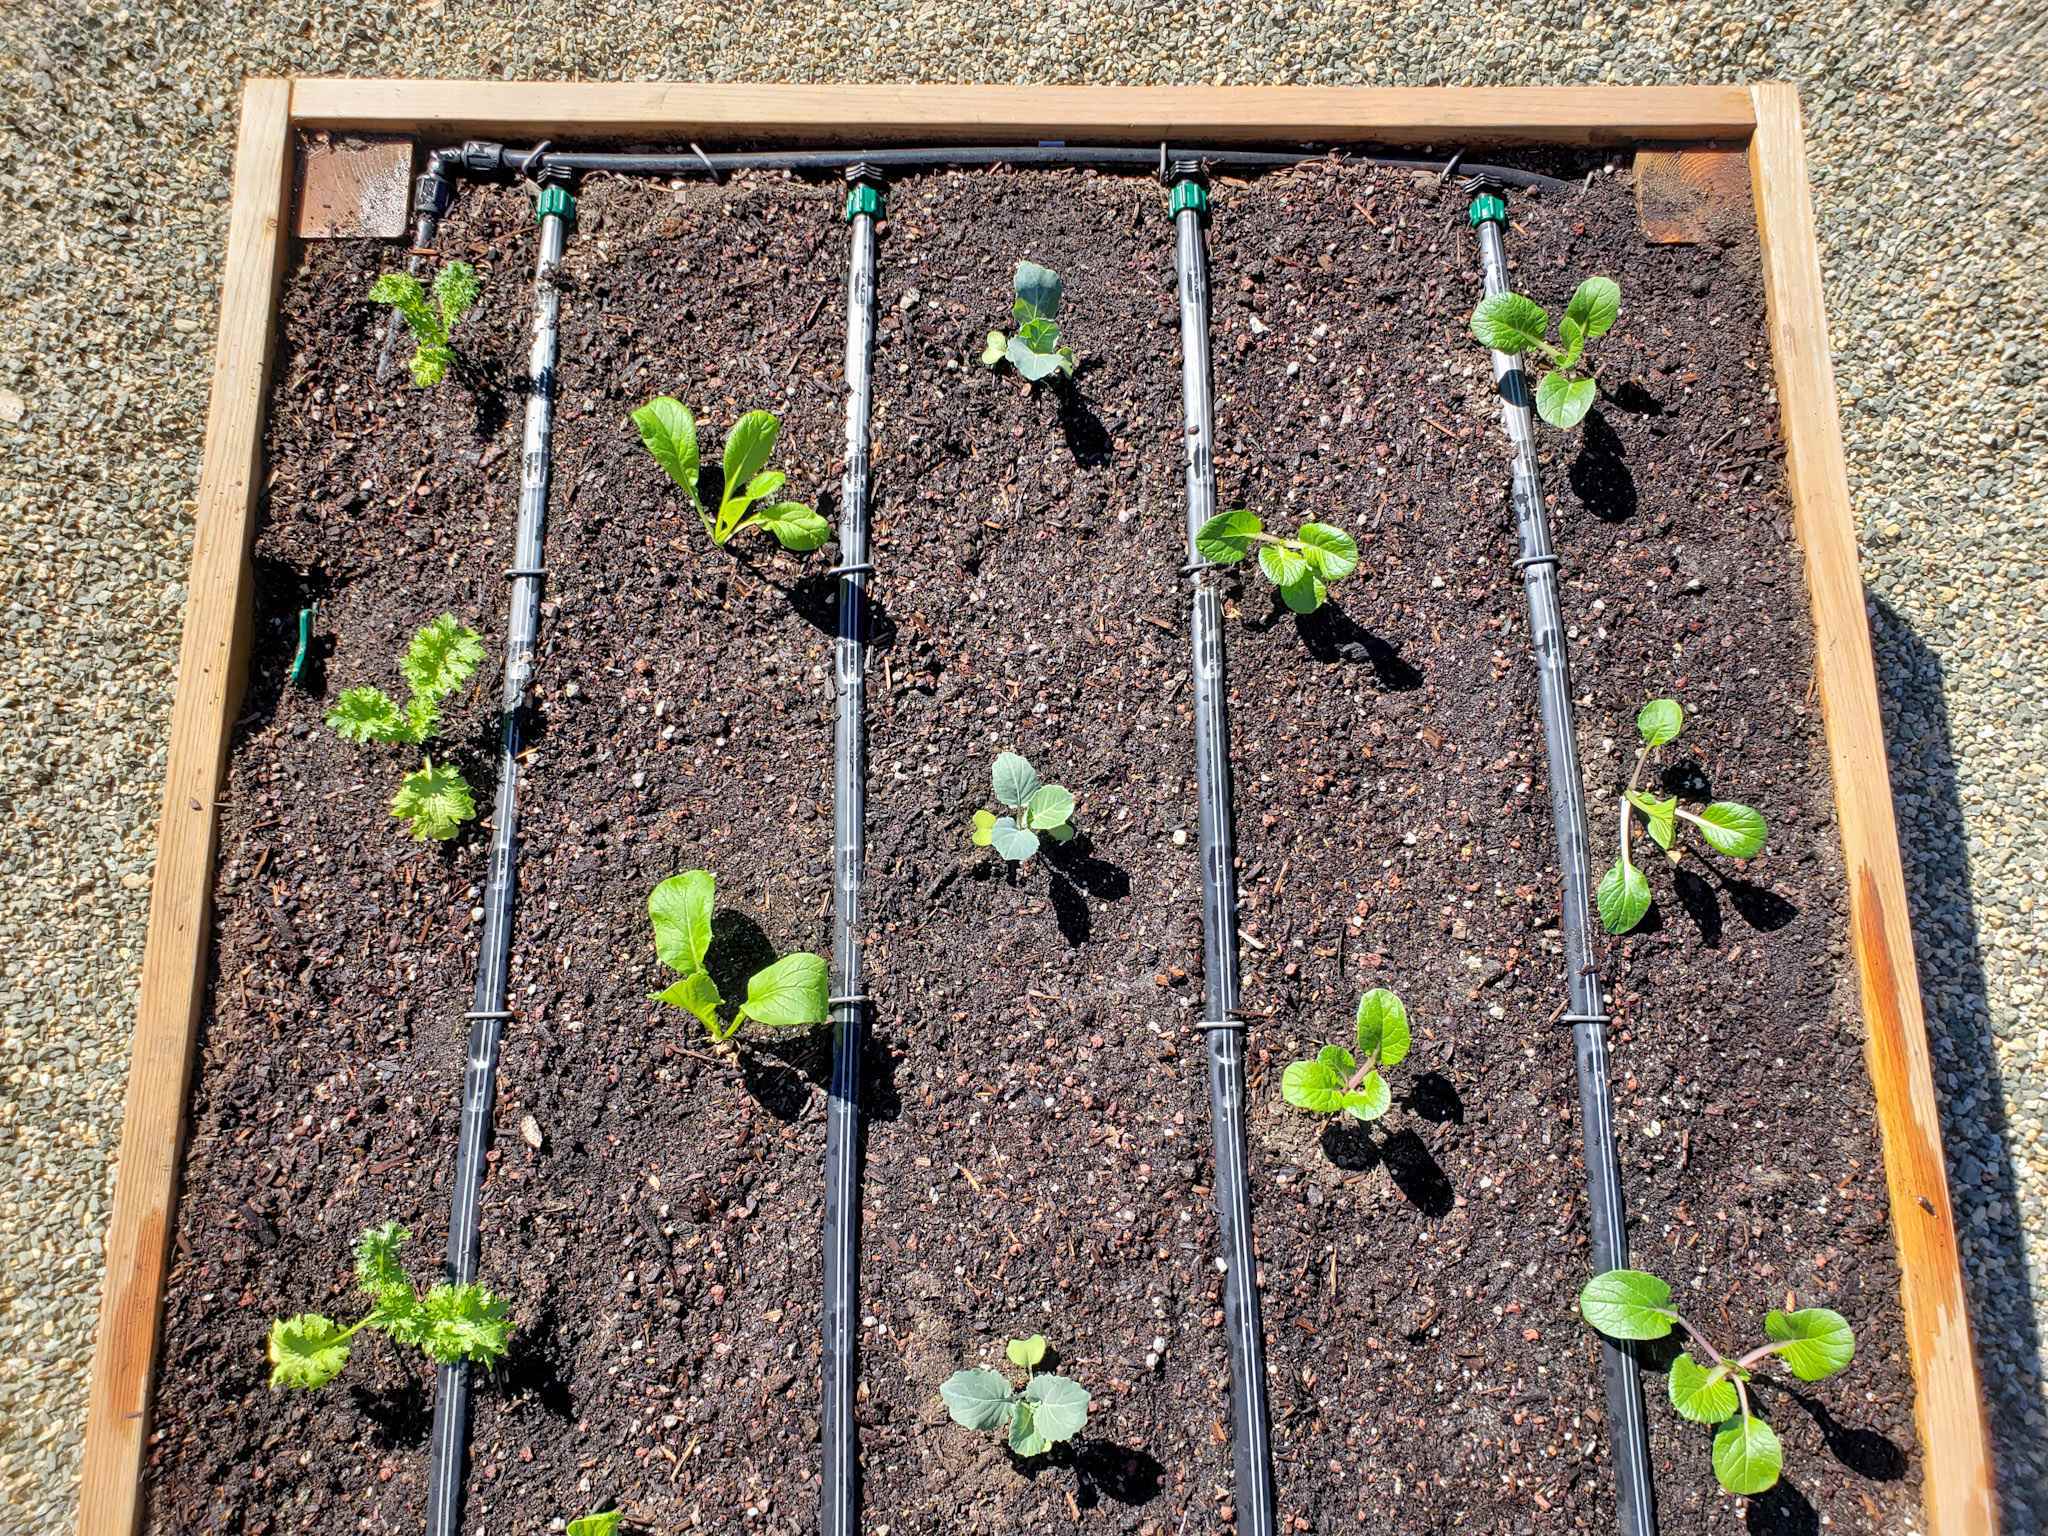
Installing Main Tubing
Installing the main tubing is the first step in setting up your drip irrigation system for raised beds. This tubing carries water from the source to the entire garden bed. Proper installation ensures even water distribution and efficient watering. Follow clear steps to connect, lay out, and secure the tubing for best results.
Connecting To Water Source
Start by attaching the main tubing to your water supply. Use a hose bib adapter or a pressure regulator if needed. Make sure the connection is tight to avoid leaks. Turn on the water briefly to check for proper flow. Adjust the connection if you see dripping or low pressure. A secure connection ensures steady water delivery to your raised beds.
Laying Out Tubing
Unroll the main tubing along your raised beds. Plan the route to cover all areas evenly. Avoid sharp bends or kinks that block water flow. Cut the tubing to fit the length of your beds. Use a utility knife for clean cuts. Leave extra tubing at the ends for future adjustments. Proper layout helps water reach every plant.
Securing Tubing
Keep the tubing in place using garden staples or stakes. Push the staples gently to avoid damaging the tubing. Space the staples every few feet along the tubing. Secure tubing near corners and bends for stability. This prevents movement caused by wind or watering. Firmly fixed tubing maintains a tidy and effective irrigation system.
Credit: homesteadandchill.com
Adding Emitters And Drip Lines
Adding emitters and drip lines is a crucial step in setting up your drip irrigation system. This stage controls how water reaches each plant. Proper installation ensures efficient watering and healthy plant growth.
Punching Holes
Start by punching holes in the main drip line tubing. Use a hole punch tool made for drip irrigation. Avoid sharp tools to prevent damaging the tubing. Space holes according to your plant layout. Make sure holes are clean and round.
Attaching Emitters
Insert emitters firmly into the punched holes. Choose emitters that match your plants’ water needs. Push emitters in until they fit snugly. Test each emitter by running water through the system. Check for leaks or loose fittings.
Positioning Along Plants
Place emitters close to the base of each plant. This directs water to the roots where plants absorb it best. Avoid placing emitters too far away from plants. Adjust the drip lines to cover all raised bed areas. Keep lines flat and secure to prevent movement.
Testing The System
Testing the drip irrigation system is a crucial step after installation. It ensures that your raised bed garden receives water efficiently. Proper testing helps spot problems early. This saves water and protects your plants.
Checking For Leaks
Turn on the water supply to the system. Walk along the tubing and look closely for any drips or wet spots. Leaks waste water and reduce pressure. Tighten connections or replace damaged parts if needed. Fixing leaks keeps your system working well.
Ensuring Even Water Flow
Observe the emitters to see if water flows evenly. Each plant should get the right amount of water. If some emitters drip faster or slower, adjust or clean them. Even water flow helps plants grow strong and healthy.
Adjusting Pressure
Check the water pressure with a gauge if you have one. Too high pressure can burst tubes. Too low pressure means plants do not get enough water. Use a pressure regulator to set the correct flow. Balanced pressure makes the system last longer and work better.
Maintaining Your Drip Irrigation
Maintaining your drip irrigation system ensures it works efficiently throughout the growing season. Regular care prevents clogs, leaks, and uneven watering. Simple maintenance tasks can extend the life of your system and help your plants thrive.
Regular Inspection
Check your drip lines often for leaks or damage. Look for cracked tubing or loose connections. Ensure emitters deliver water properly. Fix any issues quickly to avoid water waste. Inspecting regularly keeps your system running smoothly.
Cleaning Emitters
Emitters can clog from dirt or mineral buildup. Remove and soak them in vinegar or a mild cleaner. Use a small brush or toothpick to clear blockages. Clean emitters provide steady water flow and protect plant roots.
Winterizing Tips
Prepare your system for cold weather by draining all water. Remove tubing and store it indoors to avoid cracking. Cover or disconnect timers and filters. Winterizing prevents damage and saves repair costs in spring.
Troubleshooting Common Issues
Drip irrigation in raised beds can face some common problems. These issues affect water flow and plant health. Knowing how to fix them keeps your system running well. This section covers simple solutions for leaks, clogs, and pressure loss. Follow these tips to maintain steady watering and healthy plants.
Fixing Leaks And Breaks
Leaks waste water and reduce pressure. Check the tubing for holes or cracks regularly. Use drip irrigation repair tape or connectors to seal small leaks. For bigger breaks, cut out the damaged section and join the ends with a coupling. Avoid sharp bends to prevent tubing damage.
Preventing Clogs
Clogs block water flow and stop emitters from working. Flush the system before each season to clear debris. Use a filter at the water source to catch dirt and particles. Clean emitters with a thin wire or soak them in vinegar to remove mineral buildup. Keep water clean to avoid frequent clogs.
Managing Pressure Loss
Low water pressure causes uneven watering and dry spots. Check for leaks or blockages that reduce pressure. Use pressure regulators to keep water flow steady. Avoid very long tubing runs that drop pressure at the end. Arrange emitters evenly and match them to your water source’s pressure.

Credit: www.youtube.com
Optimizing Watering Schedule
Optimizing the watering schedule is key to making drip irrigation efficient. It ensures plants get the right amount of water at the right time. Proper scheduling saves water and supports healthy plant growth.
Soil Moisture Monitoring
Check soil moisture regularly to avoid overwatering or underwatering. Use a moisture meter or simply stick your finger into the soil. Water only when the soil feels dry a few inches below the surface. This helps keep roots healthy and prevents water waste.
Adjusting For Weather
Change watering times based on the weather. Water less on rainy days and more during hot, dry spells. Morning watering reduces evaporation and lets plants absorb moisture before heat rises. Adjusting to weather keeps plants hydrated without wasting water.
Seasonal Changes
Plants need different water amounts in each season. Water more often during hot summer months. In cooler seasons, reduce watering to avoid soggy soil. Watch your plants for signs of stress and adjust your schedule accordingly. Seasonal changes affect soil moisture and plant needs.
Frequently Asked Questions
What Is The 30 30 Rule For Drip Irrigation?
The 30 30 rule for drip irrigation limits tubing runs to 30 feet with 30 emitters. This prevents friction loss and ensures even water distribution.
How Many Drip Lines For 4×8 Raised Bed?
Use 2 to 3 drip lines for a 4×8 raised bed. Space lines evenly to ensure uniform watering.
What Is A Major Problem With Drip Irrigation?
A major problem with drip irrigation is leaks and breaks in hoses or emitters. These cause significant water wastage over time.
What Is The 200 Rule For Drip Irrigation?
The 200 rule limits drip irrigation tubing to 200 feet per line. This prevents friction loss, ensuring consistent water pressure and even distribution.
Conclusion
Installing drip irrigation in raised beds saves water and time. It delivers water directly to plant roots, promoting healthy growth. The setup is simple and fits most raised bed designs. Regular checks prevent leaks and keep the system efficient. With careful installation, your garden will thrive even in dry weather.
Start small, learn as you go, and enjoy better watering results. This method helps you grow plants stronger and use water wisely. Give your raised beds the care they deserve with drip irrigation.