
A lush, green lawn can make any yard look beautiful. But many people struggle with thin grass areas that spoil the overall look. These bare or patchy spots happen for many reasons—heavy foot traffic, poor soil, shade, or just old grass. Fixing thin grass is not only about looks; thick grass also helps prevent weeds and soil erosion. If you want your lawn to look like a thick, green carpet, you need to know the right steps. Let’s explore how you can successfully thicken thin areas in your lawn, even if you’re not a lawn care expert.
Understanding Why Grass Gets Thin
Before you start fixing your lawn, it’s important to know why grass thins out. Many homeowners overlook this step, but understanding the cause helps you choose the best solution.
Common reasons include:
- Soil Compaction: When soil gets hard from walking or heavy equipment, roots cannot grow well.
- Low Fertility: Poor soil or lack of nutrients weakens grass.
- Shade: Grass needs sunlight. Trees or buildings can block light, making grass thin.
- Pest Damage: Bugs like grubs or insects can kill roots.
- Disease: Fungal diseases often leave patches of dead or weak grass.
- Improper Mowing: Cutting too short stresses grass.
- Drought or Overwatering: Both extremes hurt root growth.
Non-obvious insight: Sometimes, people only treat the surface without solving the real cause—such as reseeding a compacted area without loosening the soil. This makes the problem return quickly.
Assessing Your Lawn’s Thin Areas
Start with a close look at your lawn. Walk around and note:
- Where are thin patches?
- Is the soil hard or soft?
- Do the spots get less sunlight?
- Are there signs of pests, like small holes or chewed roots?
- Is the area wet or dry?
Take photos for reference. If unsure, you can send a soil sample to your local extension office or garden center. They will test it for pH, nutrients, and texture. This small step can save you from wasting time or money on the wrong fix.
Preparing Thin Areas For Improvement
Good preparation is key for thickening thin grass. Here’s what to do:
1. Remove Weeds And Debris
Pull out weeds by hand or use a weed remover tool. Rake away dead grass, leaves, and sticks. This clears space for new grass to grow.
2. Loosen The Soil
Grass roots need loose soil. For small spots, use a hand rake or garden fork to break up the top 2–3 inches. For bigger areas, rent a core aerator. This machine makes holes in the soil, helping air, water, and nutrients reach the roots.
Practical tip: Don’t skip aeration if your soil feels hard. Most beginners miss this, and seeds struggle to grow without it.
3. Add Topsoil Or Compost
Spread a thin layer (about ½ inch) of quality topsoil or compost over the area. This improves nutrients and helps seeds sprout.
4. Test And Adjust Soil Ph
Grass prefers a pH between 6.0 and 7.0. Use a simple soil test kit (sold at most garden stores). If needed, add lime to raise pH or sulfur to lower it, following package directions.
Choosing The Right Grass Seed
Picking the right seed is critical for thick grass. Not all grass types work in every climate or yard. Here’s a quick comparison:
| Grass Type | Best For | Growth Speed | Sun/Shade Tolerance |
|---|---|---|---|
| Kentucky Bluegrass | Cool climates | Medium | Sun, some shade |
| Fescue | Cool climates, shade | Fast | Shade tolerant |
| Bermuda | Warm climates | Very fast | Needs full sun |
| Zoysia | Warm climates, drought | Slow | Sun, some shade |
For shaded areas, use shade-tolerant varieties like fine fescue. For sunny spots, Kentucky Bluegrass or Bermuda work well. If your lawn is a mix, buy a seed blend suited for your region.
Non-obvious insight: Avoid cheap seed mixes with high amounts of filler or weed seeds. Check the label—good seeds should have less than 1% weed content.

Credit: www.amazon.com
Seeding Thin Grass Areas
Now, you’re ready to plant. Follow these steps for best results:
- Spread the Seed: Scatter seeds evenly by hand or use a broadcast spreader for larger areas. Check the bag for recommended rates. Too much seed leads to weak, crowded seedlings.
- Lightly Rake In: Gently rake the area so seeds mix with soil, but don’t bury them too deep (1/8–¼ inch is best).
- Add Mulch or Straw: Cover seeds with a thin layer of straw or mulch. This keeps moisture and protects seeds from birds.
- Water Lightly: Water right after planting. Keep soil moist (not soaked) until seeds sprout—usually 1–3 weeks.
Overseeding For A Thicker Lawn
Overseeding means adding new seeds to an existing lawn. It fills in thin spots and improves overall thickness.
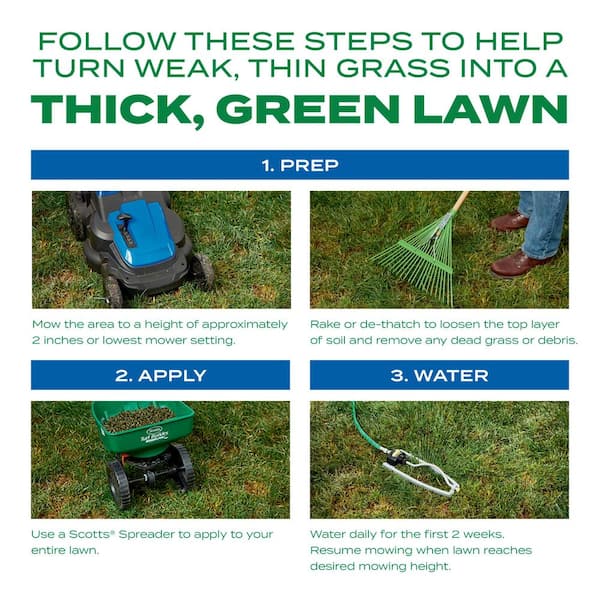
- When to Overseed: Early fall or spring are best. Fall gives seeds time to grow before summer heat.
- How to Overseed:
- Mow the lawn short (about 1.5 inches).
- Rake up grass clippings.
- Use a spreader to apply seed evenly.
- Water daily until new grass is 2–3 inches tall.
Fertilizing For Strong Growth
Fertilizer feeds your lawn the nutrients it needs to grow thick and green. Use a balanced lawn fertilizer (like 10-10-10 or 20-10-10). The numbers show the ratio of nitrogen (N), phosphorus (P), and potassium (K).
- When to Fertilize: Right after seeding and then again 4–6 weeks later.
- How Much to Use: Follow package instructions. Too much can burn new grass.
- Liquid vs. Granular: Both work, but granular is easier for beginners.
Watering For Thick Grass
Water is vital for seed germination and healthy roots. Here’s what you need to know:
| Stage | Watering Frequency | Amount |
|---|---|---|
| After Seeding | 2–3 times daily | Light mist |
| Seedlings (1–3 weeks) | Daily | Keep moist |
| Established Lawn | 2–3 times per week | 1 inch per week |
Pro tip: Water early in the morning to reduce evaporation and prevent disease. Avoid watering at night, as it encourages fungus.
Mowing To Encourage Thickness
How you mow affects grass density. Here are some guidelines:
- Don’t cut too short: Never remove more than 1/3 of the grass height at once. Taller grass shades the soil, helping roots grow deeper.
- Sharp blades only: Dull mower blades tear grass, making it weak and prone to disease.
- Leave clippings: Grass clippings decompose and return nutrients to the soil.
Controlling Weeds And Pests
Weeds steal nutrients and space from new grass. Pests can destroy roots before grass thickens.
- Hand-pull weeds in thin areas before seeding.
- Use pre-emergent herbicides only if you’re not planting new seeds, as they can stop grass seeds from sprouting.
- Check for grubs or insects: Brown patches that pull up easily may signal grubs. Use a safe lawn insecticide if needed.
Dealing With Shady Or High-traffic Areas
Thin grass often grows in shade or where people walk a lot.
- For shade: Prune lower tree branches to let more light in. Choose shade-tolerant grass.
- For high-traffic: Create stepping-stones or paths to protect grass. Rotate play areas if possible.
- Reseed more often in these spots, as they wear out faster.
Regular Maintenance For Lasting Results
Once your lawn thickens, keep it healthy with regular care:
- Aerate yearly to prevent compaction.
- Fertilize in spring and fall.
- Mow at the right height.
- Water deeply, not daily once established.
- Watch for early signs of pests, disease, or weeds.
A thick lawn needs ongoing attention—quick fixes alone won’t last.
Credit: www.homedepot.com
Realistic Timeline For Thicker Grass
Many people expect instant results, but thickening a lawn is a process. Here’s a realistic timeline:
- First week: Seeds sprout if kept moist.
- Weeks 2–4: New grass appears but is still thin.
- Weeks 5–8: Grass fills in, roots grow deeper.
- After 2–3 months: Lawn looks much thicker and healthier.
Be patient. Some areas may need reseeding after a few months, especially if conditions are not perfect.
Common Mistakes To Avoid
Even with the best intentions, these errors can set you back:
- Skipping soil prep: Seeds won’t grow in compacted, poor soil.
- Using the wrong seed: Match the grass type to your climate and sunlight.
- Overwatering or underwatering: Both can kill seedlings.
- Mowing too soon: Wait until new grass is at least 3 inches tall.
- Ignoring pH and nutrients: Grass struggles without the right balance.

Credit: www.pennington.com
When To Call A Professional
If you’ve tried everything but still have thin spots, it may be time to call a lawn care professional. They have access to better tools and can diagnose deeper problems, such as poor drainage or hidden pests. Sometimes, investing in expert help saves money in the long run.
Frequently Asked Questions
How Soon Can I Walk On Newly Seeded Areas?
Wait until the new grass is at least 3 inches tall and well-rooted. This usually takes 3–4 weeks. Walking too soon can crush seedlings and make thin areas worse.
Can I Use Regular Garden Soil For Patching Thin Spots?
It’s better to use lawn topsoil or compost. Regular garden soil may be too heavy or contain weed seeds, which can harm grass growth.
What If Birds Eat My Grass Seed?
Cover the seeded area with a thin layer of straw or commercial mulch. This hides seeds from birds and helps keep moisture in.
How Often Should I Fertilize Thin Areas?
After seeding, use a starter fertilizer once. Then, fertilize again in 4–6 weeks. Don’t overdo it—too much fertilizer can burn new grass.
Is There An Organic Way To Thicken My Lawn?
Yes! Use compost instead of chemical fertilizer, overseed with high-quality grass seed, and pull weeds by hand. Aerate with a manual tool and water regularly for best results.
A thick, green lawn is within reach with the right steps and a little patience. By understanding the causes, preparing the soil, choosing the best seed, and caring for new grass, you’ll enjoy a beautiful yard for years to come. For more lawn care advice, visit the Gardening Know How website.