
Last updated: October 2026 · Written by the LawnVibe editorial team.
A hand tamper is one of the simplest tools in the shed: a flat steel plate on a long handle. Yet it does a job that decides whether a patio stays flat, a fence post stays straight, or a paver path sinks and wobbles after the first winter. Compaction removes air pockets from soil and gravel so the base does not settle later. This guide explains how to use a tamper correctly, with step-by-step technique for paver and patio bases, post holes, landscaping projects and lawn leveling.
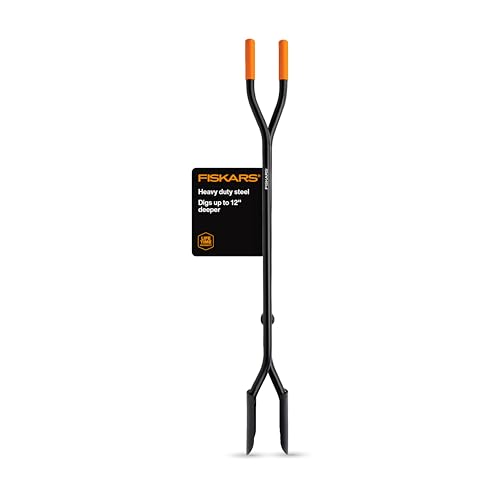
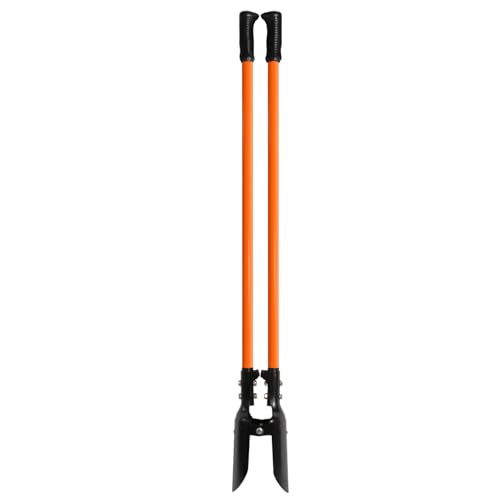
Many tamping jobs start with digging. If you are setting posts, our guide to the best manual post hole digger compares tools that pair well with a tamper.
What Is a Hand Tamper?
A hand tamper, sometimes called a dirt tamper or tamping tool, has a heavy flat plate, commonly square and around 8 to 10 inches across, attached to a long handle made of wood, steel or fiberglass. You lift it and let it drop, using its weight and a little downward force to pack material tightly.
There are also post tampers or tamping bars, which have a narrow round or flat head designed to fit inside post holes, and powered plate compactors, which vibrate to compact large areas.
| Tool | Best for | Pros | Cons |
|---|---|---|---|
| Hand tamper (flat plate) | Small patios, walkways, paver bases | Cheap, quiet, precise | Tiring on large areas |
| Tamping bar / post tamper | Fence and mailbox posts | Fits narrow holes | Small footprint |
| Plate compactor (rental) | Large patios, driveways | Fast, consistent | Heavy, rental cost |
| Lawn roller | Light lawn smoothing | Covers lawns quickly | Does not compact bases |
Top picks from our guide: Best Post Hole Digger Manual 2026: Top Picks Revealed
As an Amazon Associate we earn from qualifying purchases. Prices and availability can change; check the current price on Amazon.
Why Compaction Matters
Loose soil and gravel contain air pockets. Over time, rain, frost and weight push material down to fill those gaps, which is why uncompacted bases settle. Pavers sink, patios crack, posts lean and paths develop puddles. Proper compaction creates a dense, stable base that spreads loads evenly and drains predictably.
Safety and Comfort Tips
Wear sturdy boots, gloves and safety glasses, since gravel can fly. Keep your feet clear of the plate. Use your legs and the tamper's weight rather than your back; stand upright, lift the tamper a short distance, and let it drop. Take breaks, because tamping is surprisingly tiring. Hearing protection is wise if you rent a plate compactor.
Step 1: Prepare the Area
Excavate to the depth your project needs. For a paver patio or walkway, that typically includes room for a compacted gravel base, a thin layer of bedding sand and the pavers themselves; follow the paver manufacturer's guidelines for your climate and use. Remove roots, rocks and organic material, which decompose and leave voids.
Grade the area so water drains away from buildings, usually with a slight slope.
Step 2: Tamp the Subgrade
Before adding any base material, compact the native soil at the bottom of the excavation. This is called the subgrade, and a soft subgrade will let the whole project sink. Lightly moisten the soil if it is dry, then tamp it systematically.
Step 3: Get the Moisture Right
Moisture is the secret to good compaction. Material that is bone-dry will not bind, while muddy material squeezes out and will not pack. Aim for slightly moist: when you squeeze a handful, it should hold together loosely without water dripping. Lightly mist dry gravel or soil with a hose, and let overly wet material dry out before tamping.
Step 4: Add Material in Thin Layers
This is the most important rule. Spread base material in thin layers, commonly around 2 to 4 inches at a time for a hand tamper. Tamping a thick layer compacts only the top and leaves loose material underneath that settles later. Rake each layer smooth before compacting.
Step 5: Tamp in a Systematic Pattern
Start at the edges and work toward the center, then work in overlapping rows across the area, overlapping each strike by about half the plate width. Lift the tamper a few inches to a foot and let it drop squarely so the plate lands flat. Avoid tilting it, which digs in at the edges.
Go over the whole area two or three times, changing direction on each pass. As compaction improves, the tamper will bounce slightly rather than sinking in, and the sound becomes sharper.
Step 6: Check Level and Repeat
After each layer, check the surface with a level and a straight board or string line. Fill low spots with more material and compact again. Repeat layer by layer until you reach the final base height.
Base Materials That Compact Best
Not every material compacts equally well. Crushed stone with a mix of particle sizes, often sold as crusher run, road base, or a similar name depending on the region, compacts best because the small particles fill the gaps between larger ones and lock together. Clean, single-size gravel such as pea gravel drains well but does not lock tightly, so it shifts under load and is a poor paver base. Sand compacts reasonably when slightly damp but can wash out if not contained. Clay soil compacts very densely but drains poorly and can heave in frost, which is why it is usually covered with a compacted gravel base. Organic topsoil should never be used as a base, because it decomposes and settles.
For paver projects, the Interlocking Concrete Pavement Institute publishes guidance on base materials, thicknesses and compaction for different uses and climates, and many paver manufacturers follow its recommendations.
How Thick Should the Base Be?
Base thickness depends on what the surface will carry and on your soil and climate. Walkways and patios that only carry foot traffic need less base than driveways, which carry vehicles. Clay soils and cold climates with deep frost usually call for a thicker base. Always follow the guidelines of the paver or product manufacturer, and remember that every layer of that base should be compacted separately.
Tamping in Different Weather
Tamping works best in mild, dry weather when you can control moisture. After heavy rain, let saturated soil drain for a day or two before compacting, because waterlogged soil pumps and will not pack. In hot, dry weather, mist the material lightly as you work, since it dries quickly. Avoid compacting frozen soil or material containing ice, which settles when it thaws.
Using a Tamper for Pavers and Patios
For paver projects, compact the subgrade, then each layer of gravel base. Screed a thin, even layer of bedding sand over the compacted base, but do not tamp the sand directly with a hand tamper, as that creates uneven spots. Lay the pavers, then compact them into the sand using a plate compactor fitted with a protective pad, or tap them with a rubber mallet over a board for small areas. Sweep joint sand into the gaps and compact again. Our guides on how to make a garden path with pavers and how to level uneven patio pavers cover these projects in detail.
Using a Tamper for Fence Posts
For posts set without concrete, or with gravel at the base, tamping is what holds them straight. Put a few inches of gravel in the bottom of the hole and tamp it. Set the post, check plumb, then backfill in layers of a few inches, tamping each layer firmly with a tamping bar or the end of a narrow tamper. Recheck plumb as you go. Even when using concrete, tamping the gravel base helps prevent settling. Our step-by-step guide on how to install a chain link fence explains post setting.
Using a Tamper for Landscaping and Edging
Tamping firms the base under landscape timbers, edging, retaining wall blocks, stepping stones and shed foundations. For timbers, tamp a gravel base in the trench before laying them, as described in our guide on how to install landscape timbers for edging. For retaining wall blocks, a level, well-compacted base under the first course is critical.
Using a Tamper on Lawns
A tamper can firm small soft spots or settled holes in a lawn after filling them with soil, and can help seat sod pieces. Do not tamp entire lawns, though. Compaction is bad for grass roots, which need air and water to move through the soil. For general lawn smoothing, light topdressing with a leveling mix is better than heavy compaction.
Hand Tamper vs Plate Compactor
A hand tamper is perfect for small projects such as a few post holes, a short walkway or a small patio. For anything larger, such as a big patio, a driveway base or deep layers of gravel, rent a plate compactor. It compacts much more uniformly and saves hours of hard work. Many projects use both: a plate compactor for open areas and a hand tamper for edges and corners the machine cannot reach.
Common Tamping Mistakes
Adding too much material at once. Tamping dry, dusty material or muddy material. Skipping the subgrade. Tamping bedding sand directly. Tilting the tamper so it digs in. Not checking level between layers. Using organic topsoil as a base, which decomposes and settles.
Caring for Your Tamper
A tamper needs almost no maintenance, but a little care keeps it working for decades. Knock off caked soil after each use and let the plate dry before storing it, so it does not rust. Wipe a light coat of oil on the steel plate before long storage. Check that the handle is tight in the head; a loose joint wastes energy and can be dangerous. Replace cracked wooden handles rather than taping them.
Choosing a Good Hand Tamper
Look for a plate size that suits your work; larger plates cover ground faster, while smaller plates are easier to control and fit tight spots. A heavier head does more work for you. Choose a sturdy handle that will not loosen at the joint, and a comfortable grip. A welded steel connection between head and handle is more durable than a bolted one.
The Bottom Line: How to Use a Tamper Correctly
To use a tamper correctly, prepare and compact the subgrade, moisten material slightly, add base material in thin layers, tamp in overlapping passes from the edges inward, and check level after each layer. Use a tamping bar for post holes and a plate compactor for big areas. Proper compaction is invisible once a project is finished, but it is what keeps patios flat, posts straight and paths level for years.
Frequently Asked Questions
What is a tamper used for?
A hand tamper compacts soil, gravel, sand and crushed stone. It is used to prepare bases for pavers, patios, walkways and sheds, to firm soil and gravel around fence posts, and to level small areas of lawn or garden.
How thick should each layer be when tamping?
Compact in thin layers, often around 2 to 4 inches at a time with a hand tamper. Thick layers compact only on top, leaving loose material underneath that settles later.
Should soil be wet or dry when tamping?
Slightly moist. Material that is too dry will not bind, and material that is too wet becomes muddy and will not compact. Squeeze a handful: it should hold together loosely without dripping water.
Is a hand tamper as good as a plate compactor?
For small areas such as a few post holes, a walkway or a small patio, a hand tamper works well. For larger patios, driveways or deep bases, a rented plate compactor is faster and gives more consistent compaction.
How do I know when the base is compacted enough?
The surface should feel firm underfoot and show little or no footprint. The tamper should bounce slightly rather than sinking in. Check levels and add material where low spots appear.