

Last updated: October 2026 · Written by the LawnVibe editorial team.
Knowing how to use a rotisserie on a gas grill opens up juicy, self-basting roasts like whole chicken, pork loin and prime rib. The basics: install the motor bracket, truss the meat tightly, center and balance it on the spit with the forks secured, place a drip pan underneath, turn off the burners directly below and use the outer burners or rear infrared burner for heat. Close the lid, let it turn and cook until the thickest part reaches a safe internal temperature.
This guide follows manufacturer instructions for common rotisserie kits and food safety guidance from the USDA Food Safety and Inspection Service. Always read your grill's rotisserie manual. If you need a grill or kit, see our guides to the best 3-burner gas grill and the best outdoor grill rotisseries.
Quick Answer
Knowing how to use a rotisserie on a gas grill opens up juicy, self-basting roasts like whole chicken, pork loin and prime rib. The basics: install the motor bracket, truss the meat tightly, center and balance it on the spit with the forks secured, place a drip pan underneath, turn off the burners directly below and use the outer burners or rear infrared burner for heat. Close the lid, let it turn and cook until the thickest part reaches a safe internal temperature.
Key takeaways:
- Truss and balance the meat, use indirect or rear burner heat, place a drip pan below and cook to temperature with the lid closed.
- With a little practice, your gas grill can produce restaurant-style rotisserie roasts.
What You Need
A rotisserie kit with motor, spit rod, forks and counterweight if included; a compatible bracket for your grill; butcher's twine; a drip pan; heat-resistant gloves; and a probe or instant-read thermometer. Some grills include a rear infrared rotisserie burner, which is ideal but not required.
Step 1: Check Fit and Install the Kit
Confirm the spit will clear the lid and the grates with your largest roast. Many owners remove the cooking grates to make room. Mount the motor bracket on the side of the grill and test that the spit sits level and turns freely. Keep the motor cord away from hot surfaces.
Step 2: Prepare and Truss the Meat
Pat the meat dry and season. Truss poultry tightly with twine, tying the legs together and securing the wings against the body so nothing flops while turning. Tie roasts at regular intervals to keep an even, compact shape.
Step 3: Load and Balance the Spit
Slide one fork onto the spit, push the spit through the center of the meat lengthwise, add the second fork and press both forks firmly into the meat before tightening the screws. Hold the ends of the spit loosely in your palms and roll it; if one side drops, re-center the meat or use a counterweight. Balanced meat turns smoothly and cooks evenly.
Step 4: Set Up the Heat
Place a drip pan where the meat will turn. For grills with a rear infrared burner, light it and preheat as directed. For grills without one, light the outer burners and leave the burners under the meat off or low to create indirect heat. Preheat with the lid closed to around 350 to 400°F for most poultry and pork.
Step 5: Mount and Start the Rotation
Wearing gloves, place the loaded spit into the motor and the support on the opposite side. Turn on the motor and confirm the meat turns smoothly and clears the drip pan and burners. Close the lid.
Step 6: Cook and Monitor
Check temperature periodically with the motor paused. Keep the lid closed as much as possible. Add liquid to the drip pan if it dries out. Adjust burners to hold your target temperature.
Step 7: Remove, Rest and Carve
When the meat reaches the target temperature, turn off the burners and motor. Wearing gloves, lift out the spit, set it on a cutting board, loosen the forks and slide the meat off. Rest before carving.
Rotisserie Cooking Guide
| Food | Grill Temp | Approximate Time | Target Internal Temp |
|---|---|---|---|
| Whole chicken (4-5 lb) | 350-400°F | 1 to 1.5 hours | 165°F |
| Turkey breast | 325-350°F | 1.5 to 2.5 hours | 165°F |
| Pork loin roast | 325-350°F | 1 to 1.5 hours | 145°F, then rest 3 min |
| Beef rib roast | 325-350°F | Varies by size | 145°F minimum (USDA), many prefer higher doneness |
| Leg of lamb | 325-350°F | Varies by size | 145°F, then rest 3 min |
Times vary with size, grill and weather. Always use a thermometer.
Using a Rear Infrared Burner
Rear infrared burners provide intense, even heat from behind the meat, browning the surface as it turns while the drippings fall into the pan instead of onto burners. Start at the manufacturer's recommended setting and combine with low main burners if needed for larger roasts.
Rotisserie Without a Rear Burner
Most gas grills without a rear burner can still rotisserie using indirect heat from the outer burners. On a 3-burner grill, light the two outer burners and leave the center off with the drip pan underneath. On a 2-burner grill, you may need to rotate the drip pan position or accept slightly less even browning.
Safety Tips
Keep the motor cord away from heat, use a grounded outdoor outlet, wear heat-resistant gloves when handling the spit and forks, never leave the grill unattended and keep children and pets away from the hot grill and rotating spit.
Best Foods for the Rotisserie
Whole chickens are the classic rotisserie food because the turning action bastes the meat in its own juices and crisps the skin evenly. Cornish hens, turkey breasts and ducks also work well. For pork, loin roasts, boneless shoulder and pork belly rolls are excellent. Beef rib roasts, tri-tip and top sirloin roasts benefit from even browning. Leg of lamb and gyro-style meat stacks are other favorites. Foods should be compact and evenly shaped so they balance on the spit.
Seasoning and Marinades for Rotisserie
Dry rubs adhere well and form a flavorful crust as the meat turns. Salt the meat ahead of time, ideally several hours or overnight in the refrigerator, for better flavor and crispier skin. Herb butter rubbed under poultry skin adds richness. Avoid sugary glazes until the last 15 to 20 minutes, since sugar burns. Basting with drippings from the pan near the end adds flavor.
Using the Drip Pan for Flavor
Add water, broth, wine, onions, garlic and herbs to the drip pan. The liquid prevents drippings from burning, adds a little moisture to the cooking environment and creates a flavorful base for gravy or sauce. Some cooks place vegetables or potatoes in the pan so they cook in the drippings.
How to Choose a Rotisserie Kit
Check that the kit fits your grill width and that the spit is long enough. Motors vary in load capacity; heavier roasts need stronger motors. Stainless steel spits and forks resist rust. Counterweights help balance irregular roasts. Brand-specific kits fit precisely, while universal kits need careful measuring. Our guide to the best outdoor grill rotisseries compares options.
Troubleshooting Common Rotisserie Problems
If the meat flops or slips, the forks are not tight enough or the trussing is loose; re-tie and tighten. If the motor strains or stops, the load is unbalanced or too heavy; re-center or add a counterweight. If the outside browns too fast, lower the heat or reduce the rear burner. If the inside cooks too slowly, check that the lid is closed and the grill is holding temperature. If flare-ups occur, make sure burners under the meat are off and the drip pan is in place.
Rotisserie Chicken Step-by-Step Example
Dry brine a 4 to 5 lb chicken with salt overnight. Truss tightly. Load and balance on the spit. Preheat the outer burners or rear burner to around 375°F with a drip pan containing a little broth in the center. Mount the spit, start the motor and close the lid. After about an hour, check the thickest part of the thigh and breast; continue until both reach 165°F. Rest for 10 minutes, then carve.
Cleaning the Rotisserie
Remove the forks and spit and wash them in hot soapy water. Wipe the motor with a damp cloth but never submerge it. Store the motor indoors and the spit and forks dry to prevent rust. Discard drip pan contents once cooled, and clean the grill as usual.
Rotisserie vs Indirect Roasting
You can roast a whole chicken or pork loin over indirect heat without a rotisserie, and results can be excellent. The rotisserie's advantages are even browning on all sides, self-basting as fat rolls around the surface and a show-stopping presentation. Indirect roasting is simpler and needs no extra equipment. If you roast large cuts often, a rotisserie kit is a worthwhile upgrade; see how to cook chicken on a gas grill for the indirect method.
How Big a Roast Can You Rotisserie?
Size is limited by motor capacity, spit length and the clearance under the lid. Many home kits handle a whole chicken or a medium roast easily, while large turkeys may be too big for smaller grills. Check that the meat clears the lid and drip pan as it rotates; measure from the spit center to the closest obstruction and compare with the widest dimension of your roast.
Cooking Two Chickens at Once
Longer spits can hold two chickens. Truss both tightly and load them close together, with forks securing each end. Balance carefully, since two birds are heavier and more prone to wobbling. Cooking time increases somewhat; check both birds with a thermometer.
Weather Considerations
Wind and cold make it harder to maintain steady temperatures, especially on longer rotisserie cooks. Shield the grill from wind, keep the lid closed and allow extra time. In hot weather, watch that the motor and cord do not overheat, and keep the cord shaded from direct grill heat.
Using a Probe Thermometer
A wireless probe thermometer is ideal for rotisserie cooking, but the rotating spit can tangle wired probes. Use a probe designed for rotisserie use, or pause the motor briefly to check temperature with an instant-read thermometer. See the best wireless meat thermometer guide for options.
Rotisserie Gyros and Al Pastor
A stack of thinly sliced, marinated meat pressed tightly onto the spit makes homemade gyros or al pastor. Build the stack compactly, secure it well with forks and shave off the browned outer layer as it cooks. Make sure the meat reaches a safe internal temperature before serving.
Beginner Tips
Start with a whole chicken, which is forgiving and teaches you balancing and heat control. Keep notes on weight, temperature and timing so you can repeat good results.
Storing the Motor Safely
Keep the rotisserie motor indoors in a dry place between uses, since moisture and dust shorten its life. Coil the cord loosely and check it for damage before each cook.
Final Prep Checklist
Truss tightly, balance the spit, place the drip pan and preheat before loading.
Rotisserie Gear
These items help you get started. Confirm kit compatibility with your grill. Details come from Amazon listings; we have not hands-on tested them.
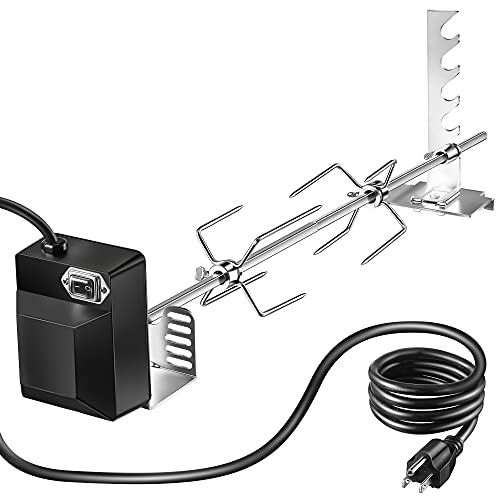
Universal Rotisserie Grill Kit, 360° Automatic Rotating Rotisserie Kit | with 12
Best for: Adding rotisserie to a gas grill
A rotisserie kit with spit, forks and motor; check fit for your grill width.
- Adds rotisserie cooking
- Universal fit options
- Measure your grill first

Oklahoma Joe’s Natural Cotton Butchers Twine, 300 ft – 3486496P12
Best for: Trussing poultry and roasts
Cotton twine for trussing meat securely.
- Food-safe cotton
- Holds shape while turning
- Single-use


Napoleon Rogue 425 3-Burner Propane Grill
Best for: Bigger cooks on three burners
A 3-burner Napoleon with 42,000 BTU, 571 sq. in. total area, porcelainized cast-iron grids and instant ignition per the listing.
- Large cooking area
- Cast-iron grids
- Locking casters
- Heavier and bulkier

Weber Spirit E-325 3-Burner Gas Grill
Best for: Families wanting a reliable 3-burner
Three burners with a Sear Zone powered by Boost Burners and a 10-year limited warranty, per Weber.
- Strong searing
- Long warranty
- Easy parts
- No side burner on this model
Need a grill with room for rotisserie? See our best 3-burner gas grill guide.
Common Mistakes
Common mistakes include not trussing tightly, poor balancing, leaving burners on directly under the meat, skipping the drip pan, opening the lid too often and relying on time instead of temperature.
Final Thoughts on How to Use a Rotisserie on a Gas Grill
Truss and balance the meat, use indirect or rear burner heat, place a drip pan below and cook to temperature with the lid closed. With a little practice, your gas grill can produce restaurant-style rotisserie roasts. For grills that handle rotisserie well, see our best 3-burner gas grill picks.
More Questions People Ask
What temperature should a gas grill be for rotisserie chicken?
Around 350 to 400°F with indirect or rear burner heat works well for most chickens.
Do you need a rear burner for rotisserie?
No. Indirect heat from the outer burners works, though a rear infrared burner gives more even browning.
How do you keep a chicken from falling off the rotisserie?
Truss tightly, push the forks firmly into the meat and tighten the fork screws securely.
Can I rotisserie on a 2-burner grill?
Often yes, using one burner for indirect heat and a drip pan, though browning may be less even.
Frequently Asked Questions
Can you use a rotisserie on any gas grill?
Many gas grills accept a rotisserie kit, but you need enough height under the lid and a compatible mounting bracket. Check the manufacturer's accessory list or a universal kit's fit guide.
Should the burners be on or off under a rotisserie?
Typically the burners directly under the meat are off or low, with outer burners or a rear infrared burner providing heat, so drippings do not flare up.
How long does rotisserie chicken take on a gas grill?
A 4 to 5 lb chicken commonly takes around 1 to 1.5 hours at medium heat. Always cook to 165°F in the thickest part.
Do you need a drip pan for a rotisserie?
A drip pan under the meat catches fat, reduces flare-ups and can hold liquid for basting or gravy.
Why is balancing important on a rotisserie?
An unbalanced load strains the motor, turns unevenly and cooks unevenly. Center the meat on the spit and test the rotation before cooking.