If you’ve ever struggled to get certain seeds to sprout, you’re not alone. Some seeds have special needs before they can grow into healthy plants, and that’s where stratification comes in.
Stratifying seeds mimics the natural cold period they need to break dormancy and start growing. But how do you do it right? You’ll discover simple, proven steps to successfully stratify your seeds, avoid common mistakes, and boost your planting success.
Get ready to turn your seeds into thriving plants with confidence!
Credit: www.bloomingbackyard.com
Why Stratify Seeds
Stratifying seeds is a natural process that helps many seeds break dormancy. Some seeds need a cold period to start germinating. This mimics winter conditions in nature. Without stratification, these seeds may never sprout or take too long to grow. Understanding why to stratify seeds can improve your planting success and yield stronger plants.
Benefits For Germination
Stratification boosts seed germination rates. It softens the seed coat, making it easier for sprouts to emerge. This process also activates enzymes inside the seed. These enzymes help the seed use stored food for growth. Seeds that are stratified often grow faster and more evenly. This leads to healthier seedlings ready for transplanting.
Seeds That Need Stratification
Many native plants and trees require stratification. Examples include oak, maple, and cherry seeds. Some wildflowers and perennials also need this cold treatment. Without it, these seeds stay dormant and do not sprout. Knowing which seeds need stratification helps plan your gardening tasks. It ensures you treat seeds properly for the best results.
Types Of Stratification
Stratification helps seeds break dormancy and sprout successfully. Different seeds need different treatments. Knowing types of stratification guides proper preparation. It improves germination rates and plant growth.
Cold Stratification
Cold stratification mimics winter conditions. Seeds stay in a moist, cold place, usually 1 to 5°C (34 to 41°F). This process lasts from a few weeks to several months. It softens the seed coat and triggers growth hormones. Many trees and perennials require cold stratification.
Warm Stratification
Warm stratification uses warm, moist conditions. Seeds stay at about 15 to 25°C (59 to 77°F). This method suits tropical or desert plants. Warm stratification often comes before cold stratification. It helps seeds start the germination process gently.
Dry Stratification
Dry stratification involves storing seeds in a dry, cool place. This method suits seeds that need a resting period without moisture. It often lasts several months. Dry stratification simulates dry seasons in nature. It prevents premature germination until conditions improve.
Materials Needed
Preparing to stratify seeds requires gathering a few essential materials. These items create the right environment for seeds to break dormancy and start growing. Using proper materials improves seed germination success. Choose items that keep moisture and cold consistent. Avoid anything that may cause mold or rot. Below are key materials you will need.
Choosing The Right Medium
Select a clean, inert medium that holds moisture well. Common options include sand, vermiculite, or perlite. These materials do not contain nutrients, preventing seed decay. Avoid using soil or organic matter that may carry fungi or bacteria. Moisten the medium slightly so it is damp but not soaking wet. This balance keeps seeds moist without drowning them. The medium should surround seeds gently, allowing air circulation.
Containers And Storage Options
Use containers that hold moisture and fit in your refrigerator or cold storage. Plastic bags with zip seals, small plastic containers, or glass jars work well. Ensure containers close tightly to keep moisture in and air out. Label containers with seed type and date to track stratification time. Store containers in a consistent cold place, ideally between 33°F and 41°F (1°C to 5°C). Avoid freezing temperatures that can damage seeds. Proper storage helps seeds complete their chilling period safely.

Credit: joegardener.com
Step-by-step Stratification Process
Stratification helps seeds break dormancy and start growing. The process mimics natural winter conditions. It involves cold and moisture to prepare seeds for planting. Follow these clear steps for successful seed stratification.
Preparing Seeds
Begin by selecting fresh seeds. Remove any damaged or broken seeds. Clean seeds gently to remove dirt or debris. Some seeds need scarification before stratification. This means lightly scratching or nicking the seed coat. Check specific needs for your seed type.
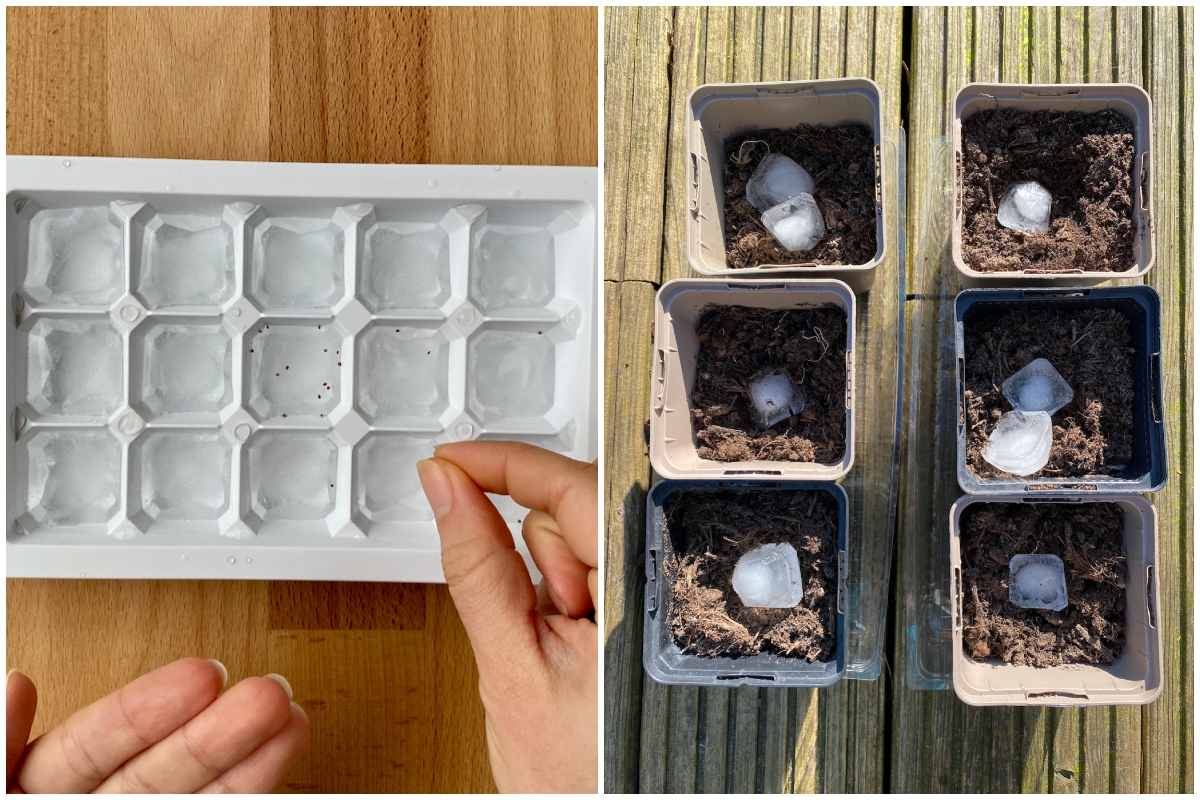
Moistening The Medium
Choose a moist medium like sand, peat moss, or vermiculite. The medium should be damp but not soaked. Spread seeds evenly in the medium. Mix seeds gently to cover them with moisture. Proper moisture helps seeds absorb water and start germination.
Sealing And Labeling
Place the seed and medium mixture in a plastic bag or container. Seal it tightly to keep moisture in. Label the bag with seed type and date. This helps track the chilling time and seed variety. Avoid opening the bag often to keep conditions stable.
Chilling Period
Put the sealed bag in the refrigerator. Maintain a temperature around 34-41°F (1-5°C). Keep seeds cold for the recommended time, usually 4 to 12 weeks. Check seeds weekly for mold or drying out. After chilling, seeds are ready to plant in soil.
Optimal Conditions
Creating the right conditions is key to successful seed stratification. Seeds need specific environments to break dormancy and begin germination. These conditions mimic natural winter cycles, helping seeds prepare for spring growth. Understanding temperature, time, and moisture helps improve germination rates and plant health.
Temperature Settings
Seeds require cold temperatures to simulate winter. Keep them between 33°F and 41°F (1°C to 5°C). Avoid freezing below 32°F, which may damage seeds. Refrigerators are ideal for maintaining steady cold conditions. Consistent temperature is crucial for effective stratification.
Duration Of Stratification
Length of stratification varies by seed type. Most seeds need 30 to 90 days of cold treatment. Check seed packets or reliable sources for exact time. Too short or too long can reduce germination success. Monitor seeds and follow recommended durations closely.
Moisture Control
Seeds must stay moist but not wet during stratification. Use damp paper towels, sand, or peat moss to hold moisture. Avoid waterlogging to prevent mold and rot. Check moisture regularly and adjust if needed. Proper moisture helps seeds activate without damage.
Common Mistakes To Avoid
Stratifying seeds prepares them for better germination. Seeds often need a cold period to break dormancy. This cold period can be done indoors or outdoors. Each method has benefits and some challenges. Understanding these differences helps you choose the right way to stratify seeds.
Fridge Vs Freezer
Using a fridge is the common indoor method. It keeps seeds cold but not frozen. Seeds stay moist and chilled at about 34-40°F (1-4°C). This mimics natural winter conditions safely. The freezer is much colder, below 32°F (0°C). Freezing can harm some seeds by damaging the embryo. Only certain seeds tolerate freezing. Fridge stratification is safer for most types.
Natural Cold Stratification
Natural stratification happens outside during winter. Seeds lie in soil or mulch and experience real cold and moisture. This method suits plants native to your climate. Outdoor stratification can be unpredictable. Weather, moisture, and temperature vary each season. Seeds may dry out or get too wet. Covering seeds with mulch helps maintain moisture. Natural stratification requires less effort but more patience.
Indoor Vs Outdoor Stratification
Testing seed viability is a crucial step before stratifying seeds for planting. It helps to know which seeds are alive and ready to grow. Viable seeds increase your chances of a successful garden. Testing saves time and effort by focusing on seeds that will sprout.
Germination Tests
Start by placing a few seeds on a damp paper towel. Fold the towel to cover the seeds completely. Put the towel in a plastic bag to keep moisture. Keep it in a warm place for several days. Check daily for signs of sprouting. Count how many seeds germinate out of the total tested. If at least 70% sprout, your batch is good for planting. If less, consider testing more seeds or getting new ones.
Handling Non-germinating Seeds
Seeds that do not sprout may still be alive but dormant. Some seeds need more time or specific conditions to germinate. Try soaking them in water for 24 hours to soften the seed coat. Another option is scarification, lightly scratching the seed surface. After treatment, repeat the germination test. If seeds still fail to sprout, discard them to avoid wasting space. Focus on seeds with higher viability for better results.
Testing Seed Viability
Planting stratified seeds requires care and attention to ensure strong growth. Stratification breaks seed dormancy, helping seeds sprout faster and healthier. After stratification, planting these seeds correctly leads to better germination and plant development.
Timing For Transplanting
Transplant seedlings after they develop 2-3 true leaves. Avoid moving them too early to prevent shock. Wait until the outdoor soil warms enough for the plant type. Cold soil can slow growth or kill young plants. Check local frost dates and plant accordingly.
Soil Preparation
Use well-draining soil rich in organic matter. Loosen soil to improve root growth and air flow. Avoid heavy clay or compacted soil. Mix compost or aged manure to boost nutrients. Ensure soil pH matches the plant’s needs for best results.
Acclimating Seedlings
Harden off seedlings by gradually exposing them to outdoor conditions. Start with a few hours in shade, then increase sun exposure daily. Keep seedlings protected from strong wind and direct sun initially. This reduces transplant shock and helps plants adjust to their new environment.
Planting Stratified Seeds
Experts share simple tips to help you stratify seeds correctly. Follow these easy steps to improve germination rates. Proper stratification prepares seeds for better growth and stronger plants.
Using Inert Media
Choose inert media like sand, vermiculite, or perlite for stratification. These materials keep moisture balanced without causing rot. Avoid using soil or organic matter that can harbor mold. Keep the medium moist but not wet to prevent seed damage.
Labeling And Record Keeping
Always label your seeds with their name and date of stratification. Use waterproof markers for clear, lasting labels. Record details such as stratification time and temperature. Good records help track progress and improve future planting success.
Adjusting For Different Seed Types
Each seed type needs specific stratification conditions. Some require cold and moist conditions; others need only cold. Research the exact needs of your seeds before starting. Adjust time and temperature based on seed variety for best results.

Credit: growitbuildit.com
Frequently Asked Questions
How To Stratify Seeds Quickly?
Place seeds in a moist paper towel, sand, or vermiculite inside a sealed bag. Refrigerate for 2-8 weeks. Check moisture regularly. Remove seeds once chilling time ends and plant promptly. This quick cold stratification mimics natural winter conditions to boost germination.
What Are Common Stratification Mistakes?
Common stratification mistakes include overwatering seeds, providing insufficient chilling time, and exposing seedlings to direct sunlight too early. These errors reduce germination success and seedling health.
How Long Should I Stratify Seeds?
Stratify seeds for 2 to 12 weeks, depending on species. Most require 4 to 8 weeks of cold, moist conditions to germinate well.
Do You Cold Stratify Seeds In The Fridge Or Freezer?
Cold stratify seeds in the fridge, not the freezer. Freezing can damage seed embryos and reduce germination. Use moist sand or vermiculite in a sealed container for best results. Keep seeds chilled for the required period before planting.
Conclusion
Successfully stratifying seeds boosts your chances for healthy plants. Keep seeds moist but not soaked during chilling. Use the fridge, not the freezer, for cold stratification. Follow the recommended chilling time for each seed type. After stratification, plant seeds in well-prepared soil.
Watch for signs of sprouting and care for seedlings gently. Simple steps lead to better germination and stronger growth. Give seeds the right conditions and patience. Enjoy watching your garden grow from stratified seeds.