If you’ve ever picked up your trimmer only to find the line worn out or broken, you know how frustrating it can be to stop your yard work mid-task. But here’s the good news: replacing the line on your trimmer is easier than you think.
With just a few simple steps, you can have your trimmer cutting like new again, saving time and money on expensive repairs or replacements. Ready to get your trimmer back in action quickly and confidently? Keep reading, and you’ll learn exactly how to replace the line on your trimmer—no stress, no guesswork, just straightforward guidance you can follow right now.
Tools And Materials Needed
Before replacing the line on a trimmer, gather the right tools and materials. Having everything ready makes the process easier and faster. Using the correct supplies helps ensure a proper fit and smooth operation.
Below are the essential tools and materials needed for this task. Each plays a key role in replacing the trimmer line safely and effectively.
Replacement Trimmer Line
Choose the correct diameter and type of line for your trimmer model“>trimmer model. Check your user manual to find the right size. Using the wrong line can damage the trimmer or reduce its performance.
Screwdriver Or Wrench
These tools help remove the trimmer head cover“>trimmer head cover. Some models require a Phillips or flathead screwdriver. Others may need a small wrench or socket to loosen bolts.
Gloves
Wear gloves to protect your hands from cuts and dirt. Trimmer line can be sharp, and the head may have rough edges. Gloves improve grip and keep your hands clean.
Scissors Or Utility Knife
Use scissors or a utility knife to cut the replacement line to the right length. A clean cut prevents fraying and tangling during use. Keep the blade sharp for best results.
Cleaning Cloth
Have a cloth ready to wipe dirt and debris from the trimmer head. Cleaning the area before replacing the line helps parts fit properly. It also extends the life of your trimmer.
Preparing The Trimmer
Preparing the trimmer correctly is essential before replacing the line. It ensures safety and makes the process smoother. Taking time to set up your tool helps avoid mistakes and damage.
This section covers how to get your trimmer ready step-by-step. Focus on safety and proper positioning to work efficiently.
Safety Precautions
Always turn off the trimmer and unplug it if electric. For gas models, remove the spark plug wire to stop accidental starts.
Wear thick gloves to protect your hands from sharp edges. Safety glasses shield your eyes from flying debris.
Work in a clear space away from pets and children. Keep the trimmer on a stable surface to prevent it from falling.
Positioning The Trimmer
Lay the trimmer flat with the cutting head facing up. This position makes the spool easier to access.
Use a table or workbench to raise the trimmer to a comfortable height. This prevents back strain and improves control.
Secure the trimmer if possible, so it does not move while you work on it. Good positioning saves time and effort.
Removing The Old Line
Removing the old line from your trimmer is the first step to keep your tool working well. It clears worn-out or tangled line to make space for new string. This process is simple but needs care to avoid damage.
Follow these steps to remove the old line safely and prepare your trimmer for a fresh spool.
Accessing The Spool
Place the trimmer on a flat surface with the head facing up. Locate the trimmer head at the bottom. The spool is inside this head, holding the cutting line. Check for tabs or buttons on the sides of the trimmer head. These parts secure the spool cover.
Press or push these tabs gently. This action releases the spool cover. Do not use too much force to avoid breaking the tabs. Once released, you can lift or pull off the cover. Now, the spool with the old line is visible and ready for removal.
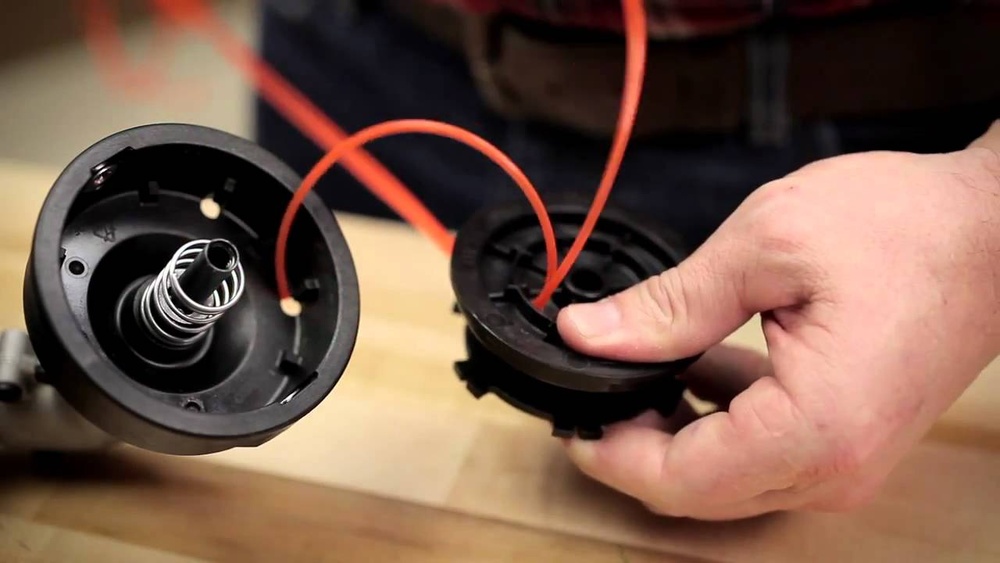
Removing The Spool Cover
Hold the trimmer head firmly. Take off the spool cover carefully. Set the cover aside in a safe place. Look at the spool inside. It may have leftover line wrapped around it. Pull the loose ends of the old line out slowly. If the line is stuck, gently unwind it by hand.
Remove all the old string from the spool. Make sure no pieces remain. Clean the spool area if it has dirt or debris. This step helps the new line fit and work well. After the spool is empty and clean, you are ready to add new line.
Credit: support.dewalt.com
Choosing The Right Replacement Line
Choosing the right replacement line is important for your trimmer’s performance. The correct line helps cut grass and weeds efficiently. It also protects your trimmer from damage. Picking the right line depends on your trimmer model and the type of yard work you do.
Line Thickness
Line thickness affects cutting power and durability. Thicker lines cut tougher weeds and last longer. Thin lines work well for light grass and smaller yards. Check your trimmer’s manual for the recommended thickness. Using the wrong thickness can cause the trimmer to jam or wear out quickly.
Line Material Types
Trimmer lines come in different materials to fit various needs. Nylon is common and affordable, good for general use. Some lines have additives like aluminum or reinforced fibers. These lines are stronger and last longer on rough terrain. Choose the material based on the plants you trim and how often you use the tool.
Winding The New Line
Winding the new line on your trimmer is a vital step to keep it working efficiently. This process may seem tricky, but with the right approach, it becomes simple and quick. Proper winding ensures the line feeds smoothly and cuts effectively. Follow these steps carefully to avoid tangles and breakage.
Threading The Line Through The Spool
Start by cutting a suitable length of new trimmer line. Most spools require about 10 to 15 feet. Find the small hole or slot on the spool where the line will go through. Insert one end of the line into this hole. Push it through until it comes out the other side or is secure enough to hold.
Make sure the line is straight and not twisted. This helps the line wind evenly. If your spool has two sections, repeat the process for the second line. Keep the ends of the line free and ready for winding.
Proper Winding Technique
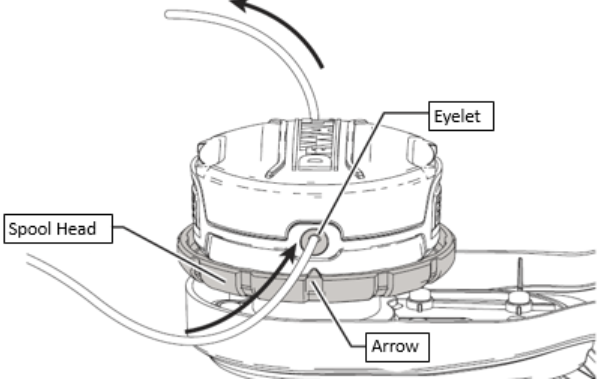
Hold the spool firmly in one hand. Use the other hand to wind the line around the spool in the direction marked on it. Most spools have arrows showing the correct winding direction. Wind the line tightly and evenly to prevent tangles. Avoid overlapping or crossing the line.
Leave about 6 inches of line free at the end. Secure this end in the notch or slot on the spool to keep it from unwinding. Repeat for the second line if your trimmer uses dual lines. Once done, place the spool back into the trimmer head and pull the free ends through the eyelets.

Credit: egopowerplus.eu
Reassembling The Trimmer Head
Reassembling the trimmer head is the final step after replacing the line. It ensures the trimmer functions correctly and safely. Careful reassembly prevents line jams and keeps the tool balanced.
Follow each step carefully to secure the spool and check the line feed mechanism. Proper assembly extends the life of your trimmer and improves cutting performance.
Securing The Spool
Place the spool back into the trimmer head. Align it so the line feeds smoothly through the eyelets. Press down gently but firmly to lock it in place. Snap the spool cover onto the head until you hear a click. Check that the cover is tight and does not wiggle. A secure spool prevents line from slipping out during use.
Testing Line Feed Mechanism
Hold the trimmer head and pull the line slightly. The line should feed out without resistance. Press the bump knob on the bottom to test automatic feed. The line should release smoothly each time you bump it. Rotate the head by hand to ensure the line spins freely. If the line does not feed well, check for tangles or incorrect spool placement.
Tips For Maintaining The Trimmer Line
Maintaining the trimmer line ensures your tool works well longer. Proper care helps avoid frequent replacements and saves money. Follow simple tips to keep the line strong and ready for use.
Avoiding Line Breakage
Use the correct line size for your trimmer. Thinner lines break easily on tough weeds. Avoid hitting hard surfaces like stones or walls. Trim carefully around these objects to prevent damage. Check the line often and replace it if it looks worn out. Keep the line dry and clean to stop it from weakening.
Storing Spare Line
Store extra line in a cool, dry place. Keep it away from sunlight to avoid brittleness. Roll the line neatly to prevent tangles and knots. Use airtight containers or bags to protect from moisture. Label your spare line with the trimmer model for easy use later.

Credit: www.youtube.com
Common Troubleshooting Issues
Replacing the line on a trimmer can sometimes lead to common problems. These issues often stop the trimmer from working well. Knowing how to fix these problems saves time and effort. This section covers two frequent troubles: line not feeding properly and line breaking frequently.
Line Not Feeding Properly
The line may get stuck or fail to feed out smoothly. Dirt or debris can block the spool area. Check and clean the spool housing carefully. Sometimes the line is wound too tightly. Rewind the line with even tension to avoid jams. Also, make sure the spool is seated correctly in the trimmer head.
Another cause is using the wrong line size. Use the line size recommended by the trimmer maker. Too thick or thin line can cause feeding problems. Finally, inspect the spring inside the trimmer head. A weak spring can stop the line from feeding properly.
Line Breaking Frequently
Line that breaks often means it wears out too fast. Hard surfaces like rocks or concrete cause the line to snap. Avoid trimming too close to these surfaces. Using low-quality or old line also leads to frequent breaks. Replace the line with fresh, high-quality string designed for your trimmer.
Check the line thickness as well. Thinner lines break more easily on tough grass. Use a thicker line if your trimmer allows it. Keep the trimmer speed steady; sudden jerks can snap the line. Lastly, avoid overloading the trimmer by cutting very thick or tall weeds in one pass.
Frequently Asked Questions
How Do I Replace My Trimmer Line?
To replace your trimmer line, remove the spool cover and take out the old line. Thread new line through the spool center. Wind it evenly, then reattach the spool and cover securely. Ensure proper tension to prevent tangling during use.
How To Reload A String Trimmer?
Remove the spool cover by pressing the tabs. Pull out the spool, thread new line through its center, and rewind it evenly. Reassemble the trimmer head securely.
Why Do Landscapers Remove Trimmer Guards?
Landscapers remove trimmer guards for better visibility, access tight spots, use longer line, and reduce weight. This improves precision but increases safety risks and can void warranties.
How To Replace Trimmer Line Bump Feed?
To replace trimmer line bump feed, remove the spool cover, take out the old line, and thread new line through the spool. Wind the line evenly, secure it, then reattach the spool and cover. Ensure the line length suits the trimmer’s specifications before use.
Conclusion
Replacing the line on your trimmer keeps it working well. Follow the steps carefully for a smooth process. Use the right line type for your trimmer model. Regular maintenance helps your trimmer last longer and cut better. With practice, changing the line becomes quick and easy.
Keep your yard looking neat and tidy with a sharp trimmer. Try it yourself and save time and money on repairs. A well-maintained trimmer makes yard work less stressful.