
You’ve just finished a rewarding day in your garden, but before you put your tools away, there’s one crucial step you can’t skip: cleaning them. Properly cleaning your garden tools after each use not only keeps them looking good but also protects them from rust, disease, and wear—saving you time and money in the long run.
If you want your tools to stay sharp, reliable, and ready for your next gardening session, you need to know the right way to clean them. Keep reading, and you’ll discover simple, effective tips that anyone can follow to keep their garden tools in top shape season after season.
:max_bytes(150000):strip_icc()/how-to-clean-garden-tools-4799140-06-1cf7c6660ffc4c738e69d79b7b1a730a.jpg)
Credit: www.thespruce.com
Gathering Cleaning Supplies
Before you start cleaning your garden tools, gather all necessary supplies. Having the right items ready makes the process smooth and efficient. It also helps protect your tools from damage and rust. Keep your cleaning area organized to save time. Below are key tools and safe cleaning agents you should prepare.
Essential Tools And Materials
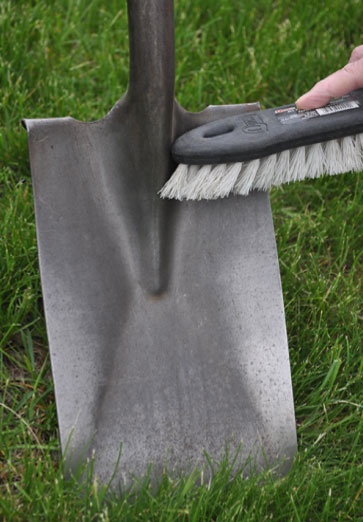
Collect a stiff brush to remove dirt and debris. A wire brush is useful for tougher grime and rust spots. Have a bucket or container filled with warm water. Use a soft cloth or rag to wipe down tools after cleaning. Keep a pair of gloves to protect your hands. Sandpaper or a metal file helps smooth rough edges. Prepare a spray bottle for applying cleaning agents or water. A putty knife can scrape off stuck soil or sap.
Choosing Safe Cleaning Agents
Select mild soap or detergent for washing tools. Avoid harsh chemicals that may damage metal or wood. White vinegar works well to dissolve rust naturally. Baking soda mixed with water creates a gentle scrubbing paste. Rubbing alcohol or turpentine can remove sticky sap. Use disinfectants like diluted bleach to kill germs. Always read labels to ensure safety for garden tools. Choose eco-friendly products to protect your plants and soil.
Removing Dirt And Debris
Removing dirt and debris from garden tools is the first step to keep them in good shape. Soil, mud, and plant matter can stick to blades and handles. Cleaning these residues stops rust and damage. It also keeps tools ready for the next use. The process is simple and quick.
Using Brushes And Scrapers
Start by scraping off large clumps of dirt with a scraper or putty knife. Use a stiff brush to scrub away stubborn soil. Wire brushes work well on metal parts. For wooden handles, use a softer brush to avoid damage. Focus on tight spots and joints where dirt hides. This step removes most debris before rinsing.
Rinsing With Water Effectively
Rinse tools under running water to wash away loosened dirt. Use a garden hose or a bucket of water. High-pressure water helps clean hard-to-reach areas. Make sure to rinse both metal and wooden parts thoroughly. After rinsing, shake off excess water. Dry tools completely to prevent rust and wood swelling.
Eliminating Sap And Sticky Residue
Wooden handles on garden tools need special care to last long. Moisture and dirt can damage wood quickly. Regular maintenance keeps handles smooth and strong. It also prevents splinters that can hurt your hands. Follow simple steps to care for wooden handles after each use.
Sanding Rough Spots
Start by checking the handle for rough or splintered areas. Use fine-grit sandpaper to smooth these spots gently. Sand along the wood grain to avoid damage. This step removes dirt and old finishes too. Clean the handle with a dry cloth after sanding. Smooth handles feel better and reduce injury risk.
Treating With Linseed Oil
Apply boiled linseed oil to protect the wood from drying out. Use a clean cloth to spread the oil evenly over the handle. Let the oil soak in for about 15 minutes. Wipe off any extra oil to prevent stickiness. Repeat this process once or twice a year for best results. Oiled handles stay strong and resist cracking.
Drying And Rust Prevention
Disinfecting garden tools is crucial to stop the spread of plant diseases. Dirty tools carry bacteria, fungi, and viruses from one plant to another. Cleaning alone does not remove these harmful germs. Using disinfectants kills pathogens and protects your garden. This step keeps your plants healthy and your garden thriving.
Using Alcohol And Other Disinfectants
Isopropyl alcohol works well to disinfect garden tools. Use 70% alcohol for best results. Apply it with a cloth or spray bottle. Let the tools air dry to kill germs effectively. Bleach solution is another option. Mix one part bleach to nine parts water. Soak tools for a few minutes and rinse well. Avoid strong chemicals that can damage metal or wood. Always wear gloves when handling disinfectants.
When And How To Sanitize
Sanitize tools after every use to prevent disease spread. Especially important when working on sick plants. Also sanitize before pruning healthy plants. Clean tools first by removing dirt and debris. Then apply disinfectant to all metal parts. Allow enough contact time for the disinfectant to work. Dry tools thoroughly before storing them. Regular sanitizing reduces risk of infections in your garden.
Maintaining Wooden Handles
Storing garden tools correctly helps keep them in good shape and ready to use. Proper storage prevents rust, damage, and loss. It also saves time searching for tools and keeps your garden area tidy.
Choosing The Best Storage Location
Select a dry and well-ventilated place for storing garden tools. Avoid damp areas that cause rust and wood rot. A shed, garage, or covered porch works well. Keep tools off the ground to avoid moisture. Use hooks or shelves to hang or place tools safely.
Arranging Tools To Avoid Damage
Arrange tools to stop blades and sharp edges from touching each other. Hang tools with handles down to protect the working ends. Store heavy tools separately from light ones to prevent bending. Group similar tools together for easy access and to avoid clutter. Clean tools before storing to reduce wear and tear.
Credit: hort.extension.wisc.edu

Credit: www.dancoopergarden.com
Frequently Asked Questions
What Should You Clean Garden Tools With?
Clean garden tools with water and mild soap using a stiff brush to remove dirt. Dry thoroughly to prevent rust. Use rubbing alcohol or paint thinner to remove sap. Apply linseed oil to wooden handles for protection. Regular cleaning prevents rust and maintains tool efficiency.
What Is The Best Method For Cleaning Up Tools After Use?
Remove dirt using a stiff brush or putty knife. Wash tools with soapy water. Dry thoroughly to prevent rust. Oil wooden handles for protection. Store tools in a dry place to maintain their condition.
Can You Use Wd-40 To Clean Garden Tools?
WD-40 can clean garden tools by removing rust and grime. Spray, scrub gently, then wipe dry to prevent rust.
How To Clean And Store Garden Tools For Winter?
Remove dirt using a stiff brush and water. Wipe blades with rubbing alcohol to remove sap. Dry tools thoroughly. Sand wooden handles and apply linseed oil. Store tools in a dry, ventilated area to prevent rust and damage during winter.
Conclusion
Cleaning garden tools after use keeps them in good shape longer. Remove all dirt and debris with a stiff brush. Wipe blades to clear sap and sticky residue. Dry tools well to stop rust from forming. Treat wooden handles with oil to protect them.
Store tools in a dry place to maintain quality. Regular cleaning saves money and helps your garden grow. A little care goes a long way. Keep your tools ready for the next job. Simple steps make a big difference every time.