Building a pergola in your backyard can change the way you enjoy your outdoor space. A pergola is more than a simple structure—it adds style, shade, and a cozy feeling to gardens, patios, or decks. Many people believe it’s a big, expensive project, but with the right planning, basic tools, and a clear weekend, it’s possible to build a strong, attractive pergola yourself.
Even if you’ve never built a large outdoor structure before, you can do this safely and confidently if you follow each step.
This guide walks you through everything you need, from choosing materials to finishing touches. You’ll discover useful tips that save time, prevent mistakes, and help you create a pergola that lasts for years. By the end, you’ll understand not just how to build a pergola, but how to make it a highlight of your home.
What Is A Pergola And Why Build One?
A pergola is an outdoor structure with vertical posts supporting crossbeams and an open lattice. It doesn’t have a solid roof, but it provides some shade and defines an outdoor space. Pergolas are perfect for relaxing, hosting guests, or growing climbing plants like vines or roses.
There are several reasons to build a pergola:
- Outdoor living: Creates a comfortable area for dining, reading, or spending time with family.
- Value: Increases your property’s appeal and can add value to your home.
- Style: Makes your backyard look more organized and attractive.
- Customizable: Easy to adjust size, shape, and materials to match your style.
A weekend project means you can enjoy the results quickly—no need to wait weeks for contractors.
Planning Your Pergola Project
Before you pick up a saw, planning is key. Good planning prevents mistakes, saves money, and helps you finish on time.
Choose The Right Location
Find a flat, open spot in your yard. Think about:
- Sun: Do you want morning or afternoon shade?
- View: Will the pergola block or frame a nice view?
- Space: Make sure there’s enough room for furniture and walking.
- Distance from house: Many people build pergolas near patios or doors for easy access.
Decide On Size And Style
Popular pergola sizes are:
- 8×8 feet: Small, for two chairs and a table.
- 10×10 feet: Fits a dining set or lounge furniture.
- 12×16 feet: For larger gatherings.
Style options:
- Freestanding: Stands alone in the yard.
- Attached: Connects to the house for extra stability.
Check Local Rules And Permits
Some cities require permits for building structures. Check with your local building department. Pay attention to:
- Height limits (usually 8-12 feet)
- Setback rules (distance from property lines)
- Utility lines (call 811 before digging)
Failing to check rules can lead to expensive fixes or removal.
Create A Simple Sketch
Draw your pergola on paper. Mark post positions, beam lengths, and overall size. This helps you estimate materials and visualize the final look.
Materials And Tools You’ll Need
Choosing the right materials is essential for strength and durability. Most DIYers use pressure-treated wood or cedar. Both resist rot and bugs. Cedar is more expensive but looks beautiful and smells great.
Here’s a breakdown of what you’ll need for a standard 10×10 foot pergola:
Lumber
- 4 posts (4×4 or 6×6, 10 feet long)
- 4 beams (2×8, 10 feet long)
- 7-9 rafters (2×6, 10 feet long)
- 7-9 purlins (2×2, 10 feet long) for extra shade (optional)
Hardware
- Post anchors (if not setting posts in concrete)
- Galvanized bolts, nuts, and washers (½ inch, 8 inches long)
- Wood screws (3-4 inch, exterior grade)
- Metal brackets (for extra support, optional)
- Concrete mix (if setting posts in ground)
- Post caps (to protect wood ends)
Finishing Materials
- Exterior wood stain or sealant
- Sandpaper or power sander
- Paintbrush or sprayer
Tools
- Tape measure
- Level
- Carpenter’s square
- Drill and bits
- Circular saw or miter saw
- Shovel (for post holes)
- Ladder (8 feet or taller)
- Socket wrench
- Rubber mallet or hammer
Fastener Comparison
Below is a comparison of common fasteners for pergolas.
| Fastener Type | Strength | Weather Resistance | Cost |
|---|---|---|---|
| Galvanized Bolts | Very High | Excellent | $$ |
| Exterior Wood Screws | High | Good | $ |
| Metal Brackets | Medium | Excellent | $$$ |
Tip: Always use galvanized or stainless steel for outdoor projects. Regular screws can rust and weaken quickly.
Preparing The Site
Getting the site ready is often the most overlooked part, but it’s essential for a safe, lasting pergola.
Marking And Measuring
- Use stakes and string to mark the corners of your pergola.
- Measure diagonals—both should be equal for a perfect rectangle.
- Mark post hole locations with spray paint.
Clearing And Leveling
- Remove grass, plants, and debris.
- Level the ground with a shovel if needed. Small slopes can be fixed with gravel under posts.
Digging Post Holes
- For a 10×10 pergola, dig four holes, one at each corner.
- Holes should be at least 24-36 inches deep (below frost line if in cold climate), and 12 inches wide.
- If using post anchors on a concrete slab, skip digging.
Safety
- Call 811 to check for underground utilities.
- Wear gloves and eye protection.
Credit: myfrugaladventures.com
Setting The Posts
Strong posts make your pergola sturdy and safe.
Method 1: Setting In Concrete
- Place a post in each hole.
- Use a level to keep it perfectly upright.
- Pour in concrete mix and water (follow bag instructions).
- Brace the post with boards while concrete sets (at least 24 hours).
Method 2: Using Post Anchors
- Attach metal post anchors to concrete pad or deck with bolts.
- Insert wooden posts, check for level, and secure with screws.
Post Spacing And Leveling
It’s important posts are exactly where you want them—small errors here cause big headaches later. Use a long level and string lines to double-check.
Non-obvious insight: If your ground is uneven, cut post tops after installation rather than trying to dig holes at different depths.
Installing Beams And Crossbeams
Beams are the main horizontal supports. Crossbeams go on top and give the pergola its shape.
Cutting Beams And Rafters
- Measure twice, cut once.
- Decorative ends can be added for style—trace a curve with a paint can or use a jigsaw.
Attaching Beams
- Clamp beams to the outside of posts, 8 feet above ground (or your chosen height).
- Drill holes through beams and posts.
- Secure with bolts, washers, and nuts—tighten fully.
Installing Crossbeams (rafters)
- Lay rafters across the beams, spaced 12-16 inches apart.
- Use a square to keep them perpendicular.
- Attach with long screws from above.
Extra tip: Stagger screws to avoid splitting wood.

Credit: www.youtube.com
Adding Purlins For Shade
Purlins are smaller strips laid across the rafters. They give extra shade and a finished look. They’re optional but recommended if you want more sun protection.
- Lay purlins across rafters, spacing them 6-12 inches apart.
- Attach with 3-inch screws.
Non-obvious insight: If you want even more shade, install fabric or bamboo between the purlins.
Securing And Bracing
A pergola must resist wind and movement. Add diagonal bracing at each corner for strength, especially in windy areas.
- Cut 2x4s at 45-degree angles.
- Attach one end to the post, the other to the beam.
- Secure with screws.
Example: Four braces, one at each post, will make the whole structure much stiffer.
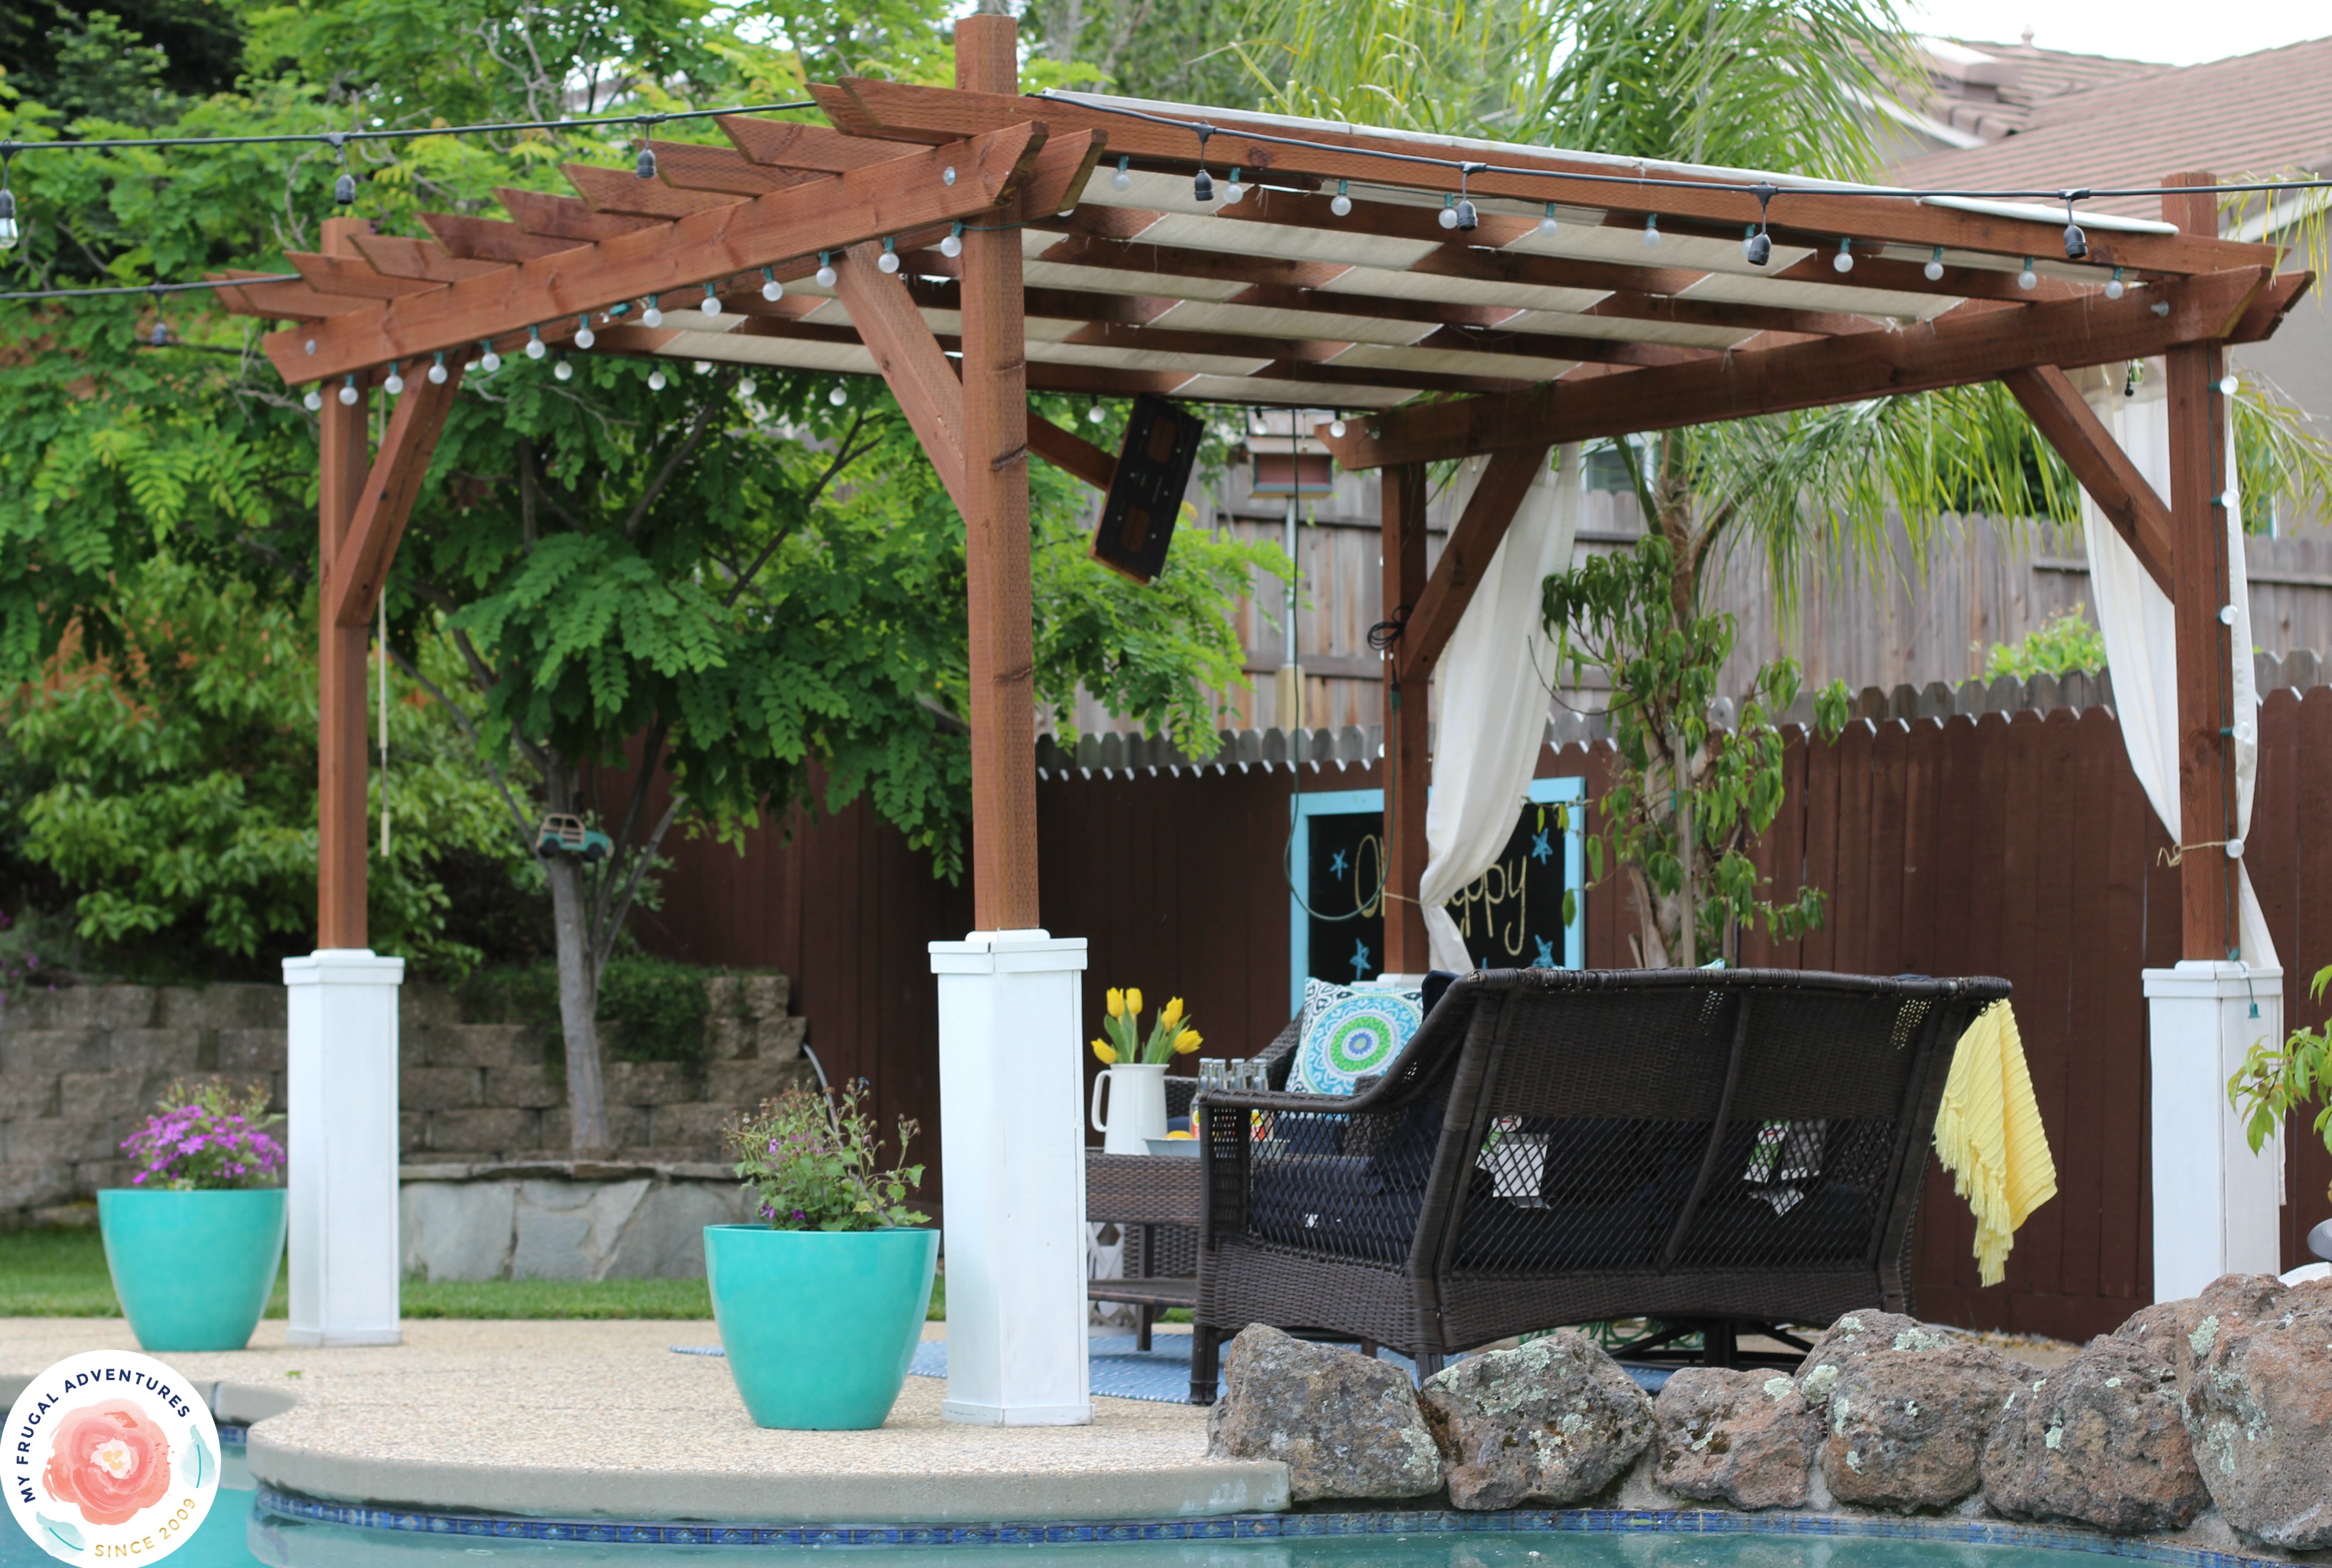
Finishing Touches
Now your pergola is built, but a few extra steps will make it last longer and look better.
Sanding And Sealing
- Sand all rough edges and surfaces.
- Apply a quality exterior stain or sealant. This protects against weather and makes cleaning easier.
- Use a brush or sprayer for even coverage.
Tip: Re-seal every 2-3 years for best results.
Decorative Options
- Add string lights, lanterns, or outdoor curtains.
- Train vines like wisteria or clematis up the posts.
- Hang planters from the rafters.
Maintenance
- Check bolts and screws every year.
- Watch for rot or insect damage, especially in wet climates.
Time And Budget: What To Expect
Building a pergola in a weekend is realistic—but only if you’re organized and work efficiently.
Time Breakdown
| Task | Estimated Time | Notes |
|---|---|---|
| Site prep & marking | 2-3 hours | Includes measuring, clearing |
| Post installation | 3-5 hours | May take longer if using concrete |
| Beams & rafters | 4-5 hours | Cutting and assembly |
| Purlins & bracing | 2-3 hours | Optional, adds time |
| Finishing & cleanup | 2-3 hours | Sanding, staining, décor |
Total: 13-19 hours (2 long days or a busy weekend)
Budget Estimate
Materials for a 10×10 pergola (pressure-treated pine):
- Lumber: $400-$700
- Hardware: $100-$200
- Concrete: $50-$100
- Stain/sealant: $50-$100
- Extras (lights, décor): $50-$200
Total: $600–$1,300 (DIY). Hiring a pro can cost $3,000–$6,000 for the same size.
Note: Cedar or composite materials cost more but last longer.
Step-by-step Instructions
This section gives you clear, easy-to-follow steps to build your pergola.
Step 1: Mark And Prepare The Site
- Use stakes and string to outline the pergola.
- Measure to confirm square corners.
- Mark post holes.
Step 2: Dig Post Holes
- Dig holes 24-36 inches deep.
- Add 2-4 inches of gravel for drainage at the bottom.
- Place posts and check for level.
Step 3: Set Posts
- Mix and pour concrete around posts.
- Brace posts with temporary boards.
- Allow concrete to cure overnight.
Step 4: Attach Beams
- Cut beams to length.
- Clamp to posts at desired height.
- Drill holes and bolt beams to posts.
Step 5: Install Rafters
- Mark rafter positions (12-16 inches apart).
- Cut rafter ends with desired design.
- Lay rafters on top of beams, screw down.
Step 6: Add Purlins (optional)
- Space purlins evenly across rafters.
- Attach with screws.
Step 7: Install Bracing
- Cut braces at 45-degree angles.
- Attach between posts and beams.
Step 8: Sand And Finish
- Sand rough edges and surfaces.
- Apply stain or sealant.
Step 9: Decorate
- Add lights, curtains, or plants.
- Move in furniture.
Practical tip: Work with a friend. Lifting beams and posts is much easier with help.
Common Mistakes And How To Avoid Them
Even experienced DIYers make mistakes. Here are problems to watch for and how to prevent them.
- Posts not level: Double-check with a spirit level before pouring concrete.
- Wrong measurements: Measure twice, cut once. Draw lines on wood before cutting.
- Skipping permits: Always check local rules. Fines can be costly.
- Cheap hardware: Use galvanized or stainless steel to avoid rust.
- No drainage: Add gravel under posts to prevent rot.
- Rushing finishing: Take time to sand and seal wood. It saves repair work later.
- Not bracing: Diagonal bracing adds huge strength—don’t skip this step.
Customization Ideas
Once your basic pergola is up, you can make it unique.
Built-in Benches Or Planters
Add benches between posts for extra seating. Planters at each corner can hold flowers or small trees.
Retractable Canopy
Install a fabric canopy that slides open and closed for extra shade on hot days.
Privacy Screens
Attach lattice panels or outdoor curtains to block wind or neighbors’ views.
Lighting
Hang string lights, lanterns, or solar-powered LED lights for evening use.
Example: A string of warm white bulbs creates a cozy glow for outdoor dinners.
Is A Weekend Pergola Really Possible?
Yes—if you plan ahead. Many people overestimate the difficulty and underestimate the power of careful preparation. The key is to have all materials and tools ready before you start, and to work with a friend or family member for heavy lifting.
Non-obvious insight: If you only have one day, try prepping the site and setting posts on Saturday, then finish beams, rafters, and details on Sunday.
When To Call A Professional
Building a pergola is a good DIY project, but some situations may require help:
- Very large structures (over 12×16 feet)
- Sloped or rocky ground
- Attaching to a house with complicated siding or brick
- Local codes requiring engineering
If you’re unsure about safety, don’t hesitate to ask a pro for advice.
Helpful Resources
For more details and inspiration, you can visit the Family Handyman Pergola Guide, which has diagrams and real-life examples. This site offers expert advice and photos from real DIYers.

Credit: www.youtube.com
Frequently Asked Questions
How Long Does A Diy Pergola Last?
With quality materials and yearly maintenance, a wooden pergola can last 10–15 years. Using cedar or composite materials can add 5–10 years. Regular sealing and checking hardware are key to a long life.
Can I Build A Pergola On An Existing Deck Or Concrete Slab?
Yes. Use post anchors designed for decks or concrete, which bolt into the surface. Make sure your deck can support the extra weight, and use lag screws or bolts for a secure connection.
How Much Shade Does A Pergola Provide?
A standard pergola provides partial shade—about 40-60%—depending on rafter spacing and direction. Adding purlins, fabric, or climbing plants can boost shade to 80% or more.
What’s The Best Wood For A Pergola?
Cedar and pressure-treated pine are the most popular. Cedar is naturally rot-resistant and looks great but costs more. Pressure-treated pine is affordable and strong but needs sealing for best appearance.
Do I Need A Permit To Build A Pergola?
It depends on your city or county. Many places require a permit for structures over 8 feet tall or over 120 square feet. Always check local rules before starting.
Building a pergola in a weekend is not only possible—it’s rewarding. With preparation, clear instructions, and a bit of effort, you’ll transform your outdoor space and gain a lasting sense of pride every time you relax under your own creation.