Is your grill not heating up like it used to? If you’ve noticed uneven flames or weak heat, it might be time to replace your grill burners.
Don’t worry—replacing grill burners is easier than you think, and you don’t need to be an expert to do it yourself. In this step-by-step guide, you’ll learn exactly how to swap out your old burners safely and quickly, so you can get back to grilling your favorite meals with confidence.
Keep reading, and by the end, you’ll have the skills to maintain your grill like a pro!
Credit: grillpartsreplacement.com
Tools And Materials
Replacing grill burners requires specific tools and materials to ensure the job is done right. Having everything ready before starting saves time and avoids frustration. Proper tools help remove old burners easily and install new ones securely. Choosing the right replacement burners ensures your grill works efficiently and safely. Wearing safety gear protects you during the entire process.
Essential Tools
Gather these tools before you begin the replacement. A screwdriver set with both flathead and Phillips heads is necessary. Pliers help in gripping and pulling parts. A wrench set assists in loosening or tightening bolts. A wire brush cleans burner ports and surrounding areas. A flashlight improves visibility inside the grill. Keep a utility knife handy to cut any packaging or tape.
Choosing Replacement Burners
Select burners that match your grill’s make and model. Check the manufacturer’s manual or label for exact part numbers. Avoid generic burners that might not fit properly. Quality burners improve heat distribution and last longer. Consider burners made from stainless steel for durability. Make sure the gas type matches, either propane or natural gas. Confirm burner size to fit your grill’s design.
Safety Gear
Safety is important during burner replacement. Wear heat-resistant gloves to protect your hands. Safety goggles shield your eyes from debris and dust. Use a mask if cleaning dusty or dirty parts. Work in a well-ventilated area to avoid inhaling fumes. Keep a fire extinguisher nearby for emergencies. Turn off the gas supply and disconnect the grill before starting work.

Credit: www.searshomeservices.com
Preparing The Grill
Preparing your grill properly is the first step to replace grill burners safely. Taking time to get the grill ready can prevent accidents and make the job easier. Follow these clear steps to prepare your grill before starting the burner replacement.
Turning Off Gas Supply
Locate the gas supply valve on your grill. Turn it off completely to stop the flow of gas. This step is crucial for safety and prevents gas leaks. Double-check to ensure no gas is escaping before proceeding.
Disconnecting The Grill
Unplug any electrical connections if your grill has them. Detach the gas hose from the propane tank or natural gas line carefully. Move the grill to a well-ventilated outdoor area to work comfortably and safely.
Cleaning The Grill Area
Remove the grill grates and heat shields to expose the burners. Use a brush or cloth to clean dirt and debris around the burner area. A clean workspace helps you see parts clearly and makes installation smoother.
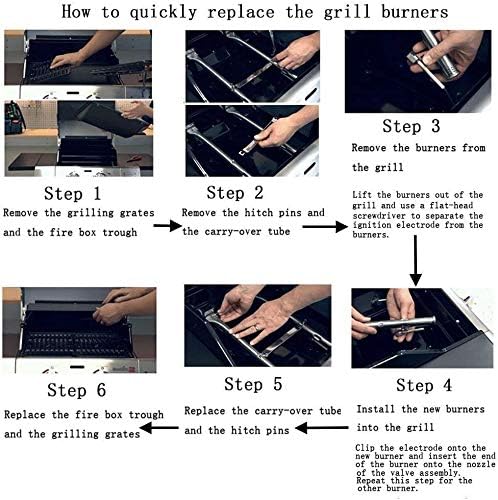
Removing Old Burners
Removing old burners is the first step in replacing your grill burners. This process requires care and attention to avoid damage. Follow each step carefully to ensure safe removal and prepare your grill for new burners.
Start by identifying the exact location of the burners. Then, detach any clips or screws holding them in place. Handle the burner tubes gently to prevent any harm or bending.
Locating Burners
Open your grill lid and remove the cooking grates. The burners sit beneath the grates, running across the width of the grill. Look for metal tubes with holes or slots where the flames come out. Each burner usually connects to a gas supply tube. Check your grill manual if you have trouble finding them.
Detaching Burner Clips And Screws
Burners are often secured with clips or screws. Use a screwdriver or pliers to remove these fasteners. Keep the screws and clips in a safe place for reuse. Take care not to strip the screws or bend the clips. Removing these parts allows the burner to come free from the grill body.
Handling Burner Tubes Safely
Burner tubes are delicate and can be damaged easily. Hold them firmly but gently while removing. Avoid twisting or bending the tubes. Disconnect the tubes from the gas supply carefully. Check for any debris or blockages before installing new burners. Proper handling helps keep your grill functioning well and safe to use.

Credit: www.youtube.com
Installing New Burners
Installing new burners is a key step in replacing your grill’s heating system. This process requires careful attention to ensure safety and performance. Proper installation guarantees even heat distribution and efficient gas flow.
Each burner must fit securely and connect correctly to the gas supply. Follow the steps below to place the burners properly, secure them, and connect the gas lines safely.
Positioning The Burners
Place the new burners in the grill where the old ones were. Align the burner tubes with the slots or brackets inside the grill body. Ensure the burner ports face upward for proper flame direction. Check that the burners sit evenly and do not wobble. Proper positioning helps avoid uneven heating and gas leaks.
Securing Burners In Place
Use screws or clips provided with your grill to fix the burners firmly. Tighten all fasteners but avoid over-tightening to prevent damage. Confirm that burners do not move when gently pushed. Secure burners ensure stability during cooking and prevent gas flow issues.
Connecting Gas Lines
Attach the burner’s gas inlet to the grill’s gas manifold or pipe. Use a wrench to tighten the connection securely without stripping the fittings. Check for rubber or silicone seals to prevent leaks. After connecting, test the gas flow by turning on the grill briefly. Look for steady flames and listen for hissing sounds that indicate leaks. Proper gas connection is vital for safe grill operation.
Testing The New Burners
Testing the new grill burners is a crucial step after installation. It ensures the burners work safely and efficiently. Taking time to check the gas connections and flame quality prevents accidents. Follow these simple steps to test your new burners properly.
Reconnecting Gas Supply
Start by reconnecting the gas supply to the grill. Make sure the gas valve is off before attaching the hose. Tighten all connections securely to avoid leaks. Use a wrench if needed, but do not over-tighten. Open the gas valve slowly once everything is connected.
Igniting The Burners
Turn the burner knobs to the ignite position. Use the grill’s ignition button or a long lighter to light each burner. Listen for a clicking sound and watch for flames. If a burner does not light, turn it off and try again after a few seconds. All burners should ignite quickly and stay lit.
Checking For Leaks And Even Flame
Inspect each burner for gas leaks by applying soapy water to connections. Bubbles indicate a leak that needs fixing. Look at the burner flames. They should be blue with small yellow tips. Flames must be even and steady along the burner tubes. Uneven flames mean the burner may be clogged or damaged.
Maintenance Tips
Maintaining your grill burners is essential for safety and performance. Proper care helps your grill last longer and cook better. Follow simple maintenance tips to keep burners in top shape. Regular attention prevents problems and saves money.
Regular Cleaning
Clean burners after every few uses. Remove food debris and grease carefully. Use a soft brush or cloth to clear blocked holes. Avoid harsh chemicals that can damage metal. Clean the grill grates and burner tubes thoroughly. This stops clogging and ensures even flame distribution. Regular cleaning keeps your grill working smoothly.
Preventing Rust And Corrosion
Rust weakens burners and shortens their life. Always dry burners completely after cleaning. Store your grill in a dry place or cover it during rain. Use a rust-resistant spray or coating on burners. Check burners for rust spots every month. Early treatment stops rust from spreading. Protecting burners from moisture keeps them strong.
When To Replace Burners Again
Burners wear out over time and need replacement. Watch for uneven flames or difficulty lighting. Cracks, holes, or heavy rust mean it is time. If cleaning does not fix problems, replace burners. Use the right type and size for your grill. Timely replacement ensures safe and efficient grilling. Regular checks help catch issues early.
Frequently Asked Questions
Is It Easy To Replace Grill Burners?
Yes, replacing grill burners is generally easy. Most models allow simple removal and installation with basic tools. Follow manufacturer instructions carefully.
What Are The Four Types Of Burners?
The four main types of burners are gas, liquid fuel, solid fuel, and electric. Each serves different heating needs.
Can I Take Off The Stove Burners To Clean Them?
Yes, you can remove stove burners for cleaning. Ensure the stove is off and cool before detaching them carefully. Clean burners with mild soap and water, then dry thoroughly before reinstalling. Avoid harsh chemicals to prevent damage and maintain burner efficiency.
How To Replace Burner Head?
Turn off the gas and disconnect the burner. Remove screws holding the burner head. Replace with a new burner head. Reattach screws and reconnect the gas supply. Test for proper ignition and flame.
Conclusion
Replacing grill burners does not have to be hard. Follow each step carefully for best results. Take your time and use the right tools. Properly installed burners help your grill work well again. Regular care extends the life of your grill parts.
Enjoy cooking with a safe and efficient grill. Now, you can handle burner replacement with confidence. Keep your grill ready for many great meals ahead.