
You’ve grown your garlic bulbs with care, and now the big question is: how do you know when they’re ready to harvest? Timing is everything.
Harvest too early, and your bulbs won’t have reached full size. Wait too long, and they might start to split or rot. But don’t worry—you’re about to discover simple, clear signs that let you pick the perfect moment to dig up your garlic.
In this guide, you’ll learn exactly how to tell when your garlic is ready, how to harvest it without damage, and tips to cure and store your bulbs so they last longer. Get ready to enjoy the full flavor and health benefits of your homegrown garlic! Keep reading to make sure you don’t miss that perfect harvest window.
Credit: garlicseed.ca
Timing The Harvest
Timing the harvest is key to getting the best garlic bulbs. Harvest too early, and the bulbs may be small and not fully formed. Wait too long, and the bulbs can split or rot in the ground. Watching your garlic plants closely helps you pick the right moment to dig them up. This section explains how to use leaf color, seasonal cues, and climate effects to time your garlic harvest perfectly.
Leaf Color As A Signal
Leaf color gives a clear sign of garlic readiness. When about half to two-thirds of the leaves turn yellow or brown, the bulbs are mature. The lower leaves usually change color first. The upper leaves stay green longer. Avoid waiting until all leaves die back. That can mean the bulbs are overripe and may split. Check the leaves daily to catch the best harvest window.
Seasonal Considerations
The season affects when garlic is ready. Garlic planted in fall often matures by late spring or early summer. Spring-planted garlic takes longer, sometimes until mid-summer. Harvest before hot summer weather causes bulbs to dry out in the soil. Dry, sunny days are best for digging garlic. Plan your harvest around your local growing season for best results.
Local Climate Effects
Climate changes the garlic growth cycle. In warmer areas, garlic may mature faster. Cooler regions often need more time for bulbs to grow fully. Rainy or humid climates increase the risk of bulb rot if garlic stays in the ground too long. Adjust your harvest timing based on weather patterns. Keep an eye on soil moisture and temperature to pick the right time.
Preparing For Harvest
Preparing for garlic harvest is key to getting the best bulbs. Knowing how to prepare helps protect the garlic and ensures a smooth harvest. This step involves gathering tools, checking soil, and careful handling. Proper preparation saves time and prevents damage to your crop.
Tools Needed
Gather a garden fork or spade to loosen the soil. Use gloves to protect your hands from dirt and cuts. A small hand trowel helps for delicate digging. Have a basket or container ready to hold the bulbs. Sharp scissors or garden shears are useful for trimming roots and stems.
Soil Conditions
Check if the soil is dry before harvesting. Wet soil makes digging harder and can cause bulbs to rot. Wait for a clear, dry day to dig garlic. Dry soil also helps keep the bulbs clean. Avoid harvesting right after rain or heavy watering.
Avoiding Damage
Loosen the soil gently around the garlic bulbs. Do not pull the plants directly; this can break the bulbs. Use your tools carefully to lift the bulbs out. Handle each bulb with care to keep the outer skin intact. Damaged bulbs do not store well and may spoil quickly.
Harvesting Techniques
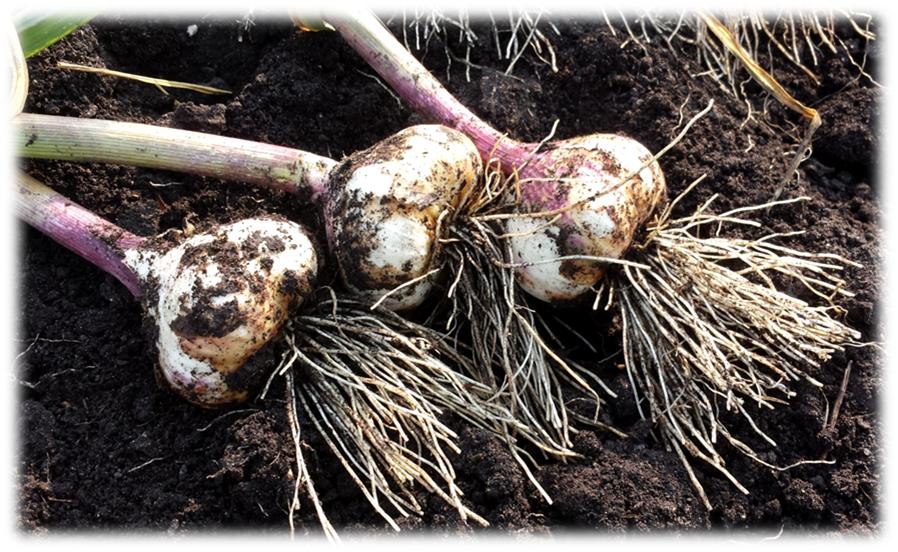
Harvesting garlic at the right time is key to a good yield and long storage. Using proper techniques helps protect the bulbs from damage and disease. Careful handling ensures the garlic keeps its flavor and freshness.
Below are essential steps for harvesting garlic bulbs safely and efficiently.
Loosening The Soil
Start by loosening the soil around the garlic bulbs. Use a garden fork or shovel gently. Insert the tool a few inches away from the bulbs to avoid cutting them. Lift the soil carefully to expose the bulbs without pulling them out forcefully. This step reduces the risk of bruising or breaking the garlic.
Lifting Bulbs Carefully
Once the soil is loose, lift the bulbs with your hands. Hold the garlic by the base of the stems. Pull slowly and steadily to free the bulb from the ground. Avoid yanking or twisting the bulbs. Damaged bulbs spoil faster and do not store well. Handle each bulb with care to keep it whole.
Cleaning Bulbs In The Field
Remove excess dirt by brushing the bulbs gently. Do not wash the garlic with water as this can cause mold. Trim long roots close to the bulb but leave the outer skin intact. Cut the stems, leaving about one inch above the bulb. Cleaning garlic in the field prepares it for drying and storage.
Curing Garlic Bulbs
Curing garlic bulbs is an essential step after harvesting. It helps the bulbs dry properly and improves their storage life. Without curing, garlic may spoil quickly or develop mold. This process prepares garlic for long-term use and enhances its flavor.
Ideal Environment
Choose a dry, well-ventilated place for curing garlic. Avoid direct sunlight, which can damage the bulbs. A shaded area with good air flow works best. Temperature should stay between 60 and 70 degrees Fahrenheit. Too much heat or moisture can harm the garlic.
Drying Time
Allow garlic bulbs to dry for two to four weeks. This time lets the outer skins become papery and the necks harden. Check bulbs regularly to ensure they are drying evenly. Proper drying helps the garlic store longer without sprouting or rotting.
Preventing Mold
Keep bulbs spaced apart to allow air circulation. Avoid stacking or crowding the garlic. Remove any damaged or soft bulbs immediately. If mold appears, discard affected bulbs to protect the rest. Proper curing reduces the risk of mold and spoilage.
Storing Garlic Properly
Storing garlic properly is key to keeping it fresh and flavorful after harvesting. Garlic needs the right environment to stay firm and avoid sprouting or rotting. Good storage extends garlic’s shelf life and preserves its taste for cooking. Simple steps help maintain garlic’s quality for months.
Temperature And Humidity
Garlic stores best in cool, dry places. Ideal temperature is between 60°F and 65°F (15°C to 18°C). Avoid warm or damp areas to prevent mold and sprouting. Keep humidity low, around 45% to 50%, to stop bulbs from rotting. Good air circulation helps control moisture and keeps garlic dry.
Storage Containers
Choose containers that allow air flow. Mesh bags, paper bags, or wire baskets work well. Avoid plastic bags or sealed containers that trap moisture. Hanging garlic in braids or bunches also keeps air moving around bulbs. Proper containers help garlic stay dry and fresh longer.
Long-term Storage Tips
Cure garlic before storing by drying it for 2-3 weeks in shade. Remove dirt but keep outer skins intact. Store bulbs whole without breaking cloves. Check garlic regularly and remove any soft or moldy bulbs. For very long storage, consider freezing peeled cloves or making garlic powder.
:max_bytes(150000):strip_icc()/harvesting-garlic-1402402_FINAL-a6af5d2ed4fa49939c6f66c3c98c35dc_1-12a11340b2b045f0bc08608fb88821ce.jpg)
Credit: www.thespruce.com
Common Mistakes To Avoid
Harvesting garlic at the right time is crucial for a good yield. Many gardeners make simple mistakes that reduce the quality and storage life of their garlic. Avoiding these errors helps keep your bulbs firm, flavorful, and long-lasting. Here are some common pitfalls to watch out for.
Harvesting Too Early Or Late
Harvesting garlic too early leads to small bulbs with thin skins. The cloves may not be fully formed and will spoil faster. On the other hand, waiting too long causes bulbs to split open. This lets dirt and moisture in, increasing the risk of rot. Check the lower leaves for browning and drying. This is a good sign your garlic is ready to harvest.
Improper Curing
After harvest, garlic needs to cure properly to dry out. Many skip this step or cure in a humid place. Wet or warm areas cause mold and soft bulbs. Cure garlic in a dry, airy spot away from direct sunlight. Leave it for two to three weeks until the skins feel papery and dry. Proper curing helps preserve flavor and prevents decay.
Storage Errors
Storing garlic in damp or warm places shortens its shelf life. Avoid plastic bags that trap moisture and cause mold. Use mesh bags, paper bags, or open containers instead. Keep garlic in a cool, dark, and dry area with good air circulation. Check bulbs regularly and remove any that show signs of sprouting or rot.
Maximizing Garlic Flavor And Benefits
Maximizing garlic flavor and benefits begins right after harvest. Proper handling and preparation unlock garlic’s full taste and health power. Following simple steps helps preserve its natural oils and nutrients. These steps also make garlic more enjoyable to cook with and eat.
Handling After Harvest
Handle garlic bulbs gently to avoid bruising. Clean off dirt without washing with water. Hang bulbs in a dry, well-ventilated area for curing. Curing strengthens flavor and extends shelf life. Avoid direct sunlight to prevent garlic from drying out too fast.
Resting Chopped Garlic
Chop or crush garlic and let it rest for 10 minutes before cooking. Resting allows enzymes to activate and form allicin. Allicin gives garlic its strong flavor and health benefits. Skipping this step reduces the power of garlic’s compounds. This simple wait time improves both taste and nutrition.
Cooking Tips
Cook garlic gently over low to medium heat. High heat can destroy beneficial compounds quickly. Add garlic near the end of cooking for best flavor. Avoid burning garlic as it turns bitter. Use fresh garlic for the brightest taste and aroma in dishes.

Credit: awaytogarden.com
Frequently Asked Questions
How Do I Know When Garlic Bulbs Are Ready To Be Harvested?
Harvest garlic when the lower leaves turn brown but five to six upper leaves remain green. This ensures bulbs are mature and store well.
What Is The 10 Minute Rule For Garlic?
The 10 minute rule for garlic means chopping garlic and waiting 10 minutes before cooking. This boosts allicin, enhancing flavor and health benefits.
What Are Common Garlic Growing Mistakes?
Common garlic growing mistakes include planting too late, overcrowding cloves, overwatering, poor soil drainage, and harvesting too early or too late.
When Should Garlic Planted In October Be Harvested?
Garlic planted in October should be harvested in mid to late summer, typically July. Harvest when lower leaves brown but upper leaves remain green.
Conclusion
Harvesting garlic at the right time ensures the best flavor and storage life. Watch for yellowing leaves and firm bulbs as clear signs. Gently dig bulbs without damage to keep them healthy. Cure garlic in a dry, shaded spot for several weeks.
Properly cured garlic lasts longer and tastes better. Enjoy your fresh, homegrown garlic in many dishes. Simple steps lead to a rewarding garlic harvest every year. Keep practicing to improve your harvest and storage skills.